We’ve all taken those photos - you know the ones. The ones where the people are unintentionally smudged. The ones where it’s too dark to see anything. The ones where everything is in focus except the subject. Sometimes we get happy accidents, but wouldn’t it be nicer to know what we did so we could either repeat it or avoid it? That is the aim of this short article so, if you’re interested, read on.
Shutter speed, aperture, and ISO make up the 3 elements of the exposure triangle. Each of these settings are adjusted to achieve “perfect exposure”. Each element can be used to increase or decrease the exposure but they also affect the image in ways that can be used creatively, as this article will discuss. They are adjusted in ‘stops’ – a single stop will either double or half the amount of light. Getting the ‘perfect exposure’ isn’t everything – an image may be correctly exposed but doesn’t have the look you envisioned. Perhaps you want to freeze action or blur a busy background. Referring to your knowledge of the exposure triangle will allow you to not only get the correct exposure for your subject but also to achieve the look you intend for the image overall.
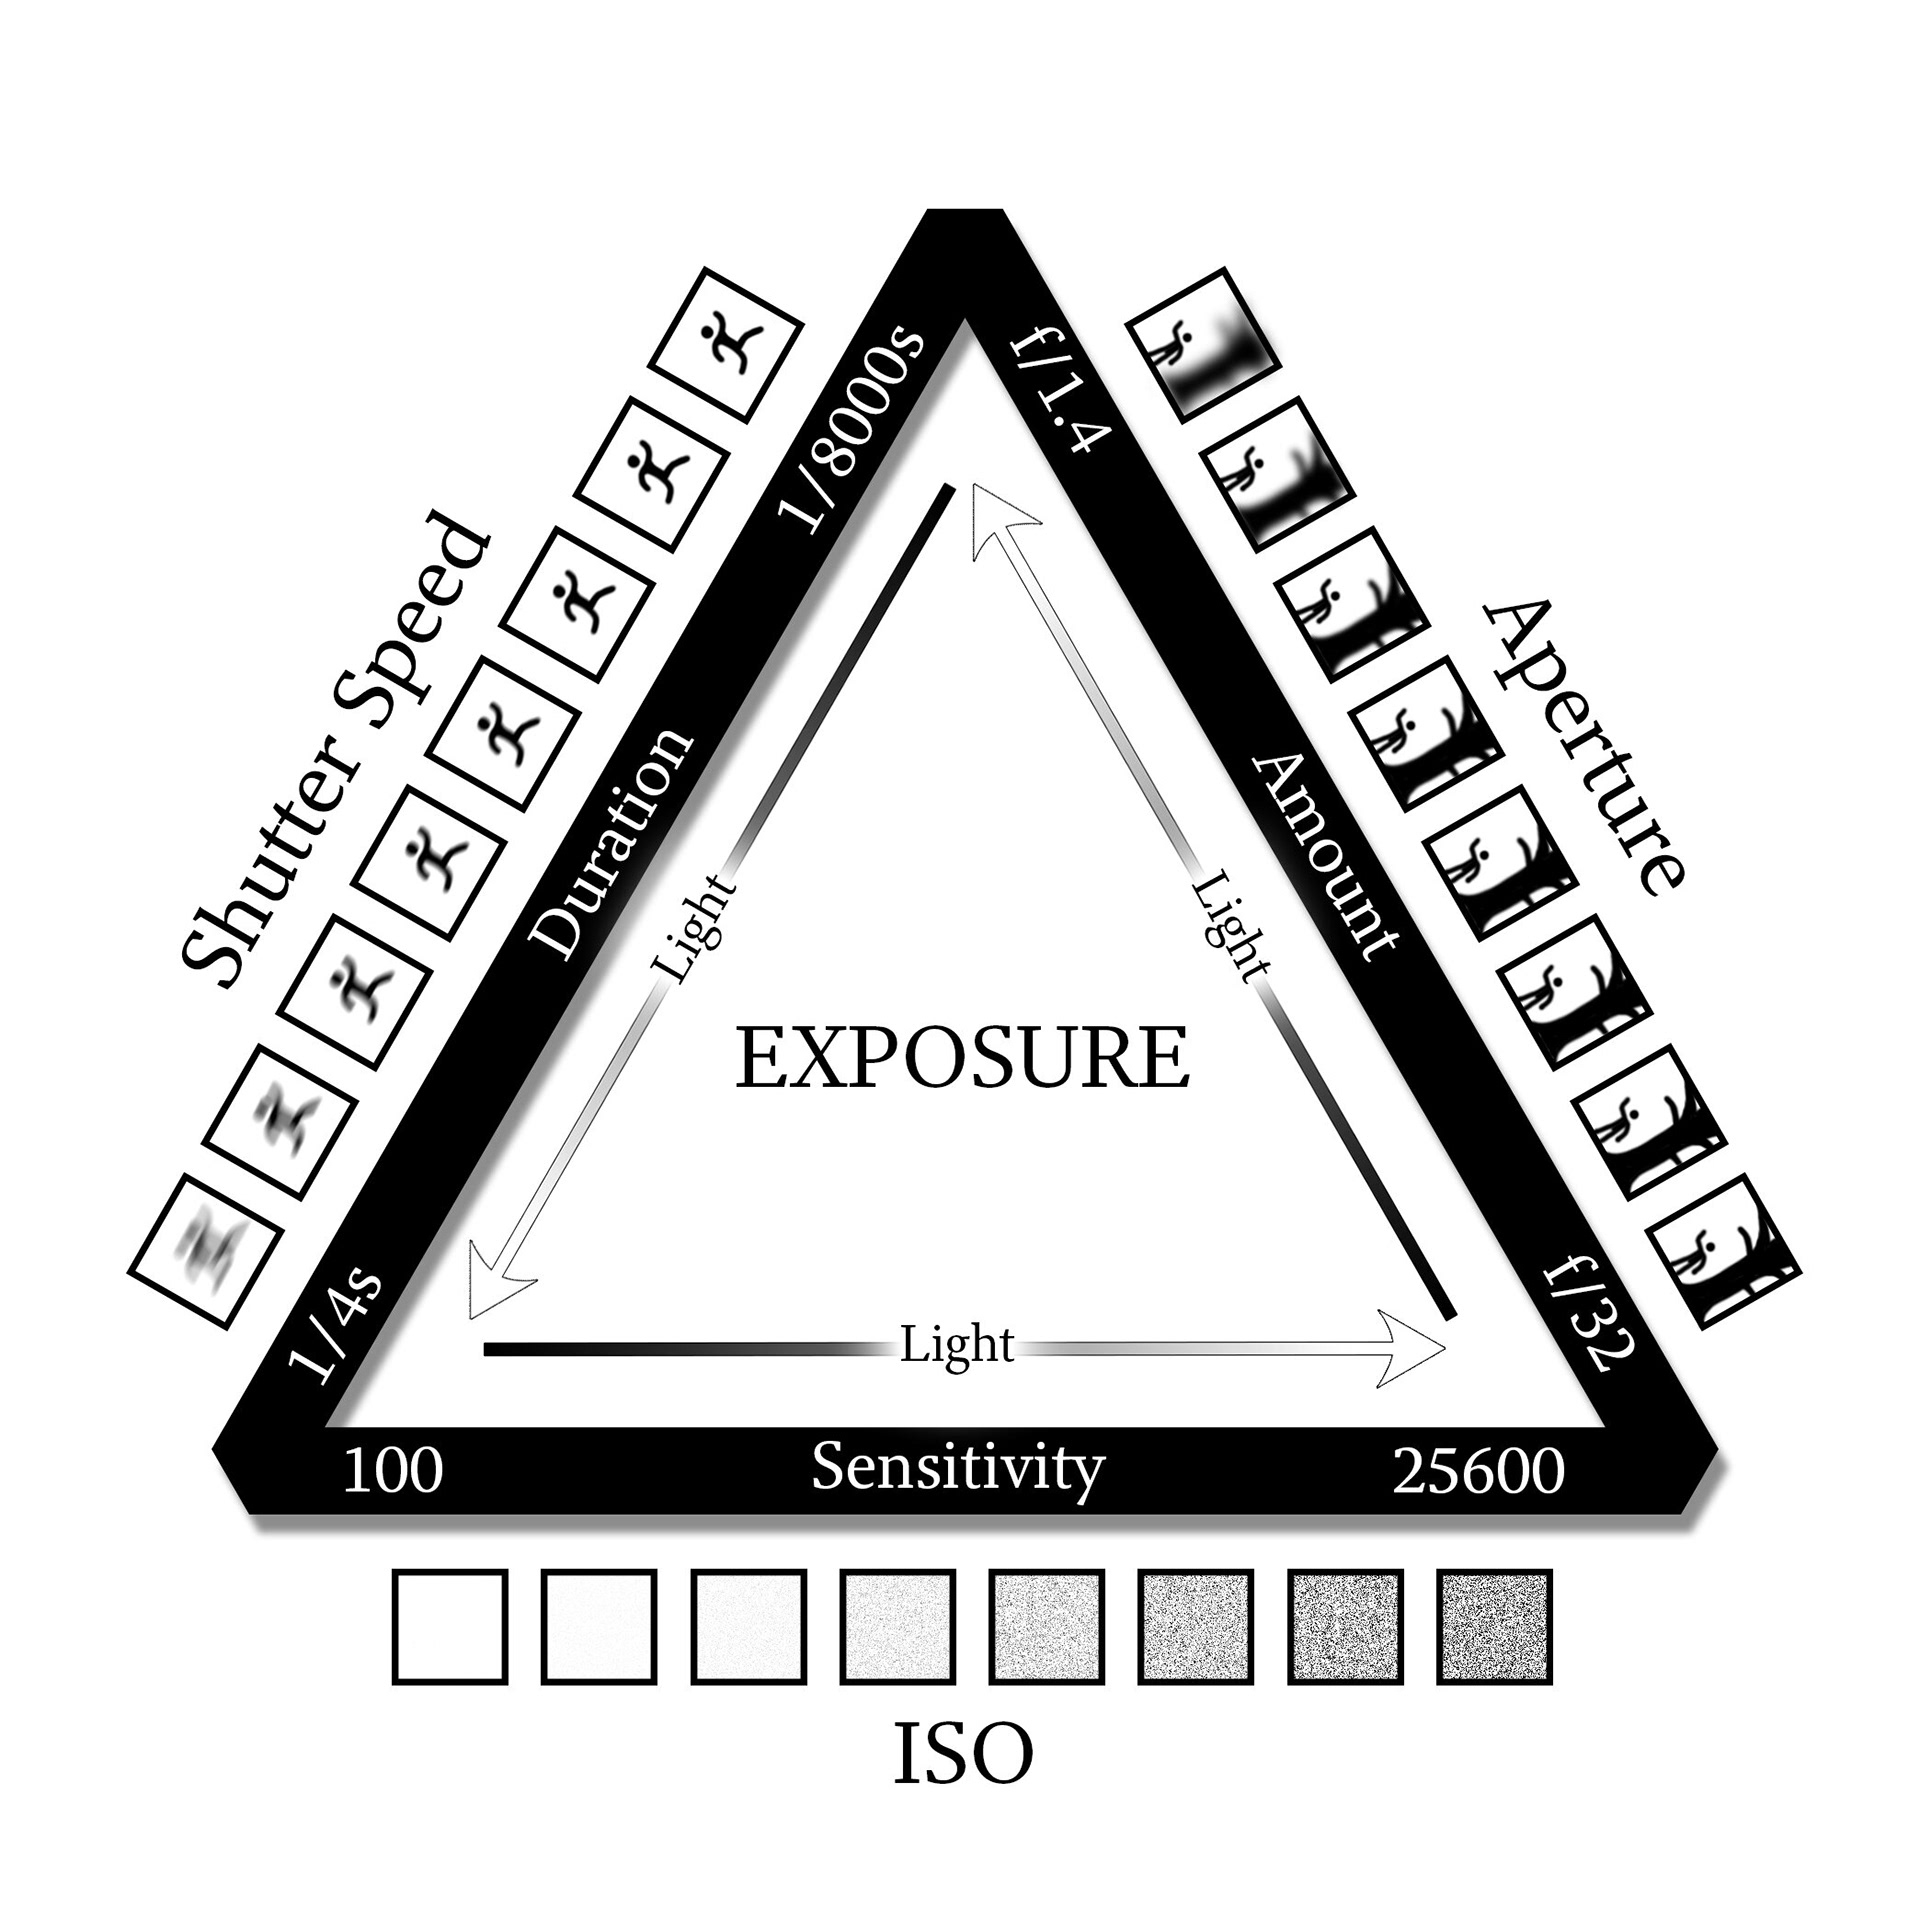
Finding the correct exposure depends on shutter speed, aperture and ISO. Longer shutter speeds, a lower f-stop and a higher ISO will all increase the amount of light but also affect the look of the image. These settings must be balanced to reflect what you want to capture.
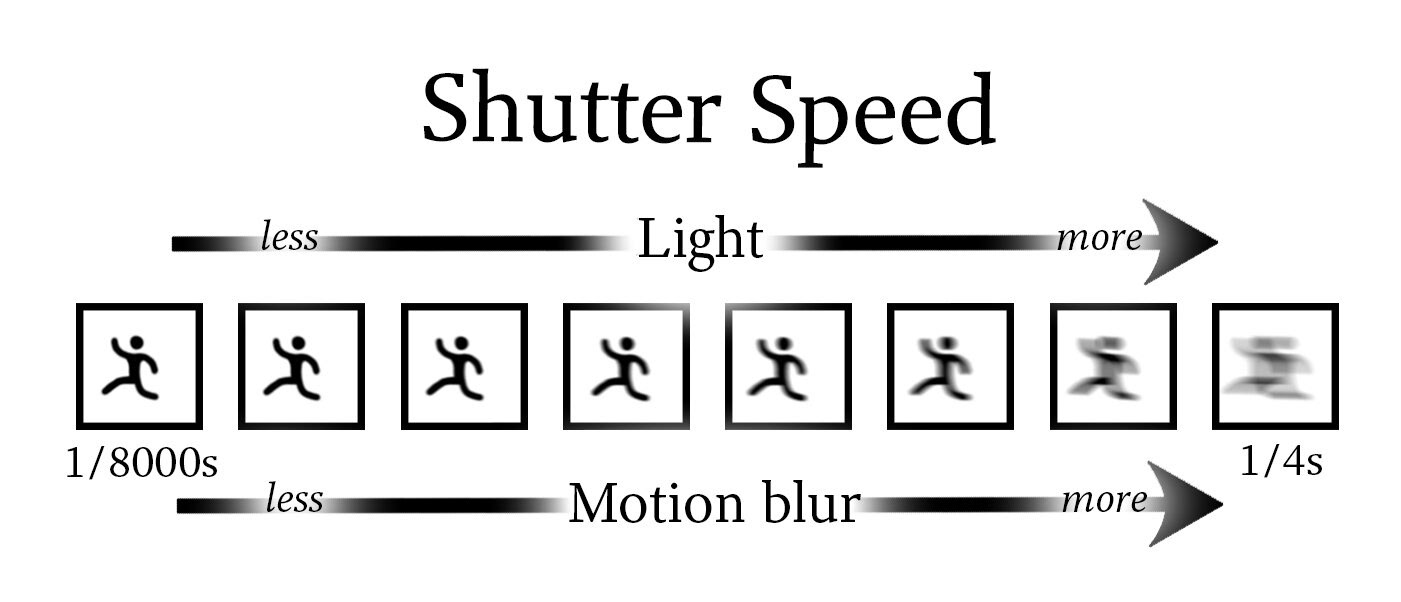
Shutter speed – Duration of light
Shutter speed determines the duration the camera sensor is exposed to light. This means that a longer shutter speed lets more light into the camera than a shorter shutter speed. Most modern cameras range from the longest shutter speed of 30 seconds, such as you might use to capture the Milky Way, to 1/8000th of a second, such as you might use to capture the movement of a hummingbird’s wings frozen in time. If you’re wondering what the ‘bulb’ setting means when you scroll past 30 seconds, this allows you to open the shutter for a length of time determined by you and is usually used in combination with a remote shutter release cable and neutral density filters for exposures longer than 30 seconds. This is how many landscapes with silky looking seas or skies are captured. Typically, a tripod or other kind of camera support is needed when using longer shutter speeds.
The time you set for shutter speed depends on your subject and what look you’re after and it’s easiest to think of this in terms of movement. If you want to freeze movement to show a split second in time then use a faster shutter speed. If you want to show movement blur and get a sense of motion in your image then use a longer shutter speed. A good example of this would be capturing a waterfall. To show individual water droplets you’d use a faster shutter speed, anywhere from 1/250th second upwards depending on light, speed of the water, and your other camera settings. If you wanted to show movement blur to get that misty water look, you’d need to expose anywhere from 1 second or longer. You can of course try something in between like 1/30th second, which will give you a sense of movement without creating a misty appearance, with the bonus that you may be able to achieve this with a steady hand. Consider how fast your subject is moving as to how fast your shutter speed will need to be to freeze the action – the flutter of bee wings in flight will need a faster shutter speed than a racecar, which will need a faster shutter speed than a child at play, which will need a faster shutter speed than a sleeping cat, and so forth.
It’s also important to consider camera shake when setting your minimum shutter speed. Hand-holding the camera when you’re on solid ground won’t need as fast a shutter speed to get a crisp image as if you were photographing whilst sat in a moving vehicle or if you’d drank too much coffee that morning. I know, I know… so many considerations.
Shutter speed is also important when using a flash or strobe. You might have heard of the term ‘flash sync speed’. Briefly, setting your shutter speed above the maximum sync speed (which varies between camera brands but is usually around 1/160th) will result in a black image or an image with a black line across it – this is actually your camera shutter sort of getting in the way of the light from the flash. In short, either lower your shutter speed or turn on high speed sync (HSS) on your light to prevent this. Much, much more about using lighting in a later article.
Aperture – Amount of light
Aperture is perhaps the most confusing of camera settings, not least because it has many terms. You may have had someone advise you to widen your aperture, reduce your depth of field or lower your f-stop – these essentially mean the same thing. The aperture is basically an adjustable hole in the lens which allows an amount of light to pass through. Changing the f-stop (Focal-stop) on your camera either widens or narrows this hole. Have a look into the front of your lens whilst you change the aperture settings on your camera to see what I mean. A low f-stop, such as f/2.8, will give you a very wide, open aperture, letting in lots of light. This also has the effect of creating a shallow or narrow depth of field.
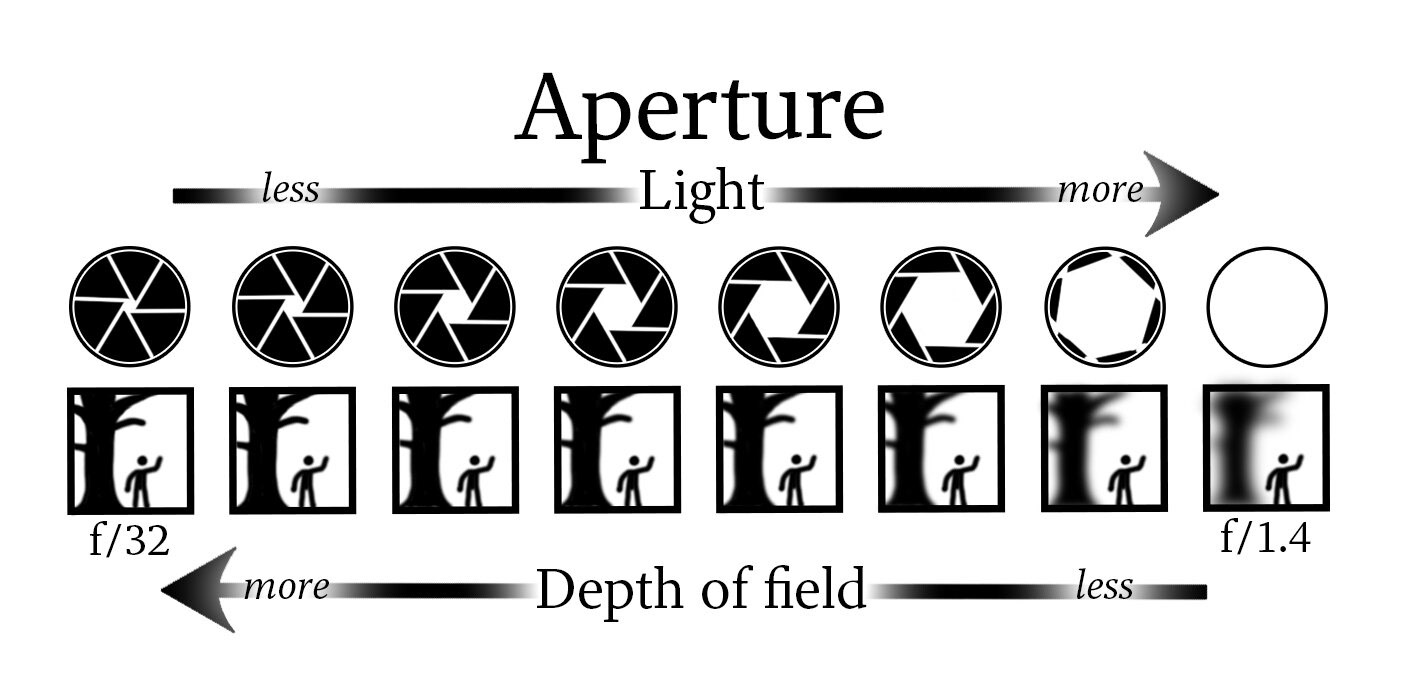
Depth of field refers to how much of your image is in focus. So, if you want a bird on a branch to be in focus but the leaves in the tree behind it to be blurry, you’d use a lower f-stop than if you wanted all of the background to be in focus. If you wanted a landscape to be mostly in focus, you’d use an f-stop of anywhere from f/8 upwards.
Got it? Well, I’m sorry but there are other factors which affect depth of field. Focal length (the length of your lens) affects aperture. A wide-angle lens like a 35mm set at f/4 will have a much greater depth of field than a telephoto lens such as a 200mm set at f/4. To get the same area of focus in the telephoto lens, you’d have to increase the f-stop by several stops and, in some cases, it might not even be possible. Macro (close-up) lenses suffer particularly badly from shallow depth of field. Very high f-stops or image stacking techniques must be used to show an object completely in focus at macro level. The closer you zoom in on a subject optically, the less depth of field you will have at the same f-stop. You can use this to your advantage if you want lots of bokeh (out of focus points of light which create pleasing blurred shapes) in your image.
Placement of your subject and surroundings affects aperture. Think of your focus as being a strip horizontally across the depth of your image. A low f-stop will create a much narrower strip of focus than a high f-stop. With this in mind, you can start to position your subject, alter your composition and swap lenses in combination with setting your f-stop to get what you want either in or out of focus. For example, if you have a model stood in front of a bush covered in flowers, placing the model a few steps in front of the bush and using a low f-stop will blur the flowers. If you want the flowers in focus you could choose to keep the model where they are and increase your f-stop until the ‘strip of focus’ includes the flowers in the background or, alternatively, move the model closer to the flowers.
You might have also noticed that your zoom lens set to the minimum aperture changes the f-stop when you zoom in and out. This is because the lens does not support that minimum aperture when zoomed in. This ‘variable aperture’ is a common feature on more affordable lenses, with higher priced lenses offering ‘fixed apertures’ that allow you to have lower f-stops even when zoomed in. So, consider this when looking for your next purchase.
I did warn you that aperture can be confusing. Want to get your head around it? Pick up your camera and photograph the same subject, only changing the f-stop.
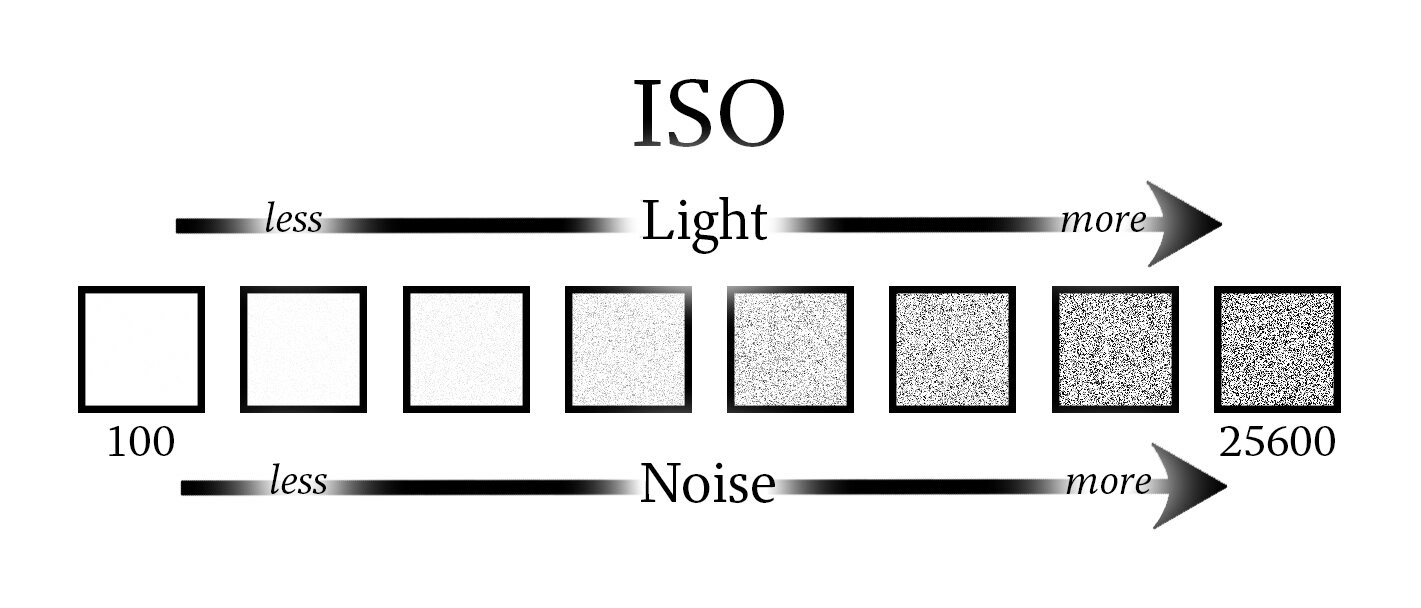
ISO – Sensitivity to light
You’ll be pleased to know that this part of the exposure triangle is comparatively simple. On modern cameras, you can set ISO to Auto and forget about it. Whilst this can help you to concentrate on other things, it is still important to know what ISO does. ISO sets the sensitivity of the camera’s sensor to light. The higher the ISO, the more sensitive the sensor is to light and the brighter your image will be – but it comes with a catch. Upping the ISO will introduce noise into your image. In film this would be grain. Noise is far worse than grain as it is multi-colored and a lot of it can make the image look of a poor quality.
So why would you ever want to use a high ISO? Basically, when there isn’t enough light. Think of ISO as a digital gain or boost for light at the expense of noise. Say you are wanting to photograph an indoor event with people where the lighting is poor. Your shutter speed is the minimum you can get away with before getting movement blur in your images. Your f-stop is as low as the lens will allow to let in as much light as possible but your images are still too dark. This is when you increase the ISO. It is often the case where capturing a noisy image is better than capturing nothing at all. You can always apply noise reduction in post processing. The other thing you can do in this situation is introduce light onto your subjects, such as using a flash.
When it comes to noise, age and size matter. Older or smaller sensors handle noise far more poorly than modern or larger sensors (for complicated reasons few people need to know about). A full-frame sensor will out-perform a cropped sensor of a similar age, whilst a modern sensor will out-perform the same size sensor made just a few years ago. Some sensors are made especially for low-light, such as those in the Sony A7S range, boosting up to a ridiculous ISO 409600. I’ll stick with ISO 100, thanks.
But ISO isn’t all bad. A little bit of grain or noise creates contrast – this is very similar to what image sharpening does - but too much destroys the image quality and the same goes for all those people who over-sharpen their images. Famous portrait photographer Sue Bryce uses a high ISO with natural light as her signature look, recreating the effect of film.
Metering – finding perfect exposure
You use the camera’s metering system to help you determine the correct level of brightness. The meter will look like a small set of bars or dots with a 0 in the middle, a + to the right and a – to the left. Find this either through the viewfinder, on a panel near the shutter button, or on the rear screen. You can see the metering system at work when you point your camera at your subject –an indicator icon will appear which shows where your exposure sits on this meter. Adjusting the shutter speed, aperture or ISO will move the indicator and the aim is to get it to 0 – what the camera thinks is perfect exposure. You may have already realized that the camera doesn’t always get it right, especially in tricky lighting situations. As I already mentioned, your choice of which settings you adjust to get this perfect exposure will affect the look of your image.
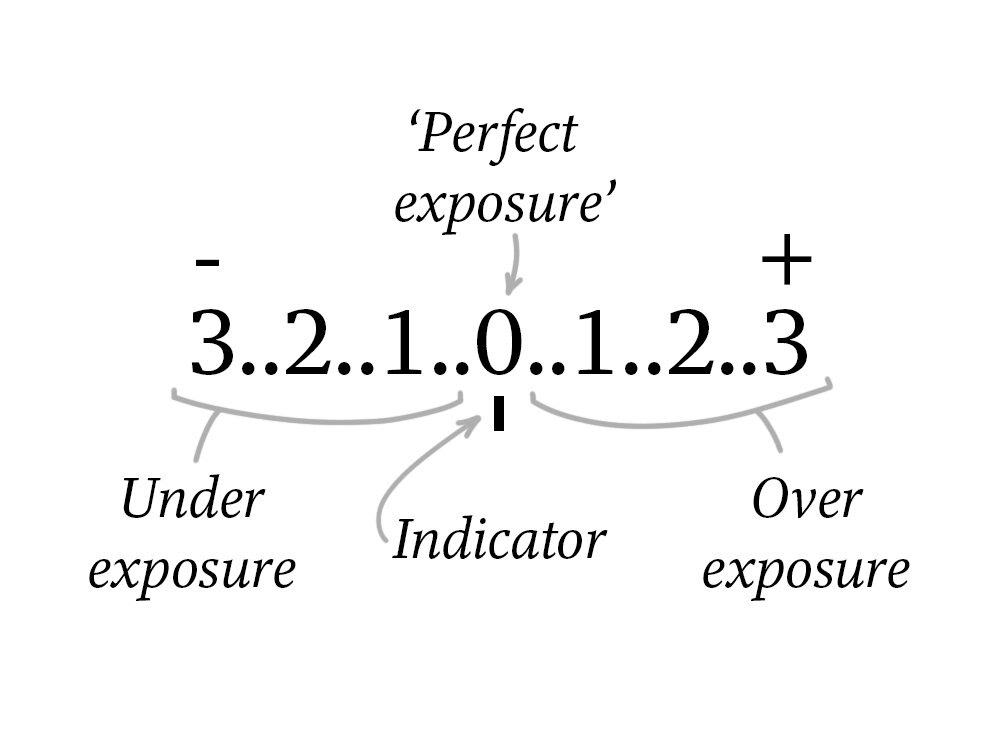
The camera meter shows whether your settings will give you an under-, over-, or ‘perfectly exposed’ image. Changing your settings will move the indicator. Exposure is displayed in stops with 1/3 increments between stops.
There are several types of metering modes – a dry but important subject – which affect how the camera reads a scene. Very briefly, the main 3 metering modes use a wide area (evaluative/matrix), a more central area (center weighted), or a small spot which you can move to the most appropriate place. For example, I use spot metering for portraits and I move the spot onto my subject’s face as this is what I want the camera to meter on. If I were to shoot a landscape, I might change the metering mode to either evaluative or center weighted, depending on my scene.
Many cameras will also display a histogram to show you the spread of light, more typically seen when reviewing images. I personally prefer to use the camera meter whilst I’m taking the photo and then use the histogram when reviewing images on the back of the camera to check them. The histogram shows me if I have clipped highlights (burnt out whites) or dropped shadows (lost detail in blacks). However, both the camera meter and the histogram are just showing you what the camera thinks – how you want the image to look is far more important. You can see from the examples below what histograms can look like and that it’s often inappropriate to have your histogram looking like a perfect bell curve.

A histogram shows blacks to the left, whites to the right, and midtones in the middle. Image left: Good tonal range – this image contains a good range of midtones with a slight skew towards darker tones. Image center: Low key – this image contains mostly shadows. Image right: High key – this image contains mostly highlights. All these images are properly exposed for the look that I wanted to achieve.
Summary
So, how do you use the exposure triangle? I would suggest that you ask yourself the following questions:
· Do I want to show movement or not?
· Do I want to blur the background or have it in focus?
Set your shutter speed and aperture according to your answers, then adjust the ISO according to the camera’s meter or histogram to get the correct exposure. From here, you can adjust the exposure and the look of the image ‘to taste’. I often underexpose my portrait work for a moody look but for my commercial work I often slightly overexpose to give a cleaner, modern look.
Once you master the exposure triangle, you can concentrate more on other aspects of your photography and spend less time worrying about settings. If you’re struggling to handle Manual mode, try shooting with Aperture Priority mode and set your ISO to auto if you can. This is my go-to mode for run-and-gun photography where I only have one chance to capture a moment and I don’t have time to mess about with all the settings but I still want some control. It’s a good middle ground between Automatic and Manual modes if you’re just getting started.
Get familiar with changing your camera settings, how each affects the image, and what works better for certain situations. As you become more confident, you will be able to tell roughly what settings to use for a given situation and be able to adjust these settings without looking where the dials are on your camera. If this sounds good to you then practice, practice, practice!