The two subjects I am most asked to teach are Photoshop and lighting. I think that’s because they are both pretty intimidating to learn from scratch. When used correctly, both skills will take your photography to another level. Understanding light truly is the key to photography and indeed the word photography itself means ‘writing with light’. I already talked about natural light in an earlier article, Getting the most from natural light (NZ Photographer Issue 43 or find it in the Articles section of my website) so, in this article, I want to demystify using a speedlight to create your own lighting when needed.
I used to be afraid of using lighting and I convinced myself that I didn’t need it, that I could just use ambient and natural light… but my job required me to be more flexible than that. I soon realised I would have to learn lighting for many reasons. I pieced together my knowledge through personal practice and research, online courses, and a lot of trying and failing… Now, I am most comfortable in my home studio with a range of strobes and speedlights to play around with and create moody lighting (special thanks to all the extremely patient models I have worked with).
Before we go into the main part of this article, it’s important to note that all speedlights will have a different layout and even different labels and icons in some cases (they wouldn’t want to make it too easy for you). What I talk about here is relevant to all speedlights, regardless of make or model. As with several of my articles, you may find it useful to read through whilst you play and discover, so have your speedlight with you. It might sound boring, but until you are familiar with the functions of your speedlight, I highly recommend digging out the manual. If you’ve lost your manual, you can probably find a free PDF replacement online by searching for the make and model of your speedlight.
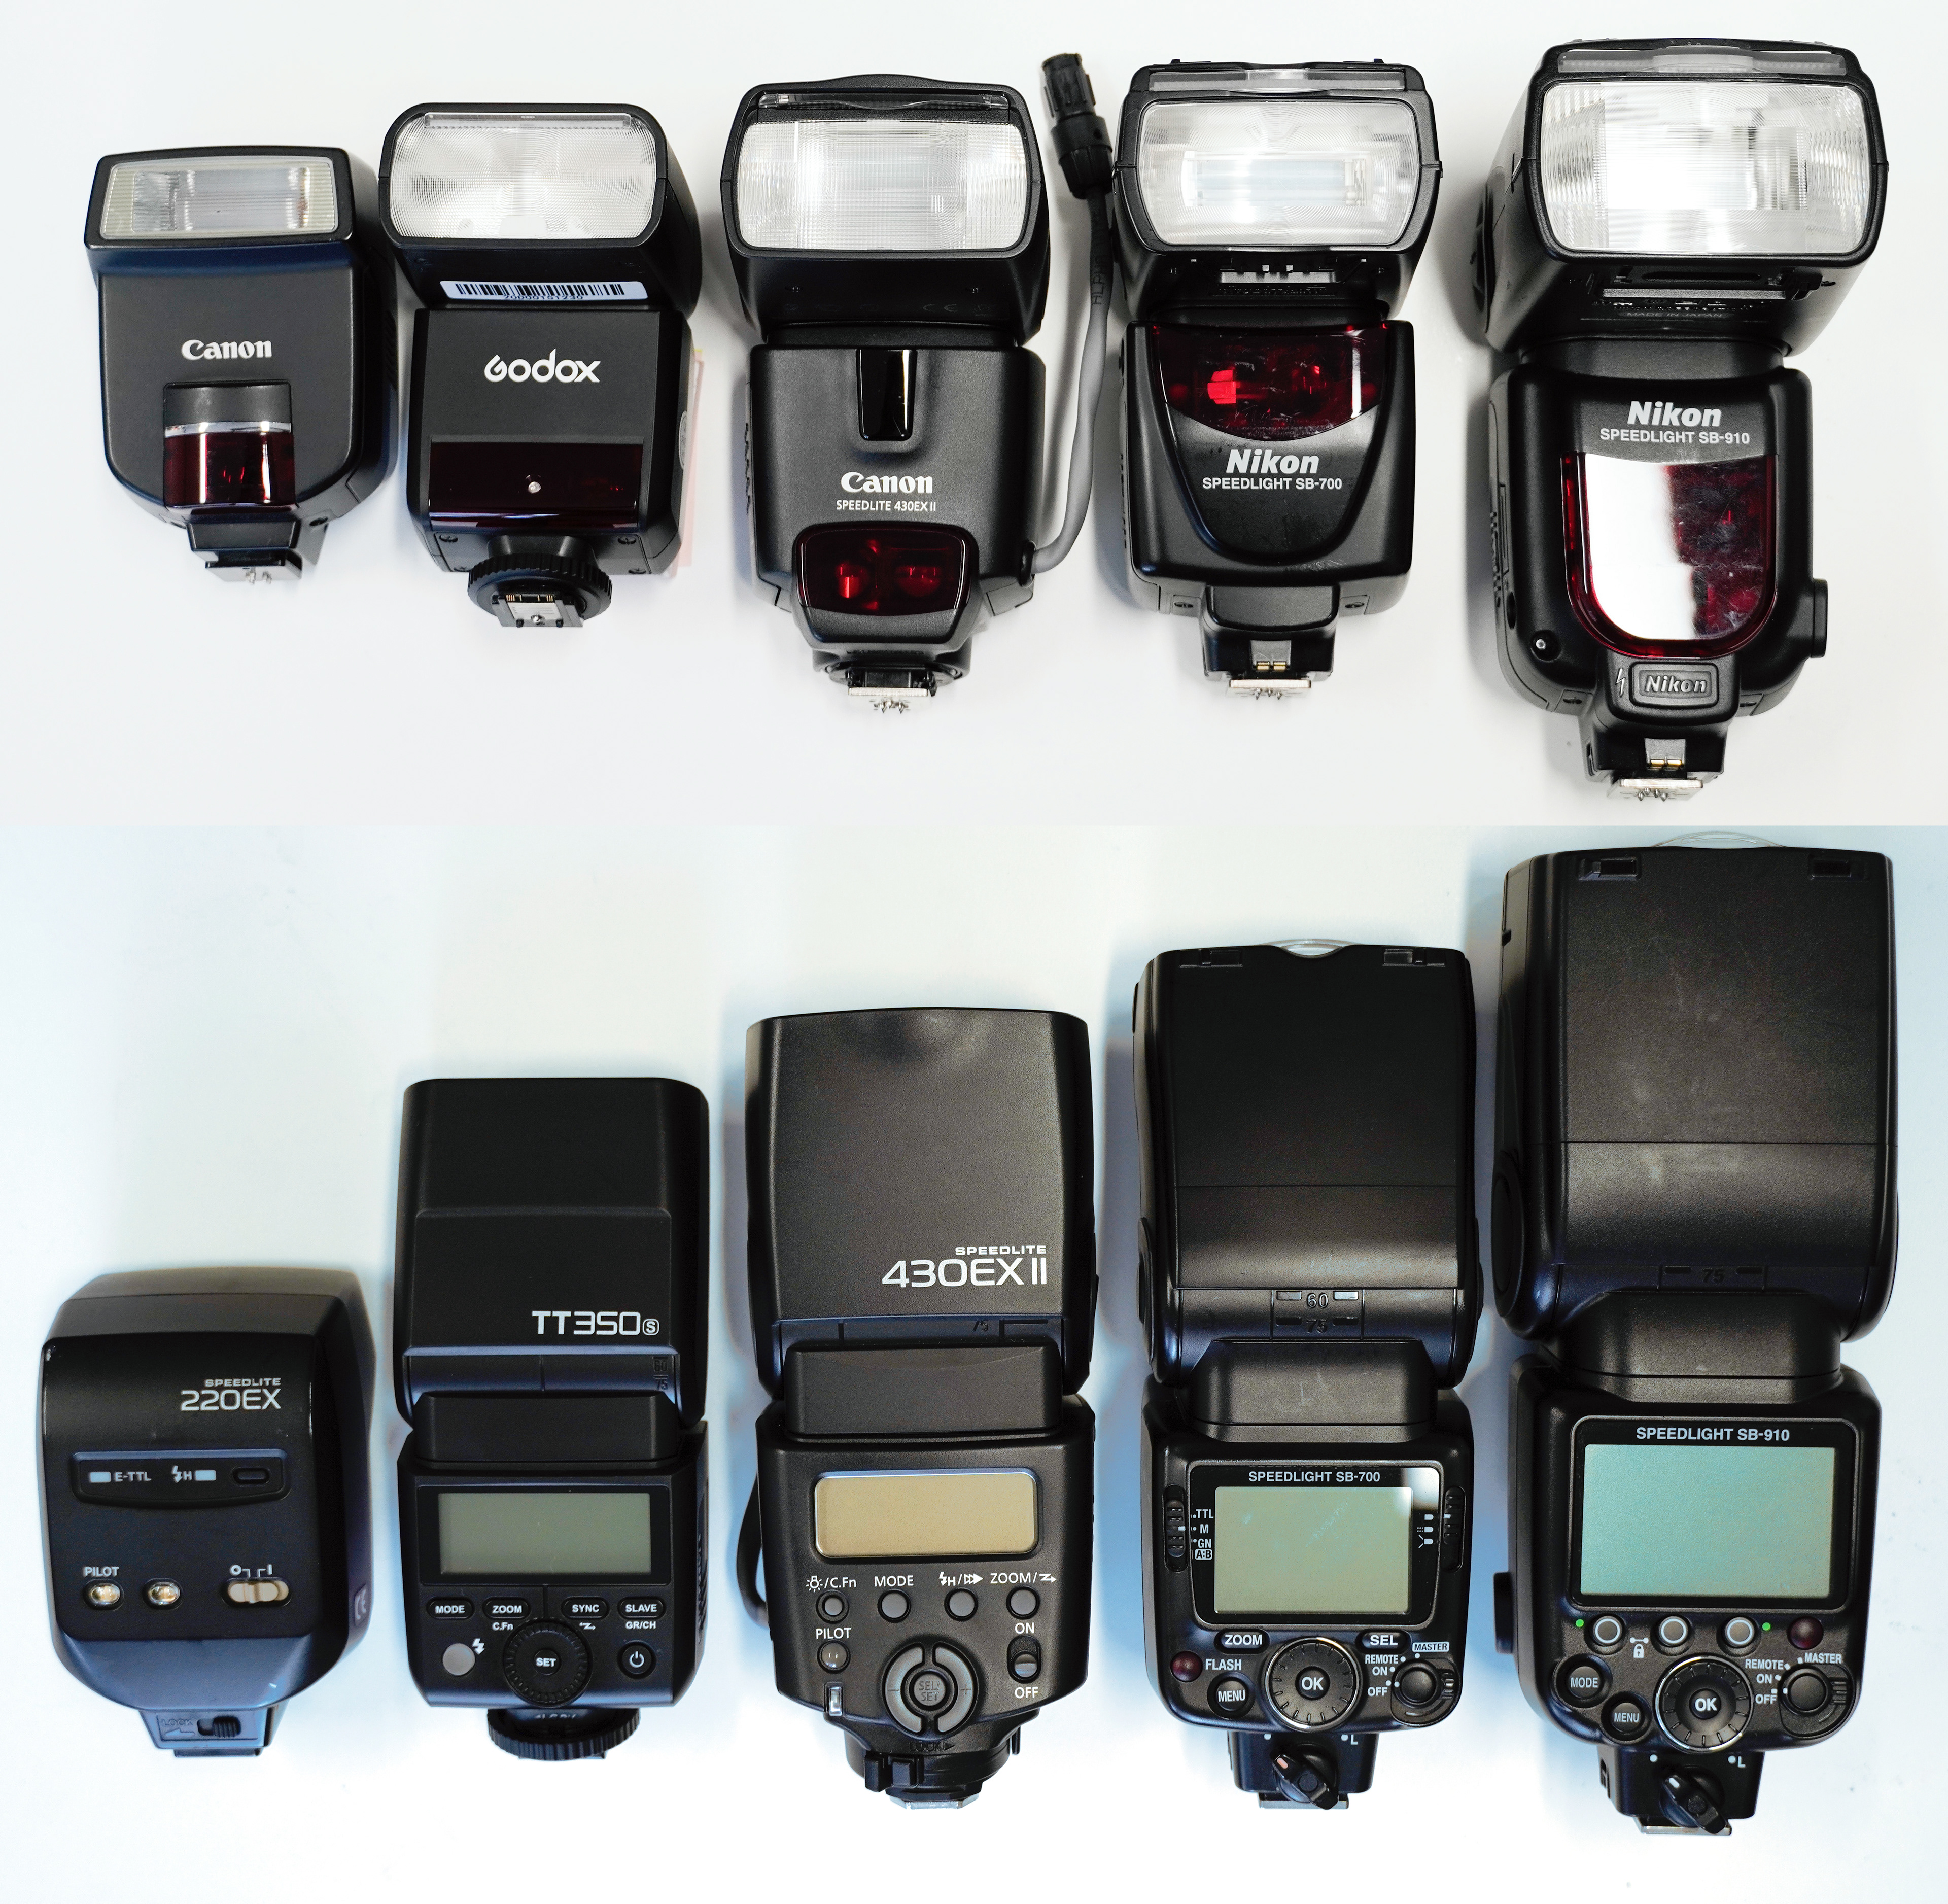
Various models of speedlight ranging in size and power output
I’ve written this article assuming that many readers will already own a speedlight but, for those who don’t, I hope that it will be useful as information on what to look for when buying a speedlight. There are many online buying guides and reviews to help choose the best for your budget.
What is a speedlight?
A speedlight is a specific term for a small light which can be mounted onto your camera. Typically powered by AA batteries, these lights are budget-friendly, highly portable and are available in a range of sizes and power outputs. Also sometimes called a flash gun, camera flash, spelled ‘speedlite’, or simply a flash by lazy people like me. This is the type of light that this article will focus on.
A strobe is larger and more powerful than a speedlight. Strobes are normally seen mounted on their own light stand and cannot be mounted onto a camera hot shoe. They can be mains or battery powered. Typically, they can produce lots of light over a short period of time and often feature a continuous light called a modelling light/lamp. They’re sometimes called a monolight. I won’t be covering strobes within this article, but I do offer tuition for both speedlights and strobes.
The most obvious use for a speedlight is to light a dark subject but arguably better uses would be to guide the viewer’s eyes, to improve the quality of the photograph and to influence a scene. A speedlight can be used to freeze motion, separate a subject, and to add vibrance and contrast to an image. Used creatively, a speedlight can add direction or colour to light, or be used in a multi-light setup. They greatly increase your flexibility as a photographer and will help you capture a wider range of subjects, especially in less-than-perfect lighting conditions.
What about your built-in camera flash? Some people might tell you this is useless, but there are a few things you can do with it. Using the built-in or pop-up flash as-is will result in a flat, brightly exposed photo with hard shadows and red-eye in a portrait but you can try to bounce or diffuse this light to soften it and get a much better result. Try searching online for pop-up or built-in flash hacks to get some ideas. However, this built-in flash is limited and will not produce the same results that a speedlight can.
Terminology
WARNING: JARGON ALERT!
Jargon has got to be the most off-putting part of using speedlights. Don’t let it stop you learning! I’ve tried to explain all of the horrible sounding terms as best as I can in this article and I’m hoping that this will help you achieve those wonderful epiphanies or ‘ah ha!’ moments.
I don’t know whether you will find this encouraging or not, but I think speedlights are the hardest to learn of all the lighting types. So, once you’ve got the hang of your speedlight, you should find strobes a breeze.
Here is a handy table of terms that you may see on your speedlight or in the menu. If you have an older or more basic model flash, some of these options may not be available. I will explain many of these terms further throughout this article although some refer to more advanced functions, like off-camera flash, which I will cover in a later article.
Modes
Pressing the Mode button on your speedlight will cycle through the available modes. The most common modes are TTL, M (manual) and Multi. Some speedlights may show a different coloured backlight (orange or green) when cycling through modes and this is referring to master, slave and wireless functions, which will be discussed in a later article. Consult your speedlight manual for more information.
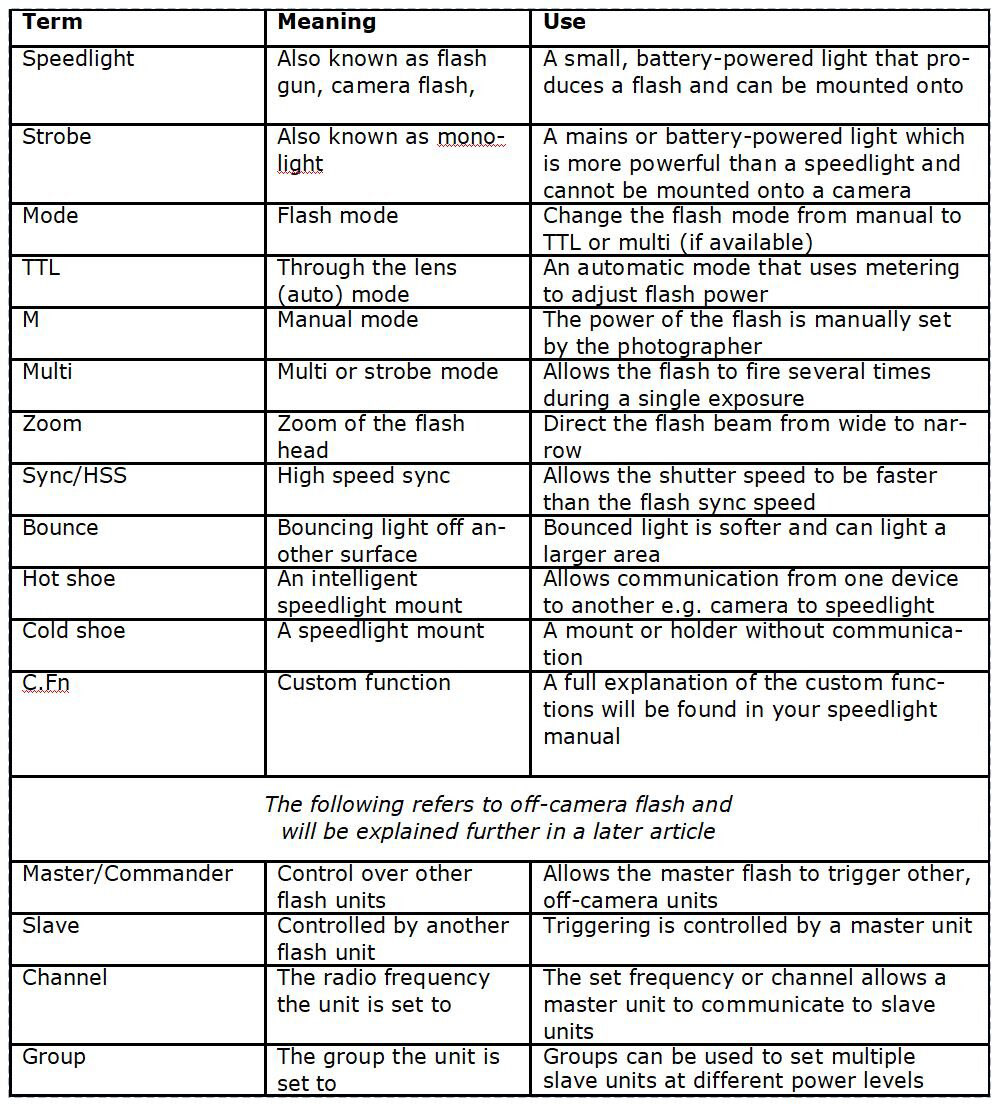
Left: On this speedlight, the mode is selected by sliding a switch. Right: Typically, the mode is selected via a button.
TTL (Through the Lens)
TTL, iTTL, eTTL… are all variations on automatic flash metering, named differently depending on the company of manufacture and the precise method each employs. Right now, the differences aren’t important, so I will just refer to TTL as a general term.
TTL is basically your speedlight set to auto. I believe that it’s the best way to get started using flash. Just select the camera settings you want, turn your speedlight mode to TTL and away you go. The speedlight and your camera do the hard work for you and give you what they think is a good exposure. This is particularly powerful when combined with aperture priority mode for capturing events or photojournalism images when you only get one chance to capture a moment. If you use aperture or shutter priority modes, you may have used exposure compensation on your camera (that dial that goes from -3 all the way to +3) and speedlights have this too. When using TTL, if you think the subject should be brighter or darker, you can adjust the flash compensation to taste and the power of the flash will be adjusted – camera settings do not change. So, although this is an automatic mode, you do have a degree of control. Flash compensation is sometimes set on the speedlight and sometimes set in the camera menu, so check your manual to see how yours works.
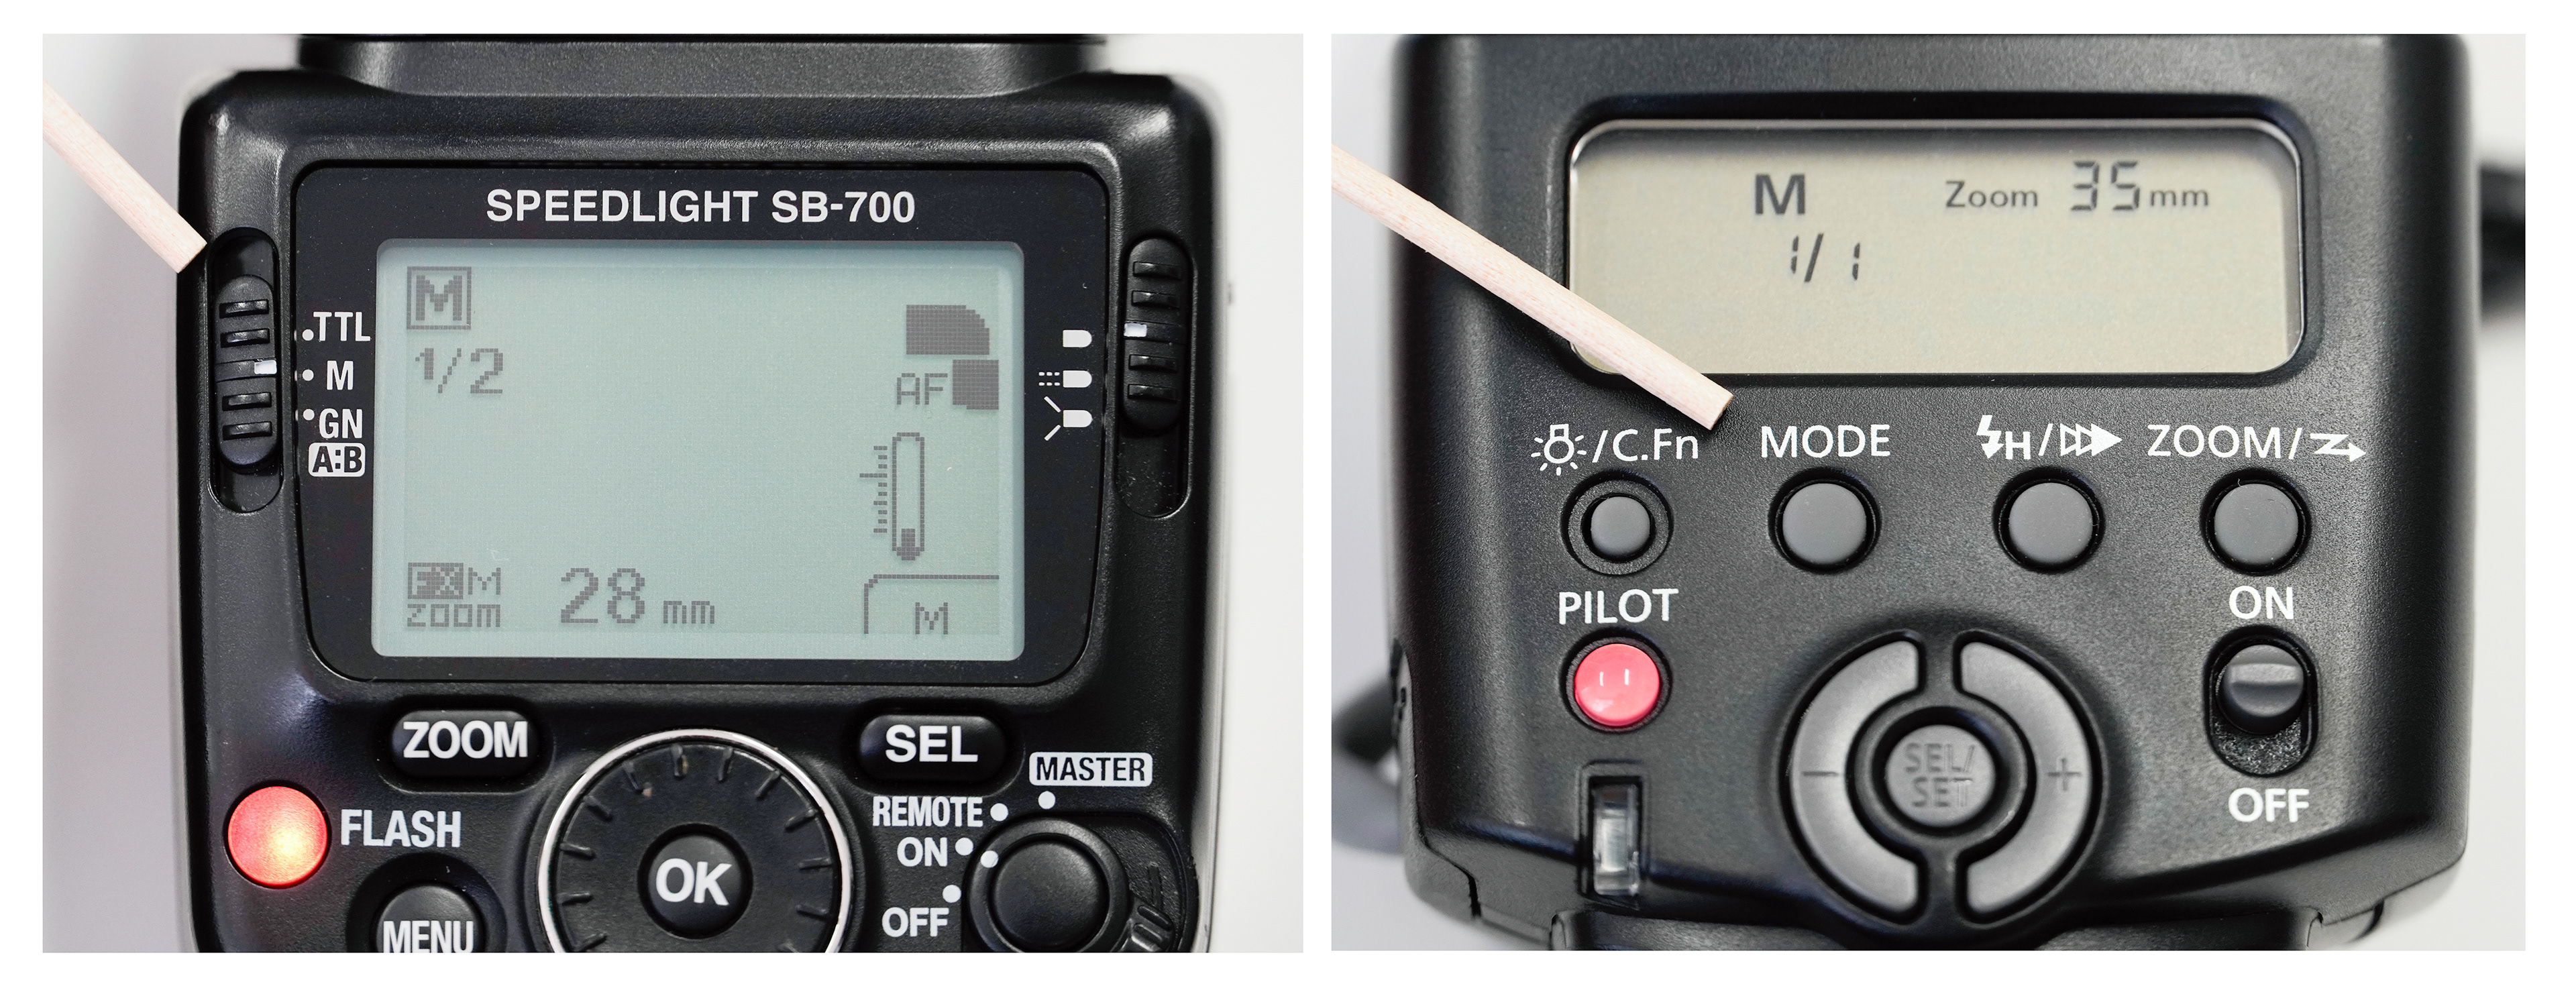
Repeatedly pressing the Mode button cycles through the 3 modes available on this speedlight.
Manual
Why would you use manual flash when you can just use it on automatic? Well, there are issues with TTL. Firstly, every time you take a photo, the TTL system will take a new reading. This means that TTL may produce variations in flash power between photos which is not desirable if you’re trying to get consistent results. Secondly, the exposure which the camera and speedlight think are correct might not be correct to your eye or may not be achieving the result you want. Thirdly, you might want to do something creative with light and your goal may not be simply to light the scene to an adequate exposure.
In manual mode, you need to set the power of the speedlight yourself. This is set as a fraction e.g. 1/1 is the equivalent of full power, 1/2 is half power, 1/4 is quarter power, etc, and each of these steps is referred to as one stop of light. Many speedlights produce as low as 1/128 power and most adjust in 1/3 increments between full stops. Be aware that different models of speedlights will have a different total power output, so full power 1/1 on one speedlight may be more powerful than another with the same setting. You can find out how powerful your speedlight is by looking up the guide number (yes, more jargon) in the specifications. Generally, larger speedlights are more powerful. In manual mode, adjusting the power of your speedlight might be as simple as turning the front wheel or pressing the plus/minus buttons if you don’t have a wheel. Some speedlights first need the OK or Sel (select) button to be pressed before adjusting using the wheel but check your manual if your speedlight isn’t cooperating.
But how do you know what setting to use in manual mode? Well, that’s the beauty of digital photography. You can click away and adjust until you get it right. If you’re keen to get it right first time, you can try and learn the math, you could purchase a light meter, or there are Apps to help you. Personally, I’m more of a try-it-and-see kind of person.
Multi
You may have an additional mode on your speedlight called multi which allows the flash to fire several times during a single exposure. You can adjust the power and interval between flashes. This is how some images of dancers or sports showing several stages of movement are captured in a single image. This mode is rarely used but can result in very creative imagery and is well worth trying.
Zoom
The zoom function of your speedlight changes the positioning of the bulb within the speedlight head. This is typically adjusted by pressing the zoom button and then using the central wheel or plus/minus buttons. If you change this setting, you will be able to see and hear the bulb moving. Many modern speedlights will track the zoom of your lens and change the zoom of the speedlight to the most appropriate setting, but you can also set the zoom manually. Each speedlight will have a different zoom range, a common one being 24mm to 105mm. The zoom in mm can be interpreted in the same way as a lens length in mm. A wider zoom setting, e.g. 24mm, will spread the flash beam to cover more of your subject (just as a wide-angle lens will give you a wider view), whereas a narrower zoom setting, e.g. 105mm, will project a beam of light towards your subject and this allows you to light a subject which is further away more effectively (just as a longer length lens will allow you to zoom into a subject which is further away).
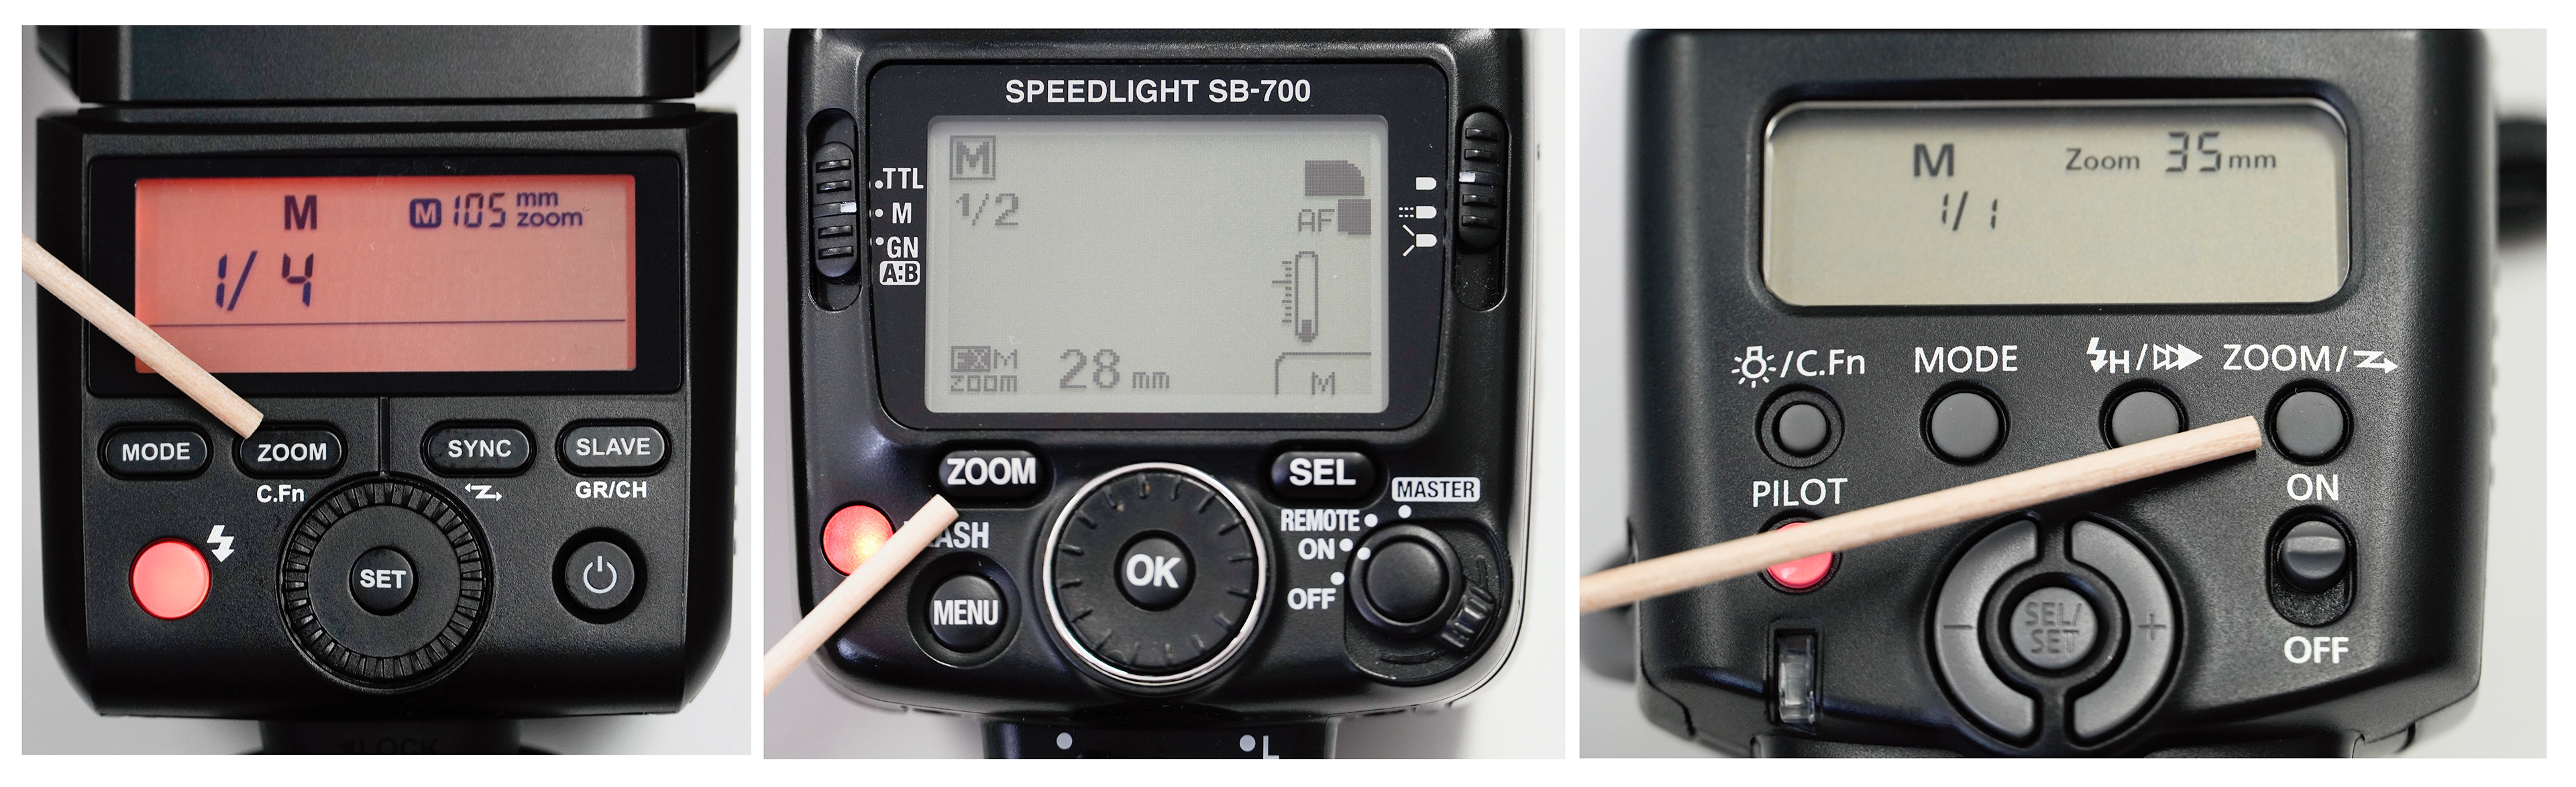
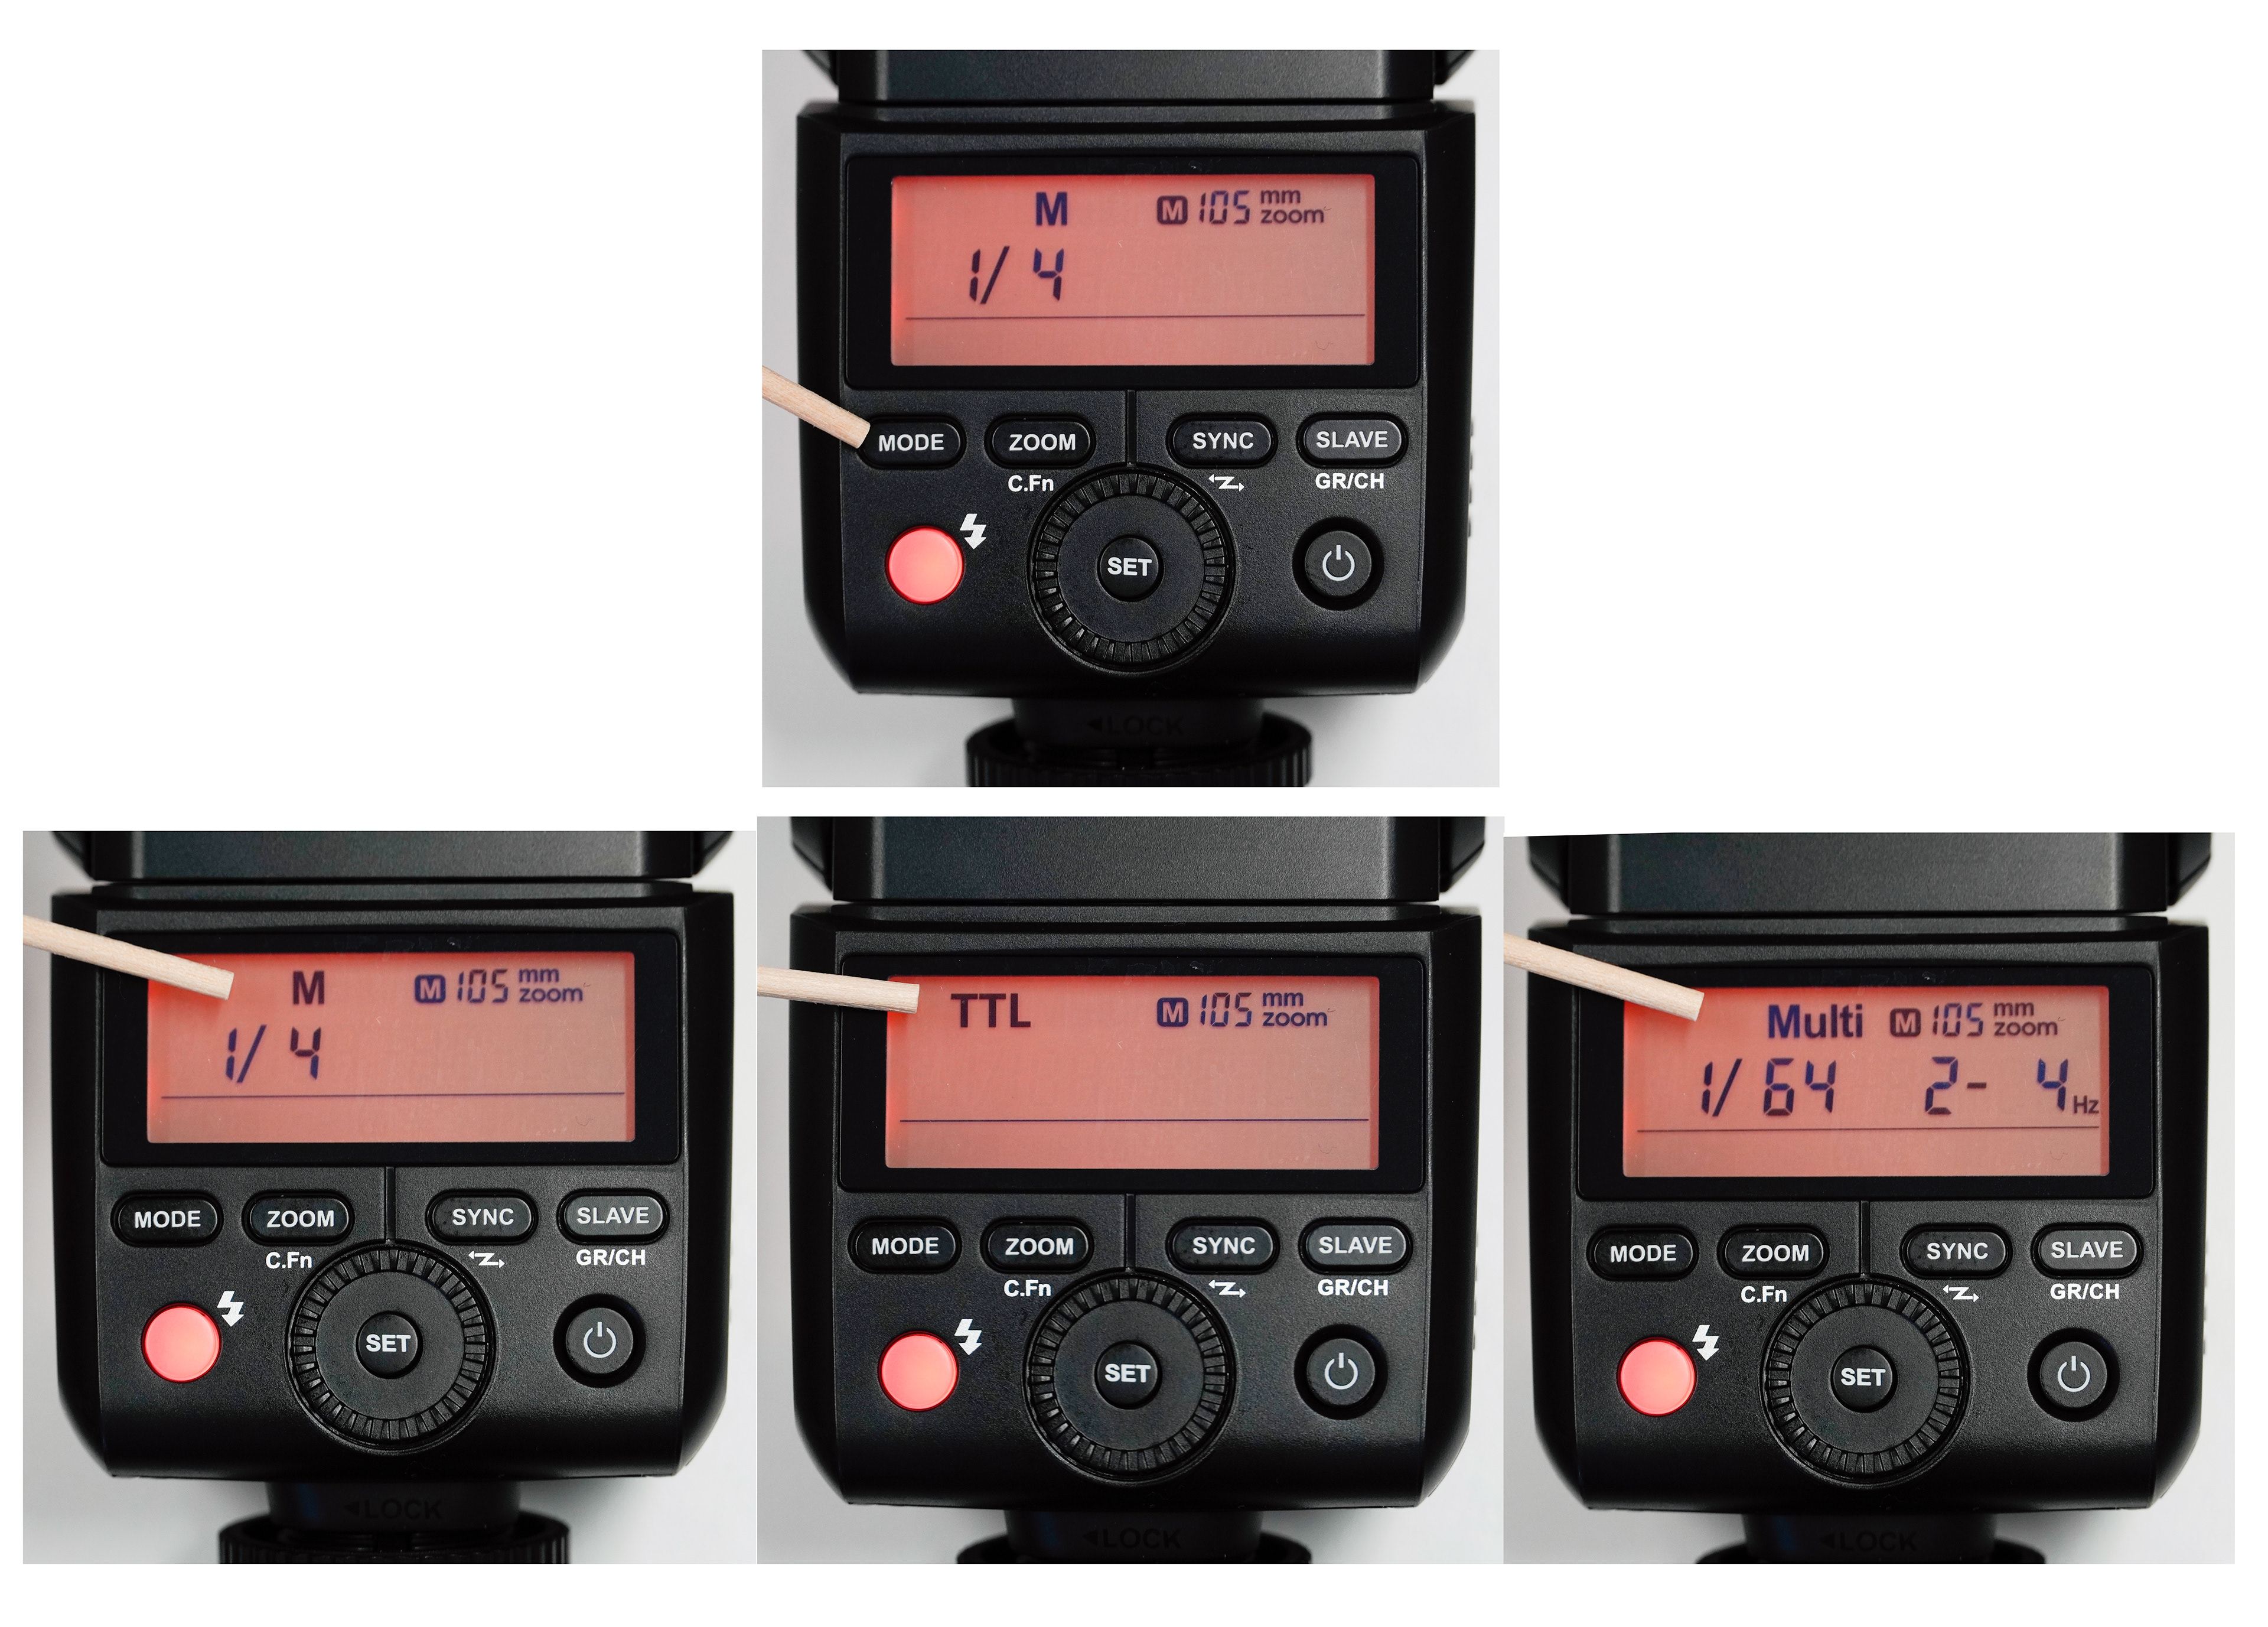
The zoom button across various speedlight models. The current level of zoom is shown on each screen in mm.
Most speedlights come with a built-in diffuser panel which can be pulled from within the flash head. This helps to diffuse and spread the light even wider, should you need it. It’s important to note that using the diffusion panel will lock the zoom to the widest (or even wider) setting and you must replace the panel fully for the zoom setting to be unlocked. You may notice a flimsy white panel also appears when you pull out the diffusion panel – this is meant for portraiture to help direct the flash into the eyes of the subject and create catchlights.
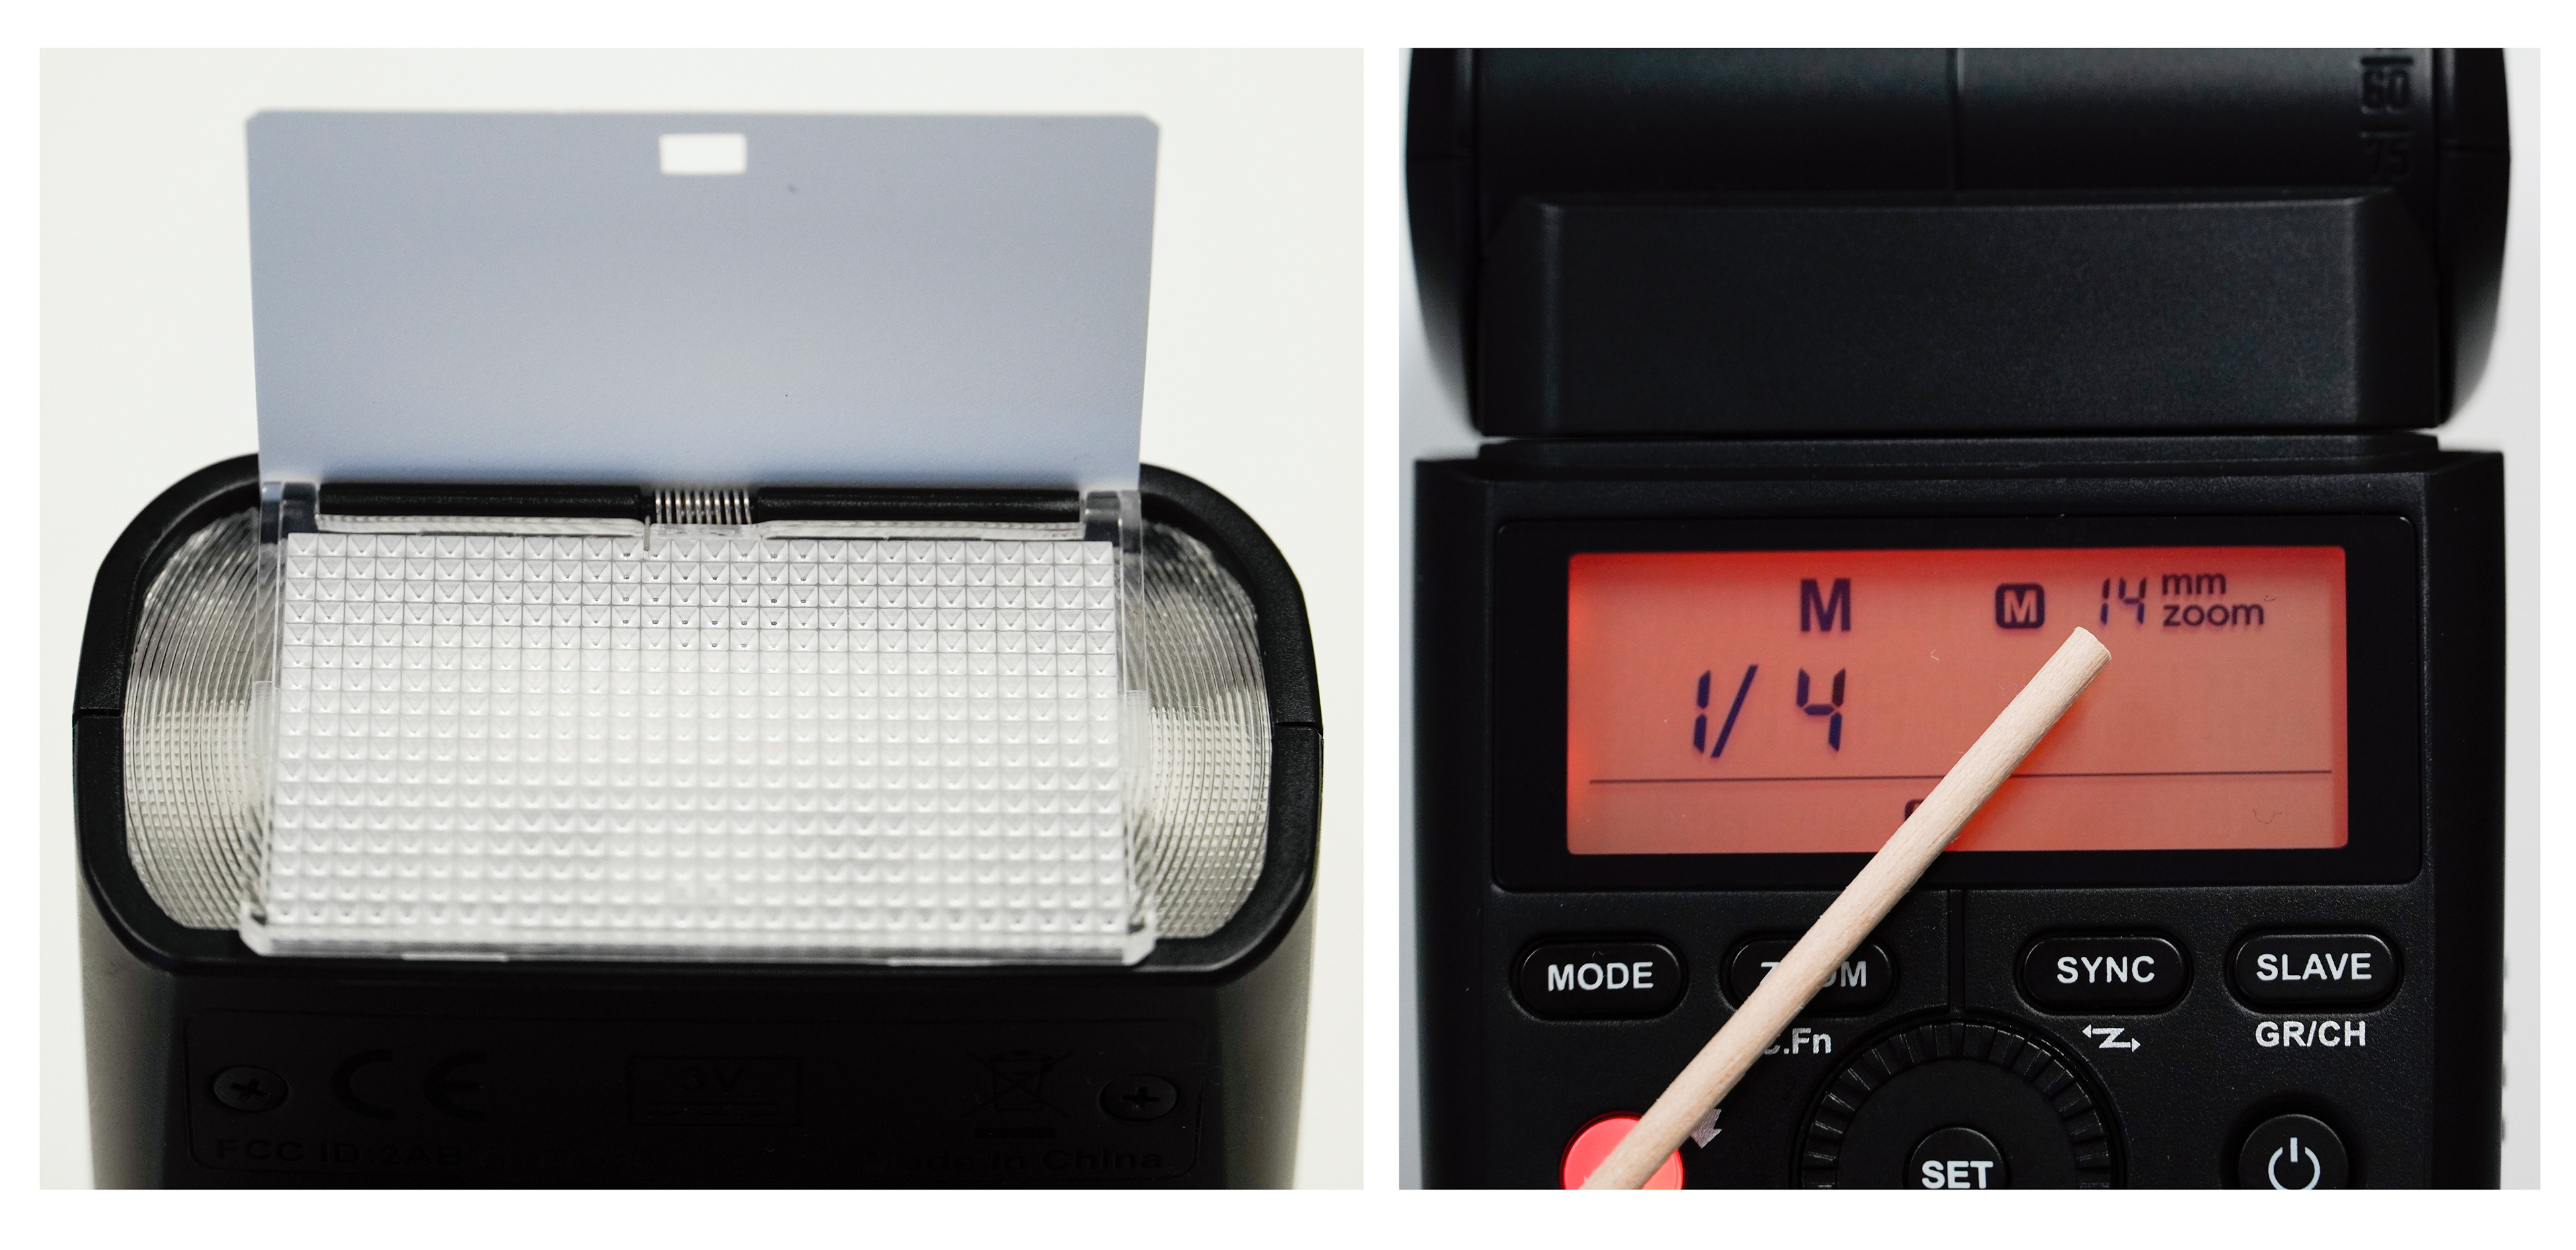
Left: The diffusion and catchlight panels. Right: Pulling out the diffusion panel sets the speedlight zoom to 14mm by default.
Sync speed and High-Speed Sync
Have you ever taken a photo with flash and part of the image or even the whole image has been black? This is because the camera shutter has closed before the sensor has been exposed to the flash. Every camera has what is termed a maximum sync speed that can be used with a standard speedlight or strobe. The good thing is that the sync speed is relating to your shutter speed, so you don’t need to learn anything new. The maximum sync speed will depend on what camera brand you are using but the most common maximum speed is 1/250th second. What that means is that, if you use a shutter speed faster than 1/250th second (or whatever your maximum sync speed is), you will get a black band across your image or it may even be entirely black. So, you must set your shutter speed to the maximum sync speed or slower. Some cameras will limit the maximum shutter speed when a speedlight is fitted to the hot shoe and will automatically change your shutter speed. This can be exceptionally annoying if you don’t realise what is happening, so it’s a good idea to double-check your camera settings when using a speedlight.
High speed sync or HSS does what it says: it allows you to use a higher shutter speed and still be able to sync with the flash. If your speedlight has this mode, then you have much more freedom with how you set your shutter speed and you don’t need to worry about your camera’s maximum sync speed. HSS is normally set by pressing the Sync button or it may look like a H with a zig-zag arrow/lightning bolt next to it. Some brands (beginning with N and ending in ikon) require you to set HSS in your camera menu, so type in a quick internet search for how to do this with your camera and speedlight. Whilst you’re online, have a little look at how HSS works if you’re interested in the technical aspects. There are downsides of using HSS which include a drop in power output from your flash unit and an increased drain on the batteries, but I think this is worth it for the increased flexibility that HSS offers.
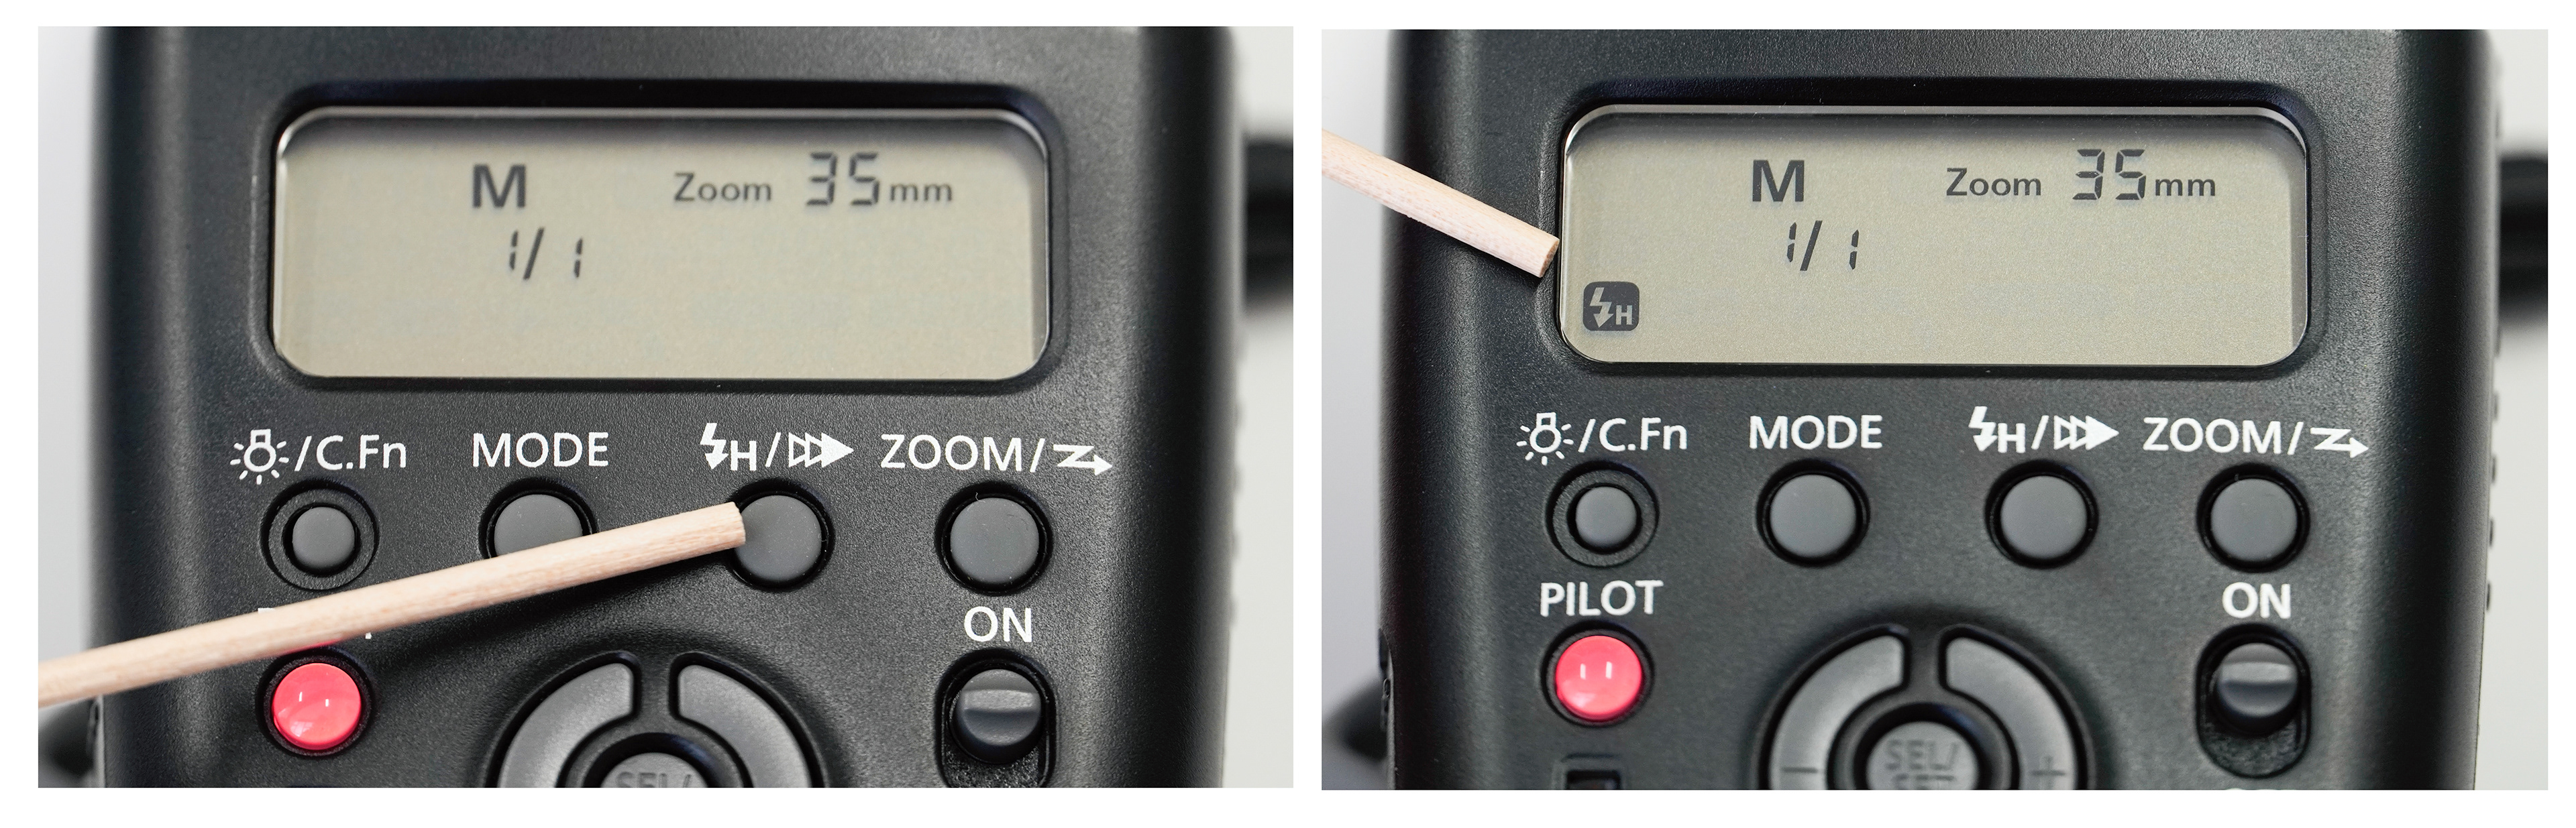
Left: The high speed sync (HSS) button. Right: The icon on the screen shows that HSS is turned on.
Bounce
Bounce flash is when you point the head of your lighting unit towards another object and literally bounce the light off of it. This is one reason why having a speedlight head that both tilts and swivels is very important. You can effectively change the size of your light source from the very small speedlight head to a huge, bounced light source like a wall or ceiling. Bounced light is softer, will light more of the scene, and can be used to create direction to light. The best places to bounce light from are white or light coloured, flat and smooth. If you can’t find a surface like this in your environment, you could introduce one with a reflector. Bounced light will be less bright and you may need to increase your speedlight settings to compensate. This is an example of when you could need a more powerful speedlight.
Combining flash with ambient light
I think that one of the best ways to use a speedlight is to combine it with ambient light. This is useful for a wide range of photography subjects, such as lighting part of a scene whilst exposing for stars in astrophotography, capturing a sharp and vibrant image of a pet, fill flash for a portrait, or adding in special effects like a starburst, freezing an image surrounded by movement blur, or even faking the sun.
It might sound tricky to use both the available light as well as flash, but it really isn’t. All you need to do is set your camera to expose the background or scene as you want it and, once you’ve done that, you can then turn on your speedlight and add flash as needed or to taste. If I use an example of a portrait backlit by the sun, you would normally choose camera settings to expose for the subject’s face if you weren’t using flash. This would almost certainly overexpose the sky and background. When using a speedlight, the camera settings should instead expose for the bright sky behind the subject. This will put the subject in silhouette, or very close to it. From here, a speedlight would be used to add light to a subject’s face. The camera settings don’t change – instead the speedlight power is adjusted to properly expose the subject. If the image captured is very dark or bright, make adjustments in full stops. If you’re fine-tuning the light, adjust in smaller steps. Using a speedlight in this case is filling in the shadows (fill flash) and how much light you add is entirely your creative choice as a photographer.
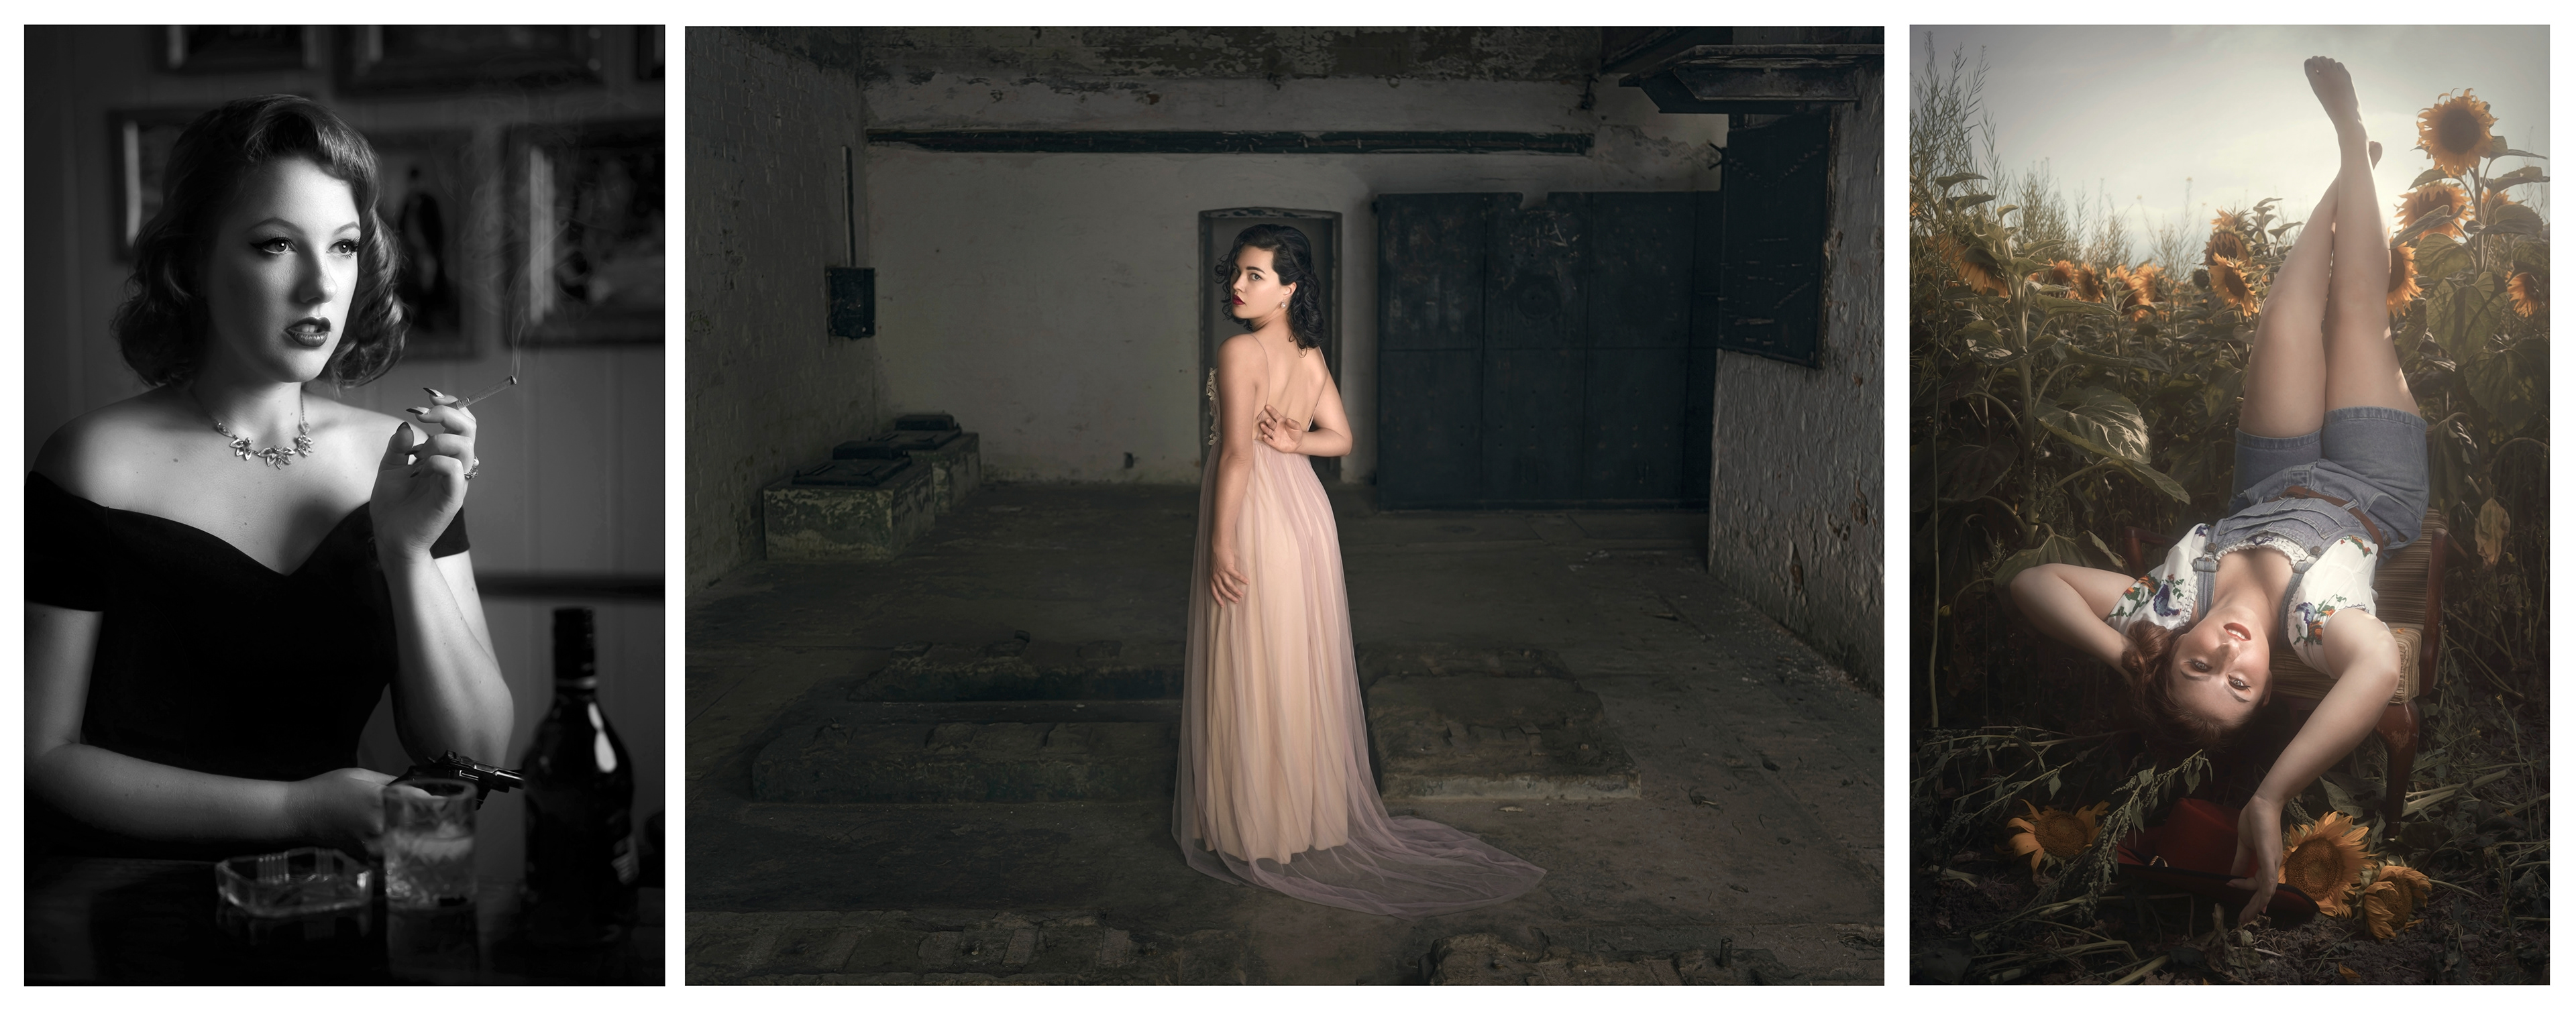
Left: I used camera settings to cut out some of the ambient light in the room and then added light onto the model with flash. Middle: I used a relatively long exposure to capture the low ambient light in the room and then highlighted the model using flash which also helps her to appear sharp. Right: I positioned the model with her back to the sun and exposed for the highlights, then added flash to light the model. Models: Marion Dollykitten (left @dollykitten_marion), Anita van der Mespel (middle, @thewildlifeofme), and Poppy Fill (right, @miss.darling.odette).
In the example written above, you need be wary of using your camera metering system to tell you what is properly exposed because the camera may get confused. A more useful readout in this case is a histogram which you can tell your camera to display when you’re reviewing images. Many cameras have this option if you go to review an image and then press an info or i button or disp (display) option. You might need to press the button a few times to cycle through views before finding the histogram and it may display divided into RBG so try to look at the general curve rather than individual colours.
I find it useful to think of adding a speedlight like adding a fourth corner to the exposure triangle, effectively turning it into an ‘exposure square’. Whilst you have your ISO, aperture and shutter speed camera settings, you also have an artificial light source that you can adjust as needed. Try to get used to thinking of using a speedlight like this and you’ll find that it adds a huge amount of flexibility to your camera settings and, ultimately, to your photographs. If you’re not sure what the exposure triangle is or how to use it, you might find my article ‘The Exposure Triangle’ helpful (there’s also info on how to read a histogram).
Summary
It’s particularly easy to give up on learning lighting because it can seem like a dark art sometimes (no pun intended). The jargon is confusing and the menu systems are not user friendly. I hope this article has helped to demystify some of the jargon and technicalities around using speedlights and that it has generally made the learning curve a little less steep. I’ve tried to include information on many of the aspects of using a speedlight that threw me off in the beginning.
I will be writing a second article on lighting and using off-camera flash which will build upon what I’ve discussed here. There are a lot of online courses and free videos available to help with using speedlights and many people, like myself, also offer personal tuition and workshops. As always, the best way you can learn is to try it yourself so grab a pack of fresh batteries, dig out that manual and practice, practice, practice!