In 1846, Calvert Richard Jones famously manipulated a negative by painting over part of it with Indian ink. In the positive image, the painted area now looked like a continuation of the bright sky. The photo was of a group of Capuchin friars and Jones had just completely erased one of them because he didn’t like his placement in the image. As photography developed, so did image retouching, known then as ‘handwork’. Beauty standards at the time drove images to be edited and manipulated much as they do now, with retouching becoming widespread from the 1850’s and customers demanding retouched images by the 1870’s. There were conflicting views on retouching, yet most agreed that over-retouching was not desirable. Do you think standards and views have changed between then and now?
Retouching can be a bit of a ‘touchy’ subject. I believe that it is often taken too far, and you only need to look at advertising (particularly beauty and fashion) to see what I mean. That doesn’t mean that all retouching is bad. For me, capturing an image in-camera is just the first part of creation and that image is not complete until I’ve laundered it through my own particular editing workflow - the most time-consuming part being skin retouching. In this article, I aim to cover some practical and general techniques for basic skin retouching, but I’ll also talk about what not to retouch. A recurring message throughout will be to keep things natural. Of course, there are some genres of photography where ‘keeping it natural’ isn’t going to cut the mustard so, if you’re looking to get into creative editing, compositing, or beauty retouching, then you’re going to need to take things a whole lot further than I’ll be discussing here. Although the techniques I’ll be showing you are mostly associated with portraiture they are relevant to any image. I follow a very similar workflow for my landscape shots.
I won’t be covering the basics of Photoshop here as I already covered this in a previous article. If you’ve read my other articles, you should be familiar with the drill by now. So, get the kettle on, turn on your computer, and let’s get started.
Editing vs retouching
You may or may not be aware that, apart from very basic models, your camera will have the ability to capture an image in a JPEG or RAW format. A RAW file is a general term and the file types they can appear as include but are not limited to ‘.ARW’, ‘.NEF’, ‘.DNG’, ‘CRW’, etc., depending on your camera manufacturer. A JPEG may also appear as “.jpg”. A JPEG file is a compressed image which will already have some edit settings applied to it which you can change in your camera menu. Combined with the correct exposure settings for what you’re shooting, this can result in an image which is ready to use straight away, and there are lots of times when this could be useful. However, the compressed format of JPEG images cuts out a lot, and I do mean a lot, of extra information that your camera can capture – such as detail in the highlights and shadows. RAW image format retains this extra information, and a basic image edit can recover this. No extra settings are added to a RAW file, including sharpening and colour settings, so a direct comparison with a JPEG would make a RAW file look dull and less crisp. My point is that RAW files need to be edited because you could consider them literally a ‘raw’, unfinished image which needs manipulation to be completed, even if it’s just basic exposure, colour and sharpening edits or adding a preset. I term this kind of image correction ‘editing’. ‘Retouching’, to me, is where we start doing things like removing a distracting sign or unsightly wire, blemish removal, changing mood, or swapping out colours. These would be considered parts of a basic retouch whereas more advanced retouching could include skin retouching, compositing, removing someone from an image completely, swapping out a background, or repositioning a landmark.

From left to right: RAW image, basic edit (with crop), retouch. Model: Violet Femmes (@violet.femmes), makeup by Laura Macdonald (@miss_powdered_primrose)
Editing an image might take seconds to a few minutes, depending on your experience and your vision for the image. A basic retouch can take up to 10 minutes, based on how much there is to do. I use Adobe Camera Raw for basic edits and Photoshop for retouching. A composite work can take hours of computer time, but I know of artists who take months to achieve their final image. It’s all up to what you want to achieve in the time you can spare.
When it comes to editing and retouching, I think it’s worth noting that you can’t process a bad image into a good one (a phrase regarding polishing comes to mind), but you can make a good image great, or a great image fantastic.
Workflow
A workflow helps you know where to start with an image and can save you time by doing things in ‘the right order’. If I’m making a composite image, the very first thing I will do before anything else is gather all parts of the composite into a single file and arrange them. Only then will I start my workflow. When I’m doing any retouching, I start with the basics and work my way up. My personal workflow for portraiture is as follows:
Gather parts of composite (if needed) -> Basic edit (in Camera Raw) -> Healing -> Dodge and burn -> Targeted exposure and colour correction -> Creative adjustments and filters -> Colour toning -> Finishing filters -> Final tweaks (in Camera Raw) -> Crop -> Output sharpening (save layered file) -> Image and file resizing / export for web / print
The order of my workflow might seem counter-intuitive to you, but remember that this is my workflow, yours could be different, depending on how you work best, and may include more or less steps than mine.
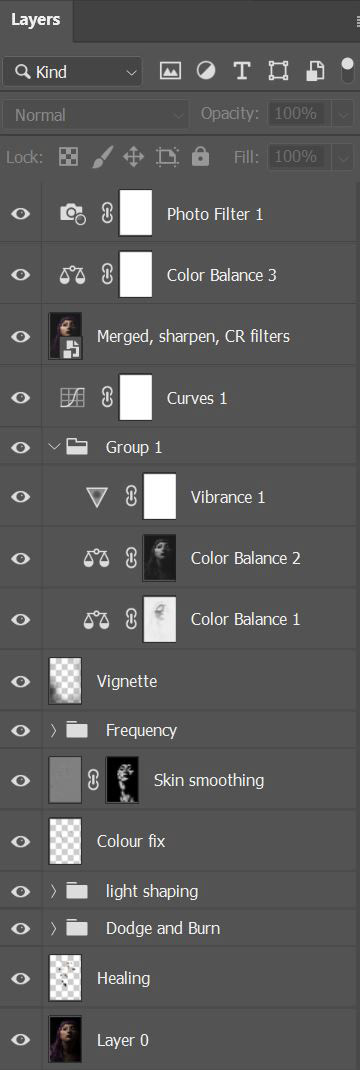
A visual representation of my workflow displayed in the layers of a completed image, beginning at the base with the original image.
Skin retouching
Healing
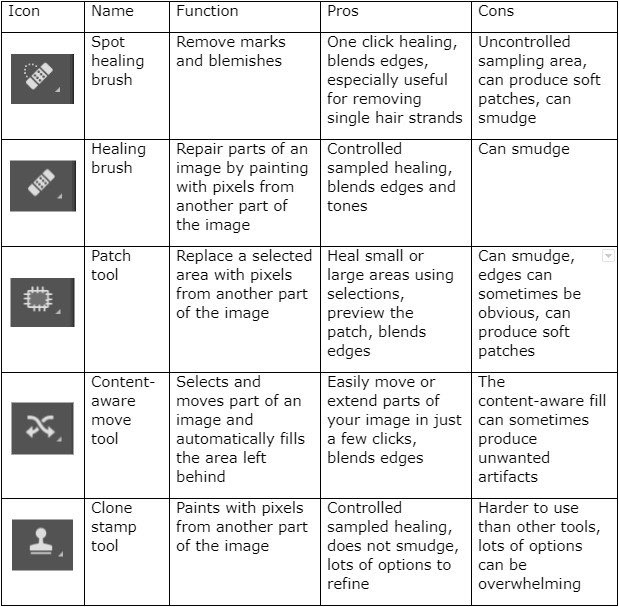
I typically use the more automatic healing tools first, trying alternatives if I get any problems. I’ll start with blemishes, makeup fallout, and stray hairs in the face. My process is to make a new layer above my background – there is no need to duplicate the background since we won’t be working directly on it. I’ll begin with the Spot Healing Brush which uses Photoshop’s smart features to work out what you want to remove based on what is around the clicked area. This is especially useful for removing blemishes and does a good job on messy hairs within the main area of hair, or stray hairs on the face. If I find that I am losing skin texture using this, I will switch to the Healing Brush which uses a sampled area set by the user - hold Alt and click (Option and click for Mac) to set the sample area, then paint the sample over the area to be retouched. When it comes to skin, it’s often best to select a sample area nearby with similar lighting and focus. Try to avoid repeated patterns by selecting new sample areas often.
The Healing Brush is very similar to the Clone Stamp, but it automatically blends edges and tones. For this reason, if I’m working near an edge, the Healing Brush will often smudge. I try to get around this by taking my sampled area from a nearby edge and lining it up with the area I want to heal. If that doesn’t work, I’ll switch to the Clone Stamp. Like the Healing Brush, use Alt or Option and click to select an area to sample from. You can get quite specific with the clone stamp and there are extra useful options in Window -> Clone Source.
The Healing Brush and Clone Stamp tools must be set to ‘current and below’ within the ‘Sample’ drop-down menu in the Options bar. Using these tools on a new layer above your background will now sample anything below that new layer (not just the immediate layer). You can also set the sample to ‘all layers’ but I find this can get confusing. If it’s set to sample ‘current layer’ and you’re on a blank layer, you won’t be sampling anything - you might think the brush is not working. If you’re having issues, check this option. Also check the correct layer is selected and not a mask.
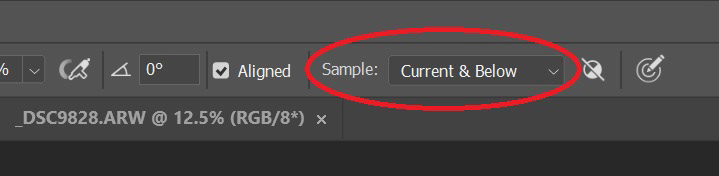
The Sample drop-down menu in the options bar
The Patch tool is a good time-saver for patching up larger areas and can be used non-destructively on a new layer by selecting the ‘content-aware’ patch option and ticking the ‘sample all layers’ box. However, I find the patch tool gives a much better result when using it destructively directly on the layer. If you get smudging or soft areas, then try an alternative tool. The Content-Aware Move tool can be used in 2 different ways: the ‘move’ mode will relocate a part of the image to a new area and fill in the gap left behind, and the ‘extend’ mode will… extend whatever you selected. This is useful for e.g. moving a bird in the sky or adding an extra story onto a building. Use on a new layer with ‘sample all layers’ ticked to work non-destructively. I don’t normally use either of these tools for skin but there are many photographers who do.
What should you be removing? Well, blemishes e.g. spots or flaky skin, makeup fallout, stray hairs, blood vessels in eyes, etc. When it comes to wrinkles, it’s best not to remove these completely, but you can reduce them. This is where you could use a healing tool set to a low opacity, or retouch these on a new layer and reduce the whole layer opacity. There is also an option to fade your last brush stroke via Edit -> Fade Brush Tool, but this only applies to the immediate last brush stroke you made. There are better ways to reduce wrinkles: blend modes. Blend modes that you should be familiar with in the layers panel are also available for many tools, including the healing tools, and you can select which mode in the Options bar. I prefer to use the clone stamp tool at a low flow, set to ‘lighten’. Sample a lighter area adjacent to the wrinkle, brush over the wrinkle itself and watch it fade – repeat for a greater effect. Don’t forget to return the blend mode for your tool to ‘normal’ to save yourself some troubleshooting later.

Retouch including wrinkle reduction, before (left) and after (right). Model: Morris Zak
For beauty images, scars, moles and birthmarks are typically removed, but for general portraiture, it’s worth having a conversation with the model(s) to ask their preference. Some people’s scars, moles and wrinkles are defining features of their personality and their life experiences. How much you retouch depends on the context of the image, the preferences of the people in the photo, and your personal style.
Dodge and burn
Dodge and burn is perhaps the most iconic technique directly translated to a digital workflow from the darkroom. To dodge part of an image is to lighten it and to burn is to darken. In portraiture, dodge is commonly used to brighten eyes, lift shadows, etc., whereas burn is often used to darken distracting light areas and create a vignette - but these tools are so much more powerful than just that. This is where I spend most of my time during a retouch and, done correctly, often negates the need for frequency separation, which I will touch upon later.
There are dedicated Photoshop tools to dodge and burn but the use of these directly onto an image would be destructive. As with most things in Photoshop, there are many ways to apply dodge and burn to an image. The way I find the simplest is to set up 2 new Curves adjustment layers – if you remember from the previous Photoshop article, we can find the Curves adjustment layer by clicking the adjustment layers icon at the bottom of the layers panel. Once selected, in the properties panel, we can change the preset drop-down menu from Default to ‘Lighter’ for our dodge and, on a second curves adjustment layer, change this preset to ‘Darker’ for our burn. Renaming these layers appropriately will save any confusion later. The mask for these adjustment layers is by default set to white, or showing, but we want these to be hidden so we need to invert the mask to black – click once on the first curves mask to select it and press control and ‘i’ (command and i for Mac) to invert the white to black. Repeat with the second curves layer. The lighten and darken curves adjustments will now be hidden and your image should look unchanged.
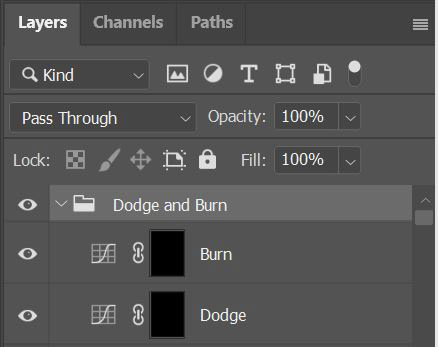
Dodge and burn curves adjustments in the layers panel, contained with a folder
You can now start dodging and burning by using the Brush tool, just as you would on any mask. In the Options bar, set your brush flow to no more than 5% and paint with a soft, white brush on any areas you feel need to be brightened or darkened. Also in the Options bar, in-between the Flow and Smoothing drop-down menus, there is a button to ‘Enable airbrush-style build-up effects’, which I recommend you have turned on. This will allow your effects to build up. Try brightening up larger areas where you’d like the viewer’s eyes to go to and darkening less important areas. Add some brightness to the eyes in a portrait but be careful not to go too far, the eyes are normally the most engaging part of a portrait and can easily look overly retouched.
When using dodge and burn to smooth skin, editing in black and white makes these tonal differences easier to spot. This technique is especially useful for a close-up portrait such as a headshot or studio image where the skin retouch needs to be of professional standard. Select the Solid Color adjustment layer and pick black (bottom left in the color picker), press OK, then set the layer blend mode to ‘Color’. If it isn’t already, move your newly created Solid Color adjustment layer to the top of your layer stack. Your image should now appear as black and white. If you zoom in to the skin on your model, you should more easily see areas which are different tones. This isn’t always a bad thing as it gives the face and features depth, but we can even it out in some areas to give a more flattering look. Change the brush size to fit the area you want to retouch – a brush which is too large will also affect the surrounding area, and one which is too small will appear patchy. Use your dodge Curves adjustment layer to lighten dark areas such as under eyes and use both dodge and burn as needed to even out any patchy skin tones or lighting. Regularly check what you’ve done so far by turning the dodge and burn layers off and on. Sometimes, the effects are so subtle you may think you aren’t doing anything, but the overall dodge and burn can make a huge difference to an image. If I were only allowed to use one technique to retouch, I would pick dodge and burn. The ability to shape light is incredibly powerful.

Retouch using only dodge and burn curves adjustments, before (left) and after (right). Model: Violet Femmes (@violet.femmes), makeup by Laura Macdonald (@miss_powdered_primrose)
Frequency separation
Frequency separation gives the appearance of separating skin texture away from skin colour so that each can be edited individually. It is often used incorrectly, resulting in a loss of skin texture and a blurred, fake appearance. If you want to create a high-end beauty look then you will find frequency separation useful, but it is not a shortcut to perfect skin and is best used as part of a workflow. I won’t tell you how to set up frequency separation here because: 1. The method varies depending on if you are using an 8-bit or 16-bit image, 2. It is a complicated setup and there are many video tutorials (good and bad) online. Be wary of any plugin, action, program, or filter claiming to perfect skin, particularly if it seems easy or simple. In my experience, there is no quick fix and professional-lookin skin retouching takes time.
Creative adjustments
What I’ve covered so far is a base to build on. What you do to your photos next is all to taste and you’ll be pleased to know that the hardest and most time-consuming part is over (at least in my workflow). Next is where I like to get creative and give my images the look I love. I will add a vignette, lift shadows, and reduce contrast. I’ll then add contrast back in through additional layers, blend modes, and colour toning. I’ll follow this with more filters or adjustments if I feel they are needed.
I like to duplicate all my layers and merge into a new image layer which is a flattened version of everything I’ve done so far so that I can start using more filters. The easiest way to do this is, with the top-most layer selected, press ctrl, shift, alt and E (Windows) or shift, command, option and E (Mac). Converting this layer into a smart object (right click on the layer -> Convert to Smart Object) means I have the option to change my mind with any changes I make to it, in a similar way to working non-destructively. Search online to learn more about smart objects. This is when I might take my image into the Liquify filter (Filter -> Liquify). Liquify allows pixels to be dragged around, stretched and altered, similarly to Warp but with more control. A lot of people think of Liquify as digital liposuction, but it is much more powerful than that. There are artists who use Liquify to turn their subjects into dolls or aliens, but you can use it subtly to enhance an image. I like to use it to tszuj-up hair, clothing, and smooth out curves. There’s also a face-aware option that automatically detects faces and can change expression – a gentle hand is good here unless you want your subject to look like the Joker or an anime character.
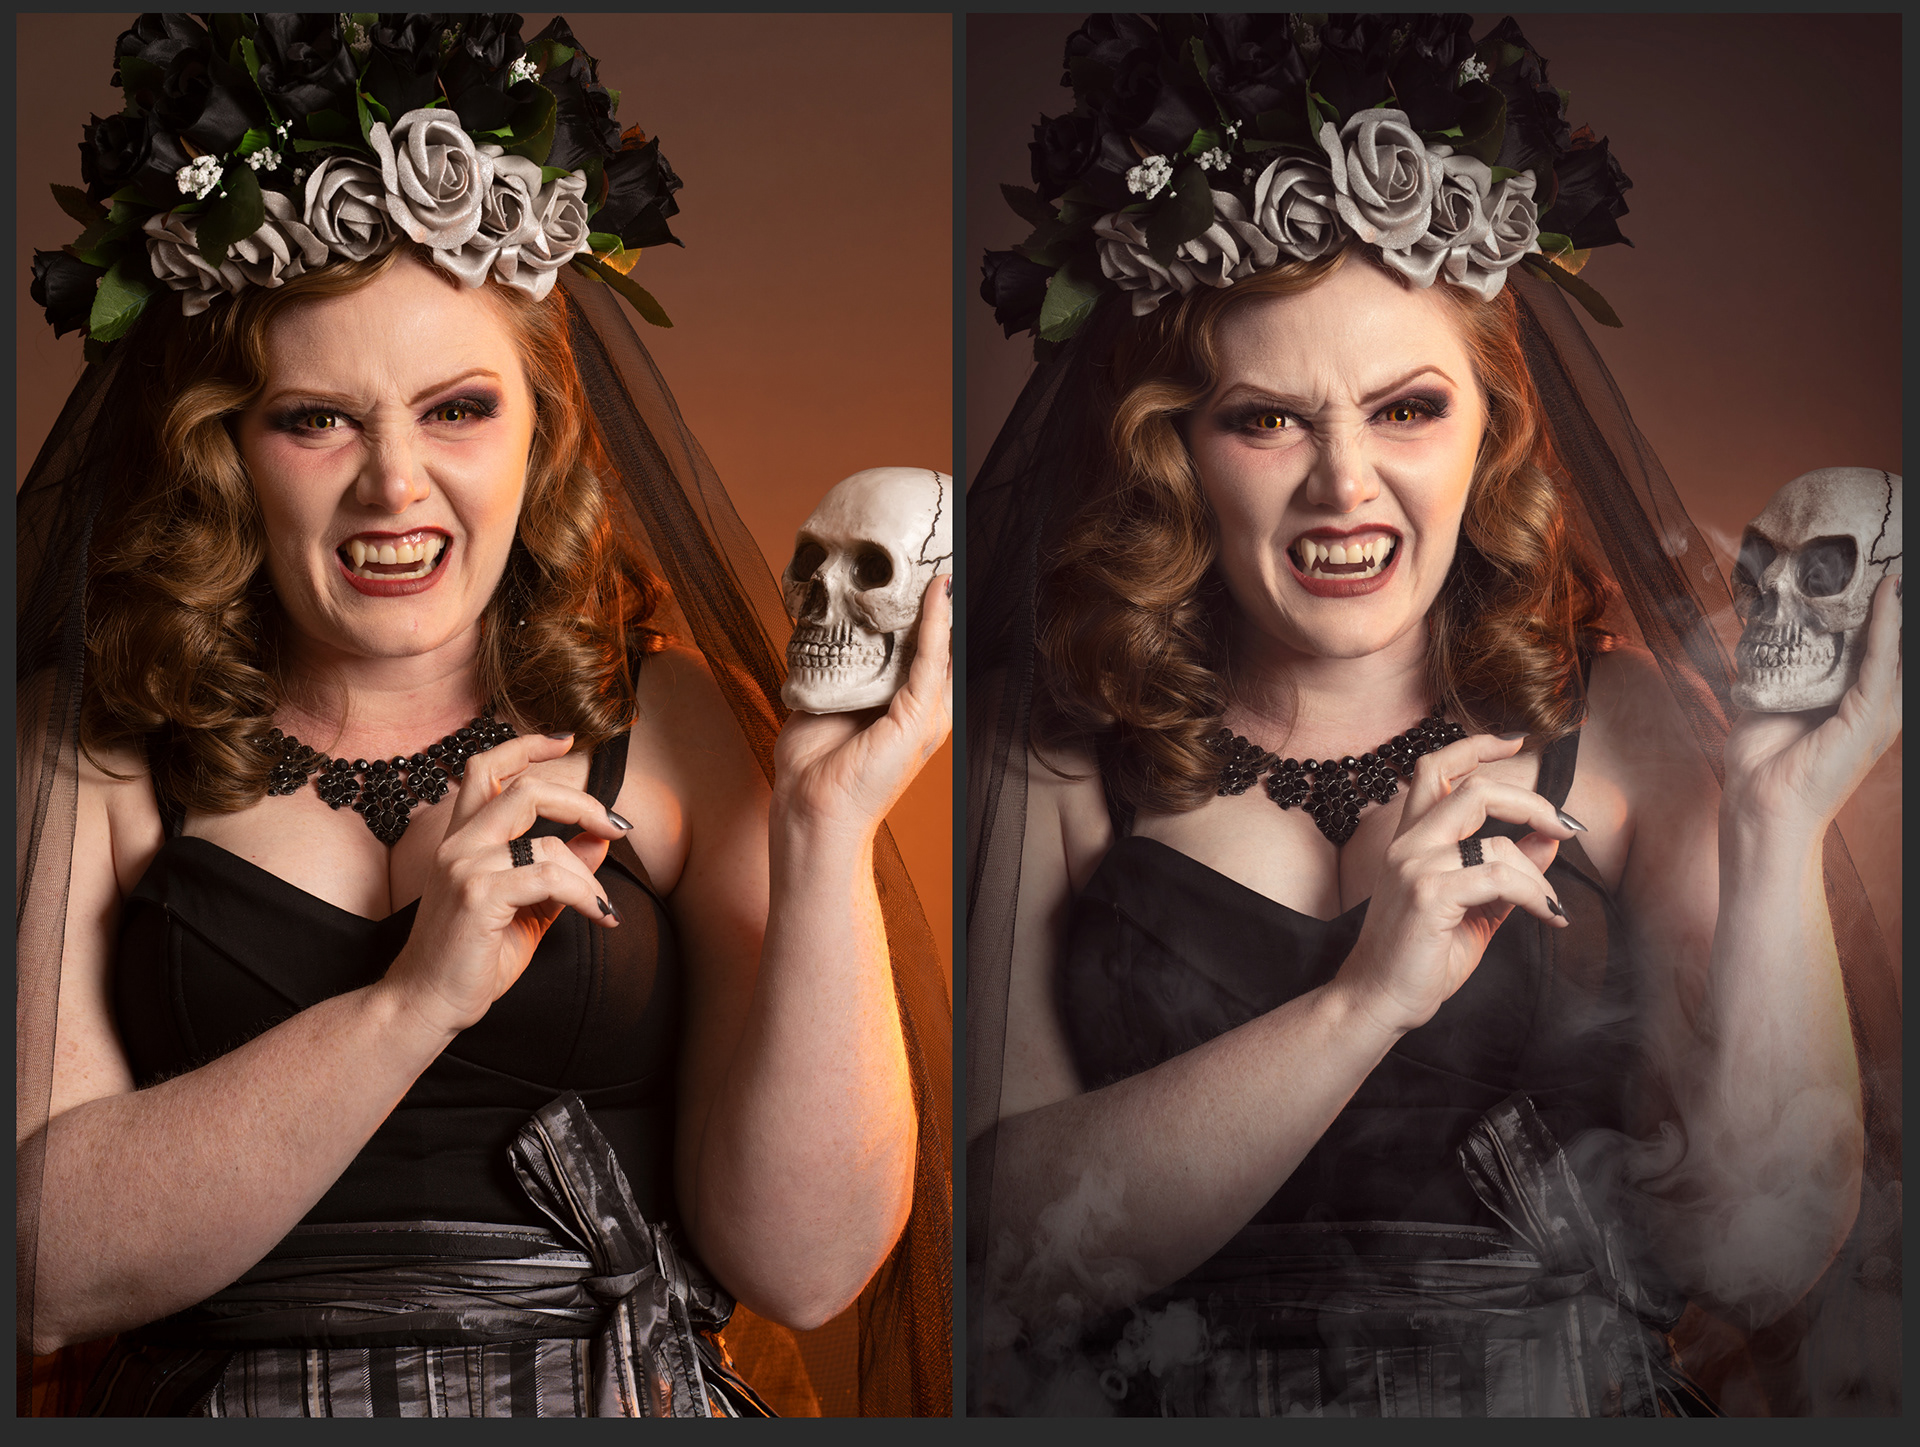
Liquify was key to enhancing the model’s expression for this Halloween-themed photoshoot. Models were informed prior to the shoot that liquify would be used for effect. Before edit (left) and after (right). Model: Laura Macdonald (@miss_powdered_primrose) with makeup by Genevieve Mohacsy (@i.am.genevieve)
One of the last things I’ll do is take the flattened smart object into Camera Raw for a second round of exposure and colour tweaks. I can feel when my image is finished – if it isn’t, a new round of creative adjustments might begin, or existing ones may be altered.
Finishing touches
When I’m happy with the look of my image, I’ll crop it if needed. In Photoshop, I choose not to tick ‘Delete Cropped Pixels’ in the options bar for the crop tool for the same reason that I choose to crop near the end of my workflow – so that I have freedom to change my mind if I wish. If I were to crop-in my image early on, all the creative adjustments and filters I apply afterwards only apply to the cropped image, regardless of whether the pixels are deleted or not. If I then decide to extend the crop back out, none of those filters will have been applied to that area. Some would be a quick fix but others not. I’m saying all of this from very frustrating personal experiences.
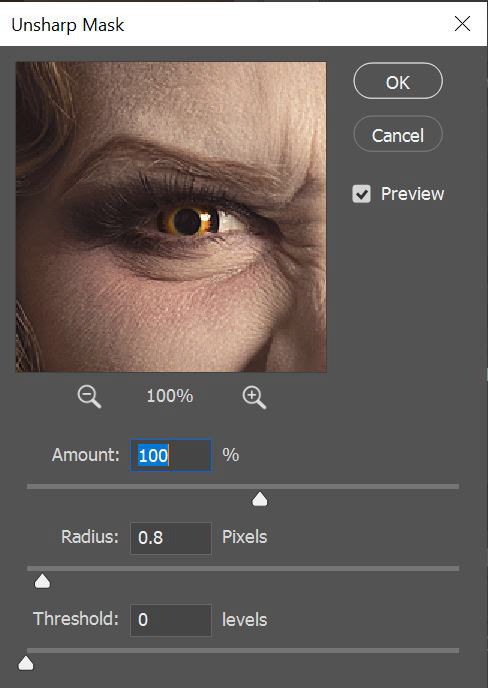
Sharpening is very important, especially if working from a RAW file. How you sharpen depends on the size of your image, how sharp it is in the first place, what is the final output will be, and personal preference. Sharpening will not make your image in focus if it wasn’t in the first place, you’d have to re-take the shot to do that. I prefer my images to be soft and painterly, so I don’t sharpen much. There are several sharpening options available in the Filter -> Sharpen menu. I use Unsharp Mask. This has a dialogue box where I can slide the amount, radius, and threshold until I get a result I like. I will typically go through this process twice, setting the sliders differently to achieve varying levels of sharpening and micro-contrast. Don’t be afraid to play with the sliders and see what they do – there’s a preview before you decide to go ahead. Make sure any sharpening enhances rather than ruins all your retouching.
Unsharp Mask dialogue box. Try sharpening once using a low radius and then a second time using a higher radius to achieve a crisp result.
If you’ve gone through everything you intended to do with your image but haven’t yet saved it, please do it now! I save my works as Photoshop documents (.psd) so that I can come back and make changes if I want to, remind myself how I created a certain look, or simply copy the adjustment layers to another image to reuse.
Summary
Everything I’ve said here is very personal to my own workflow. I’ve discussed my own preferences when it comes to retouching – these may not be to your taste, and that is obviously fine. I don’t believe there are any hard and fast rules, and I often do the opposite of what I teach because it’s easier, quicker, or just more convenient at the time. For me, retouching an image is an artistic process that is complete when the photograph evolves into an artwork. A large part of that is due to how I manipulate the photo after it has been captured.
If you’d like to learn more about retouching, feel free to contact me through my website or social media. As well as offering Photoshop tuition myself, I’d also be happy to recommend my favourite online tutorials, courses, and tutors. Investing in your own education is, I believe, one of the best things you can do for yourself. Learning new techniques is inspiring and we all need to grab hold of any inspiration we can get these days. Grow your skills, find your direction, and, as always, practice, practice, practice!