In a previous article, I broke down how to use a speedlight and what all the buttons and modes do. In this article, I’m going to help you get that speedlight off your camera so you can be more creative (and more flattering) with your lighting. This isn’t just useful for portraiture; I’ve also used this technique to light the inside of a car, backlight a subject, create a starburst in the frame, fake the sun, highlight haze, capture water drops, and so much more. If you can think of either a practical or a creative use for a light, learning how to set that light off-camera will give you a lot of freedom, and it really isn’t all that scary once you try it.
Off-camera flash
Once you are comfortable with the basics of using your speedlight, taking it off the camera is the next step. In the case that came with your speedlight, there should be a pocket with a stand or foot inside. On the underneath of the foot will be a universal-sized thread and this means that you can mount your speedlight onto any light stand or tripod with a corresponding thread. Provided you have some way to trigger your speedlight(s), that is all you need to create off-camera flash. Before we talk about triggering, we need to understand a bit more jargon (sorry).
Master and slave
A master or commander unit is one that triggers all other lighting units. This is the one you will have directly connected to your camera hot shoe (in some rare cases it can be the camera itself). The units which are triggered by the master are called slaves. These will be the off-camera flash. It might be easier to think of the master unit as the one giving orders and the slave units as the ones following the orders from the master unit.
If the units have a wireless function, this can be used to adjust the power output of the slaves by selecting the setting on the master i.e. remotely. To use this setup, each unit must be designated as either master or slave and this will be different depending on which brand you are using (check your manual).
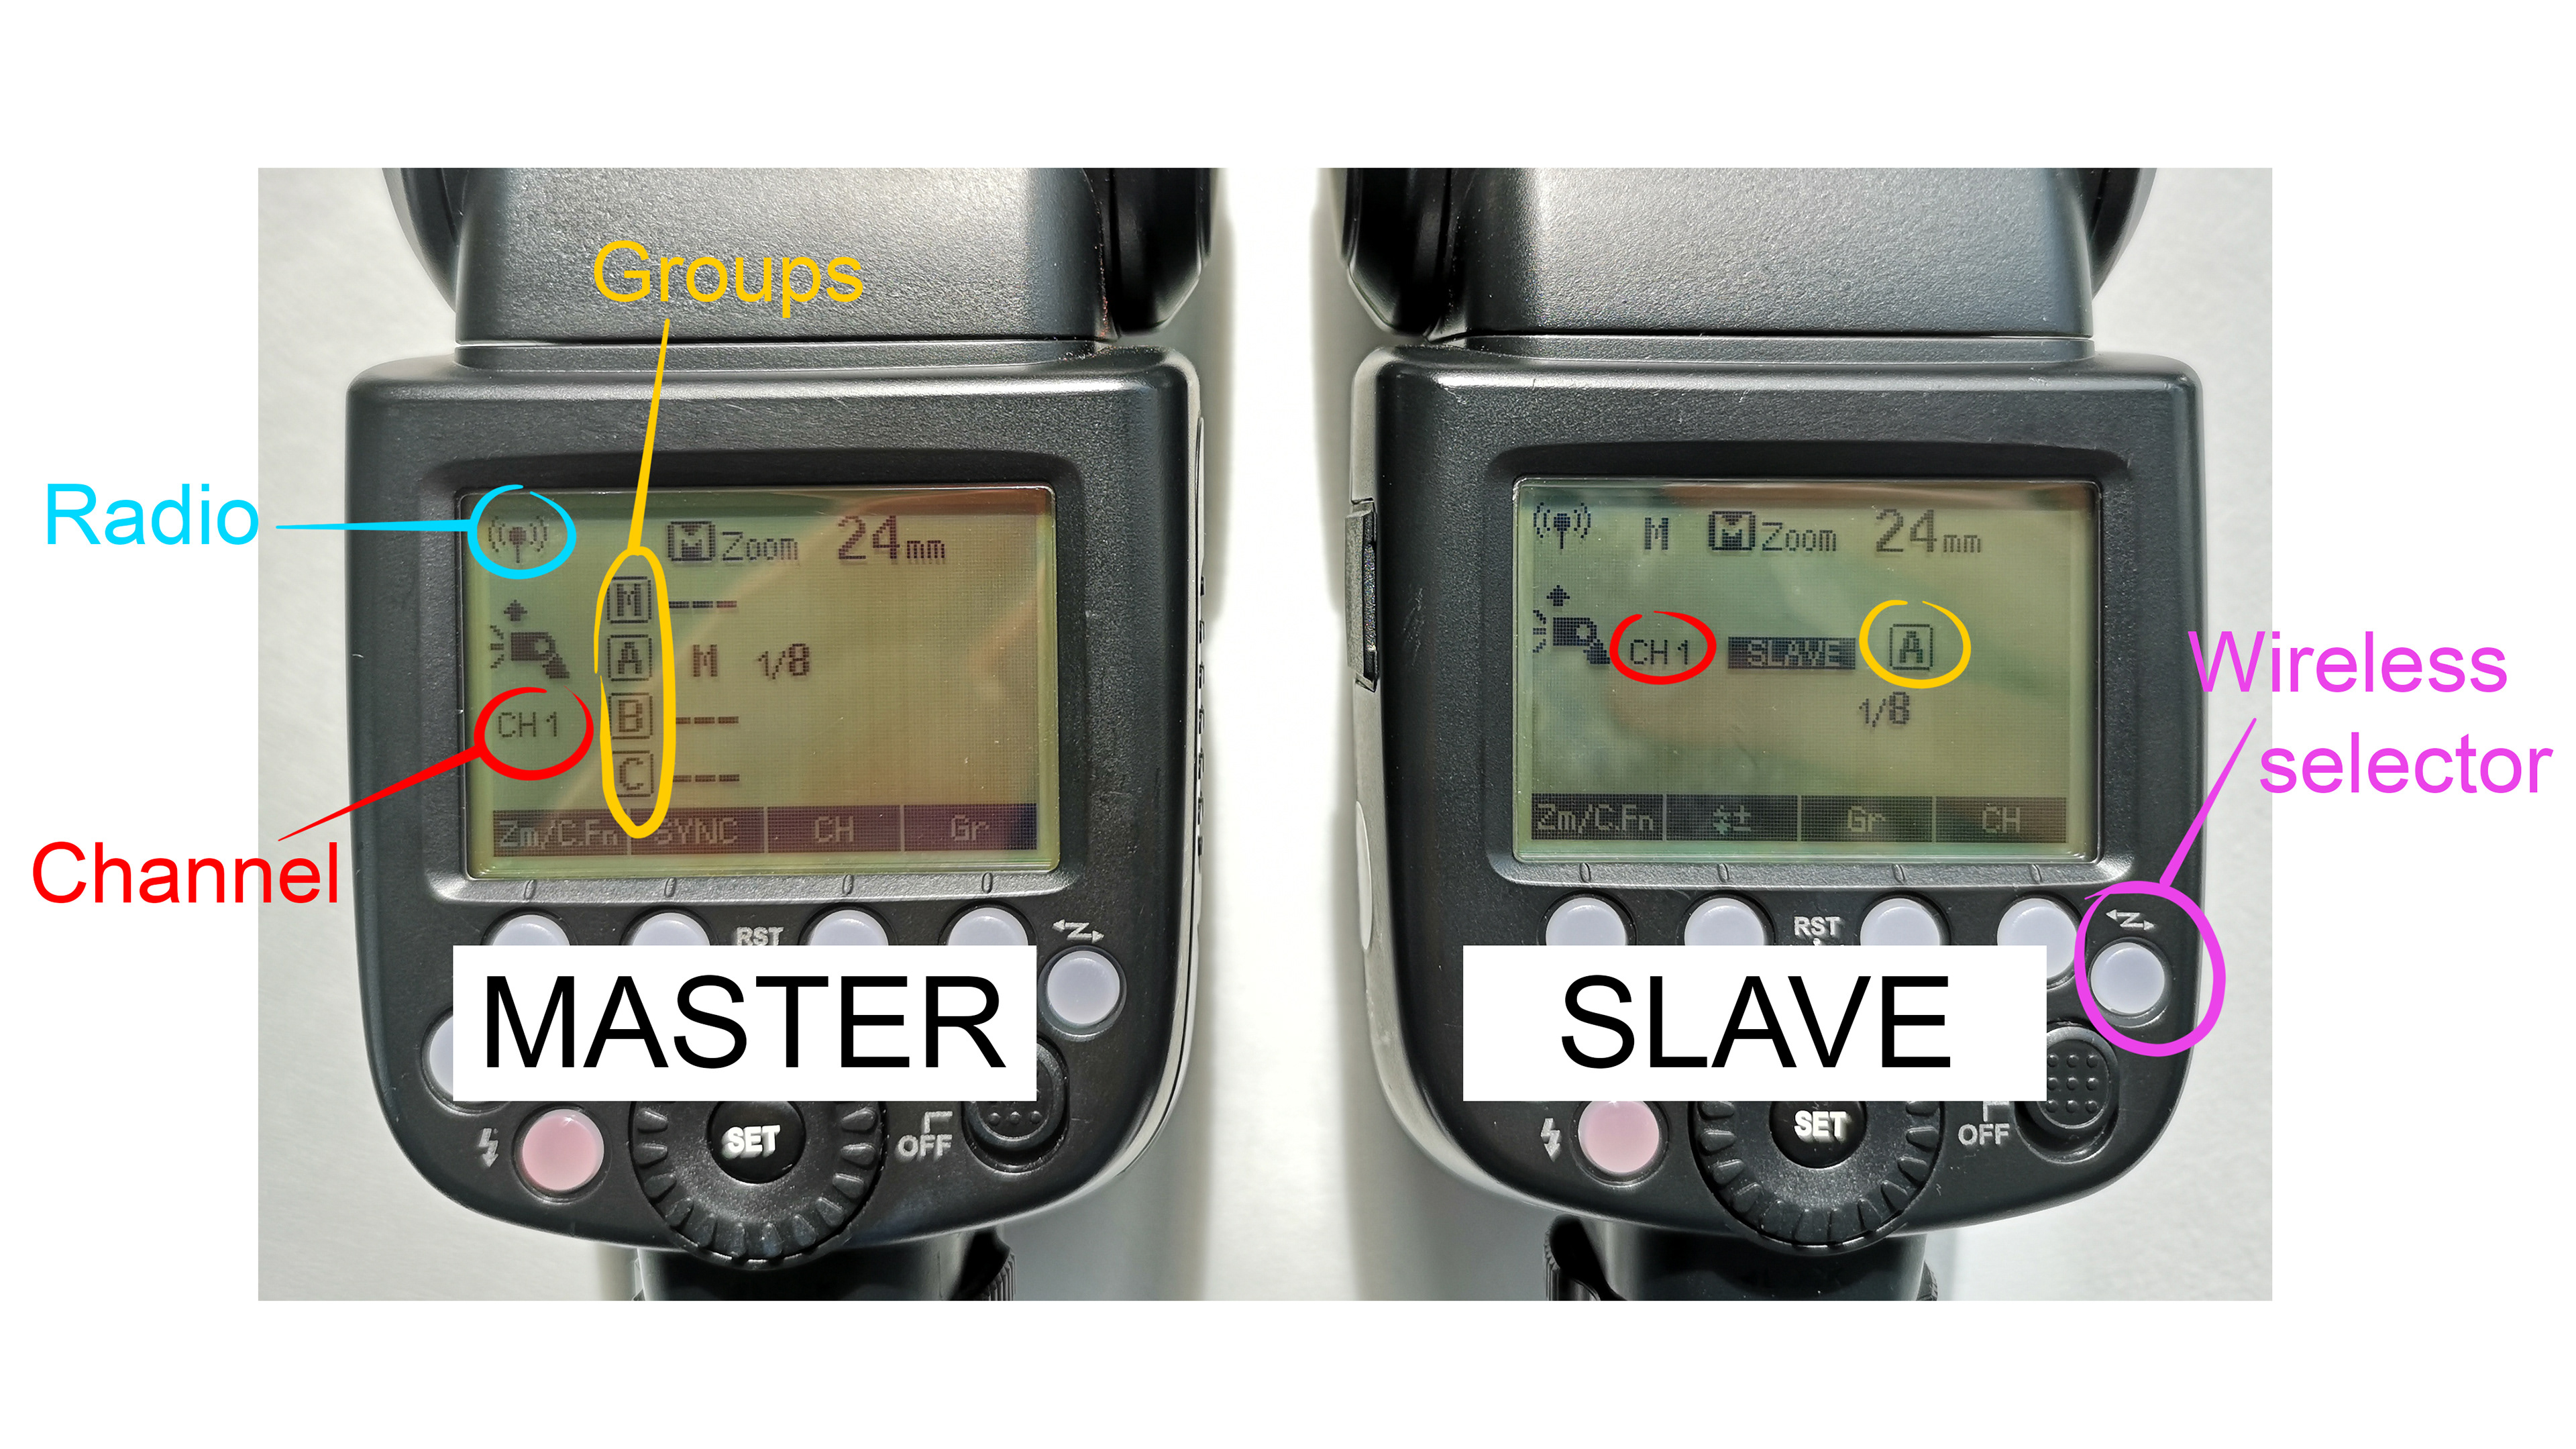
Master and Slave settings: On the Godox 880 speedlight, the wireless selector button is used to set a unit as master or slave and select between radio or optical wireless modes. For radio communication to work, all units must have wireless radio turned on and set to the same channel. Some units also require a group setting – here you can see the master unit has group A active, set to manual mode with a power output of 1/8 which corresponds with the settings on the slave unit. Unfortunately, almost all speedlights have different buttons, layouts, functions and settings, so consult your manual. This example is as complicated as off-camera flash gets - your setup might be more simplified.
Triggering
There are several ways you can trigger or fire a flash which is off-camera, listed below.
1. Use the built-in pop-up flash on your camera
2. Use the flash from a second speedlight mounted onto your camera
3. Use the built-in commander mode from your camera (limited to certain camera models)
4. Use an infra-red (IR) signal from a second speedlight mounted onto your camera
5. Use a radio signal from a second speedlight mounted onto your camera
6. Use a radio signal from a dedicated trigger mounted onto your camera
7. Use a flash sync cable
Don’t run off screaming! I’m going to go through each of these and what they mean!
Optical
Options 1 and 2 are what is known as optical triggering. The speedlight which is off-camera detects a flash fired from option 1 or option 2 and is thus triggered. In order to do this, the off-camera speedlight or strobe will need to be set to perform as an ‘optical slave’ but this option is not always available, depending on what make and model you are using. The downside of using this triggering mode is that you must use an additional flash as the trigger, and this might interfere with your lighting setup. It is triggered by any flash, so if you’re in a space where there are other photographers using flash, they will also trigger your lights. One plus side is that this method can be used to trigger multiple flash units from different brands at the same time. It is very sensitive, as I can personally attest. I was trying this out with three very powerful strobes in my small office and lightning from a storm outside triggered all three at once when I was looking right at them.
Infra-red
Options 3-6 use what is called wireless triggering. This comes in two different types – infra-red (IR) and radio signals. To use IR triggering, both the unit sending the signal and the unit receiving the signal must be within what is termed line-of-sight. This means if anything is between the two units, the signal will be blocked and the off-camera flash will not be triggered. For all units to talk to each other, the parts of the speedlights which send and receive the signal must be facing one-another. You can find out more about where this is on your speedlight from your manual, but it is normally located within the red panel on the front face of the speedlight. Some units use a smaller, circular spot on the side, so be careful not to block this or cover it in fingerprints! IR communication can be unreliable when used in bright sunlight and will interfere with another photographer’s IR units. Generally speaking, radio is superior to IR for wireless communication.
Radio
Radio signals are not affected by line-of-sight. This makes the placement of your flash units much more flexible and you can do things like use modifiers without worrying about blocking your signal, or backlight a portrait by hiding a light behind your subject. Generally, radio master units can remotely adjust the power of slave units, saving you from walking back and forth to each unit when adjusting lighting. Radio triggering requires you to set both your trigger unit and receiving unit(s) on the same channel/frequency for them to communicate. After setting the channel, many radio setups also require you to set groups and this is where you can put different lighting units (if you have several) into groups with each group set to a different power level, if you want to. How much control you exert is only limited to how many lights you have and how many groups your trigger can handle. You can probably guess by the sounds of it that this method allows very complicated lighting setups to be achieved. A radio master can be a dedicated trigger unit, or it can be a speedlight with a triggering function. A radio slave can be a speedlight with a slave function, or a speedlight mounted onto a radio receiving unit (search online for wireless flash trigger kits). If there are several photographers using radio triggers, simply ensure you’re all using different channels to avoid any cross-over.
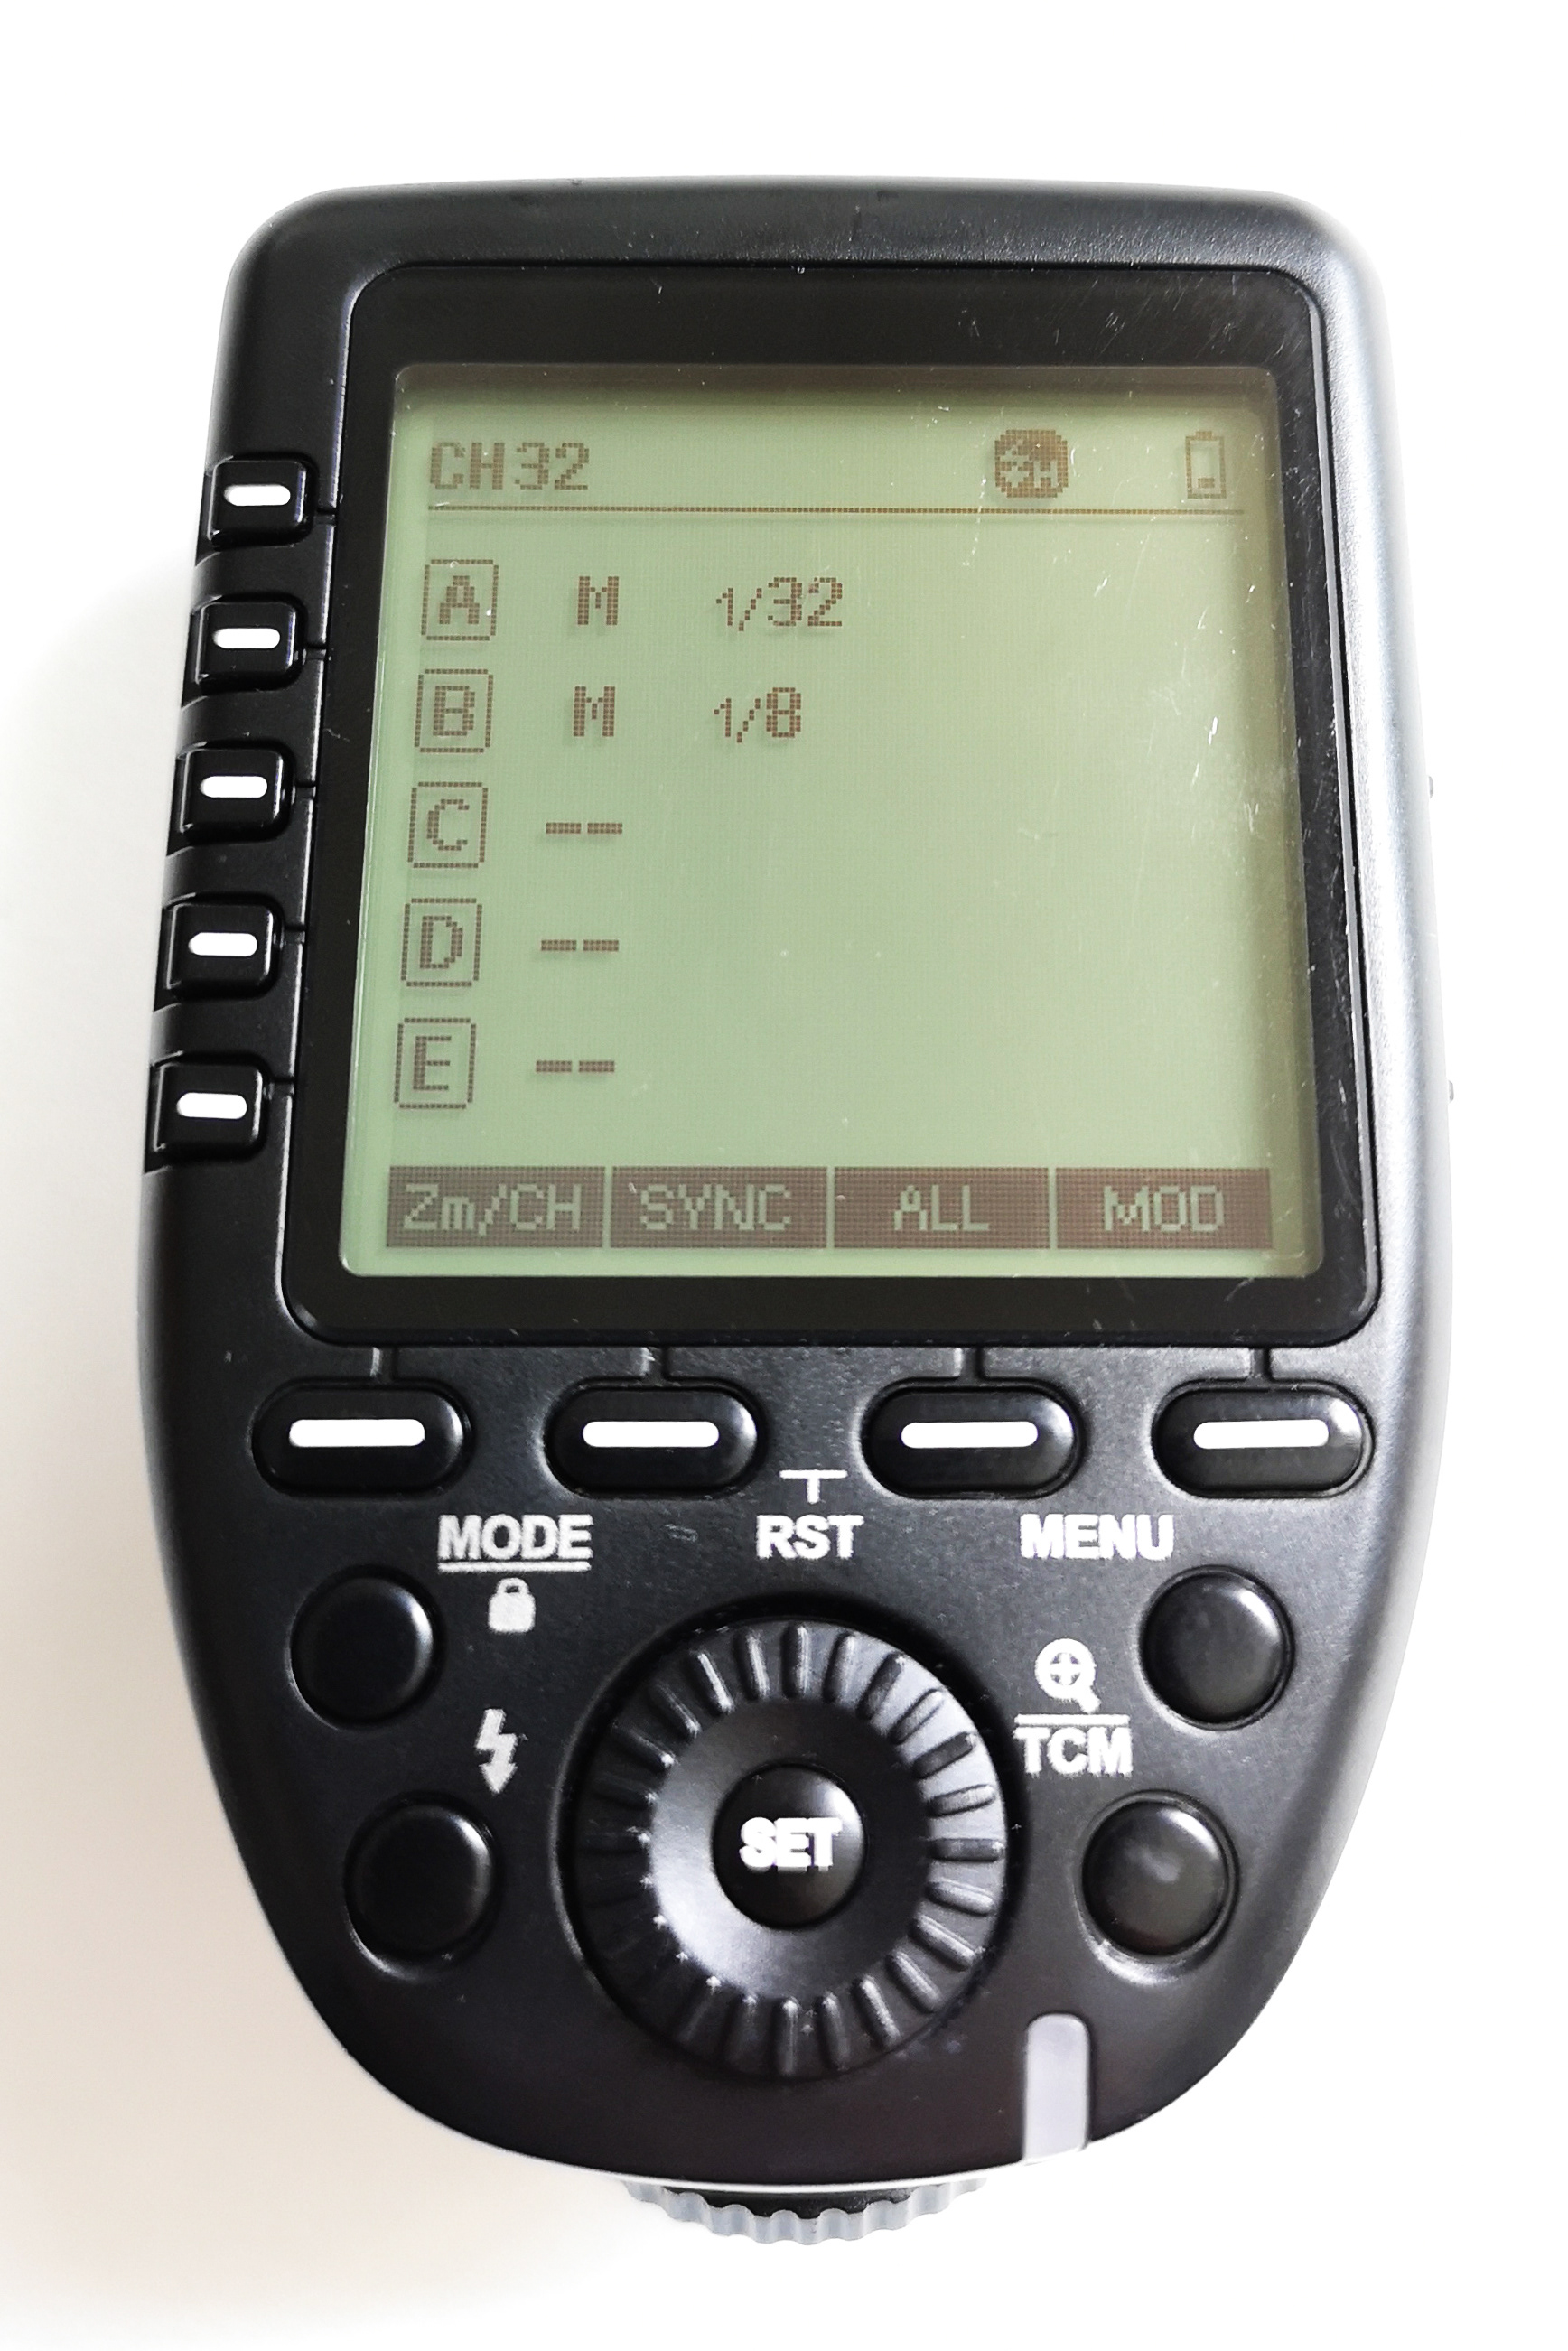
This is just one example of a radio trigger. This mounts on the hot shoe of my camera and I can control up to 5 different lighting groups (one group can contain multiple lights) wirelessly from this trigger. You can see it looks quite similar in design to a speedlight in some respects, but it does not produce a flash by itself, is quite small and is lightweight.
Sync cable
Don’t have any of options 1-6, only have 1 flash unit, or only have a cold-shoe camera mount? You can use a flash sync cable. Check to ensure both your camera and your speedlight have a port for a sync cable. Sync cables come in a few different shapes and sizes so, if you’re not sure what you need, take your camera and speedlight into your local camera store and they will be able to tell you. Of course, using a cable means you are limited to the length of that cable, but you do not need to worry about line-of-sight or setting up channels and groups. I have used this method to connect a 1960’s vintage Hasselblad film camera to a modern radio trigger. This allowed me to use radio triggering and have wireless control over all my other lighting units which were triggered when pressing the Hasselblad shutter.
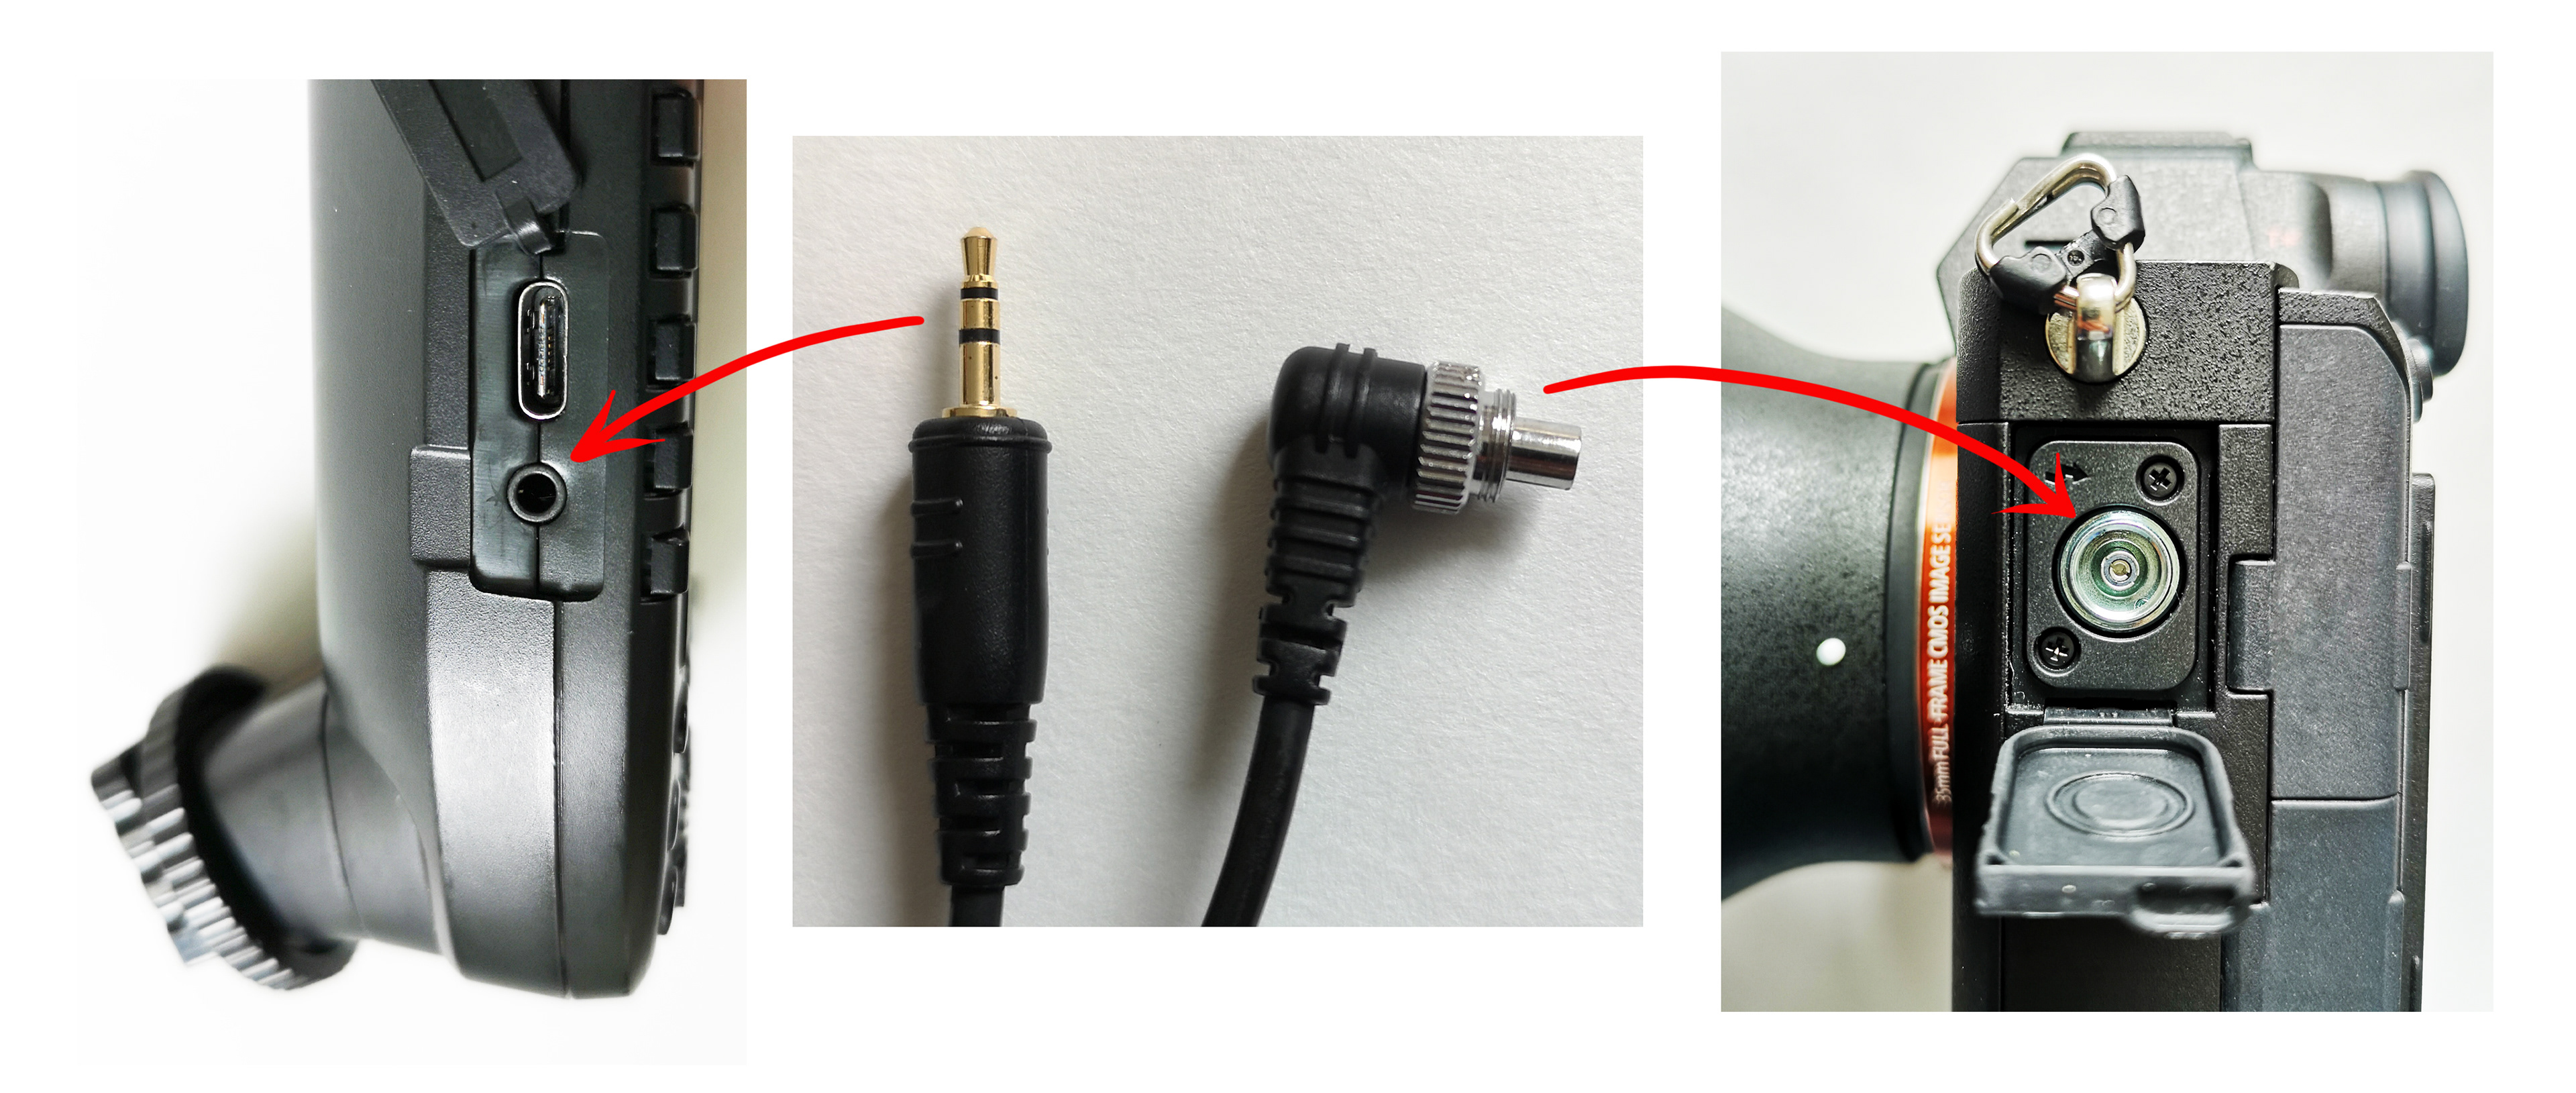
Sync ports can appear like a headphone jack (left) or like an aerial cable (right). The sync port on your camera will likely be hidden under a panel somewhere on the body. Older film cameras may have the sync port built into the lens. A sync cable can be purchased for just a few dollars.
Setting up for off-camera flash
If you’re using a wireless setup of any kind, you’ll need to program all your lighting units to speak to one-another using your chosen method.
Optical triggering, if available, is commonly turned on in the custom menu, so check your unit’s manual for more details on how to set this up.
If you have an IR unit, turn on the wireless function and navigate to the appropriate mode, as stated in the unit’s manual. Set the unit you want to use as a trigger to master/commander mode and set the off-camera units to slave mode. Ensure the IR transmitting and receiving panels are within line of sight, slaves facing the master. Typically, you will see a red blinking light to show that the units are ready for use.
For radio, turn on the wireless radio function and set master and slave units. Then, set all units to the same channel/frequency e.g. Channel 1. If required, set all units to the same group e.g. Group A. Press the test button and all units should fire. Simple as!
Troubleshooting
The best way to check if all your lights are firing is to close your eyes and ask someone else to look at all the flash heads and tell you if they go off when you press the shutter. If they tell you afterwards that they can now only see blue dots, you should be good to go.
Flash not firing? We’ve all been there. Try the following, as applicable:

Congratulations! Barring some reading of your flash manual, you should now know how to use your speedlights off-camera, have a good grasp of how to use other flash units such as strobes, and have a few other tricks up your sleeve! Feel free to stop here and return for the next section when you’re thinking about how to modify the hard light produced by a bare flash unit.
Modifiers
Modifiers come in all shapes and sizes and they modify or shape the light from a speedlight or strobe. Modifiers are more commonly thought of as being for strobes but they are still important for speedlights. They typically work by helping to spread the light, shape it, redirect it, or soften it. Some modifiers, such as softboxes, require that you work with off-camera flash, simply because there is not enough room between the speedlight and the top of the camera. Modifiers are mostly used for portraiture, commercial and product photography.
As there are so many modifiers, I will just discuss a few of my favourites. Not listed here is the humble 5-in-1 reflector with diffusor panel, which is an extremely flexible piece of kit and can be a great help when using flash (see my article ‘Getting the most from natural light’ in NZ Photographer Issue 43, for how to use a reflector and an explanation of the basic qualities of light).
Umbrella
Probably my favourite all-round modifier for low price, ease of use, portability, and flexibility. Umbrellas come in many sizes and varieties. They are cheap and produce very soft light which is perfect for most portraits. You can use these with any light stand or clamp which has a hole or slot for poking the stem of the umbrella through, or just get your model to hold it! If using outdoors, umbrellas are particularly bad for catching the wind so have an assistant hold on tight or weigh down the stand properly.
Softbox
This category contains the most variety and can produce many different qualities of light. The term ‘softbox’ might make you think that it’s a square box shape, and it can be, but the term encompasses a large range. An octabox is more circular than box-shaped and is a favourite of portrait photographers. A strip light or strip box is typically a long, slim rectangle which creates a long strip of light. You can also get umbrella softboxes, deep or parabolic shapes, and they all have diffusion and grid options. Prices range depending on size, shape and brand but budget options are available. Most will need a specific mount (e.g. Bowens) and can work with either a strobe or a speedlight. Some are available specifically to be used with speedlights. Many softboxes are collapsible for ease of use and transport.
Beauty dish
A beauty dish is so named because it modifies light to sculpt and shape the face. It is commonly used in fashion and beauty photography and produces a light that is in-between soft and hard in quality. This modifier reflects and shapes light in a different way to a softbox or an umbrella due to the way it is constructed. They come in a range of sizes and are typically solid metal which makes them expensive and not very practical outside of a studio, but they can also be found in a collapsible, portable form. Like softboxes, they require a specific mount to hold them.
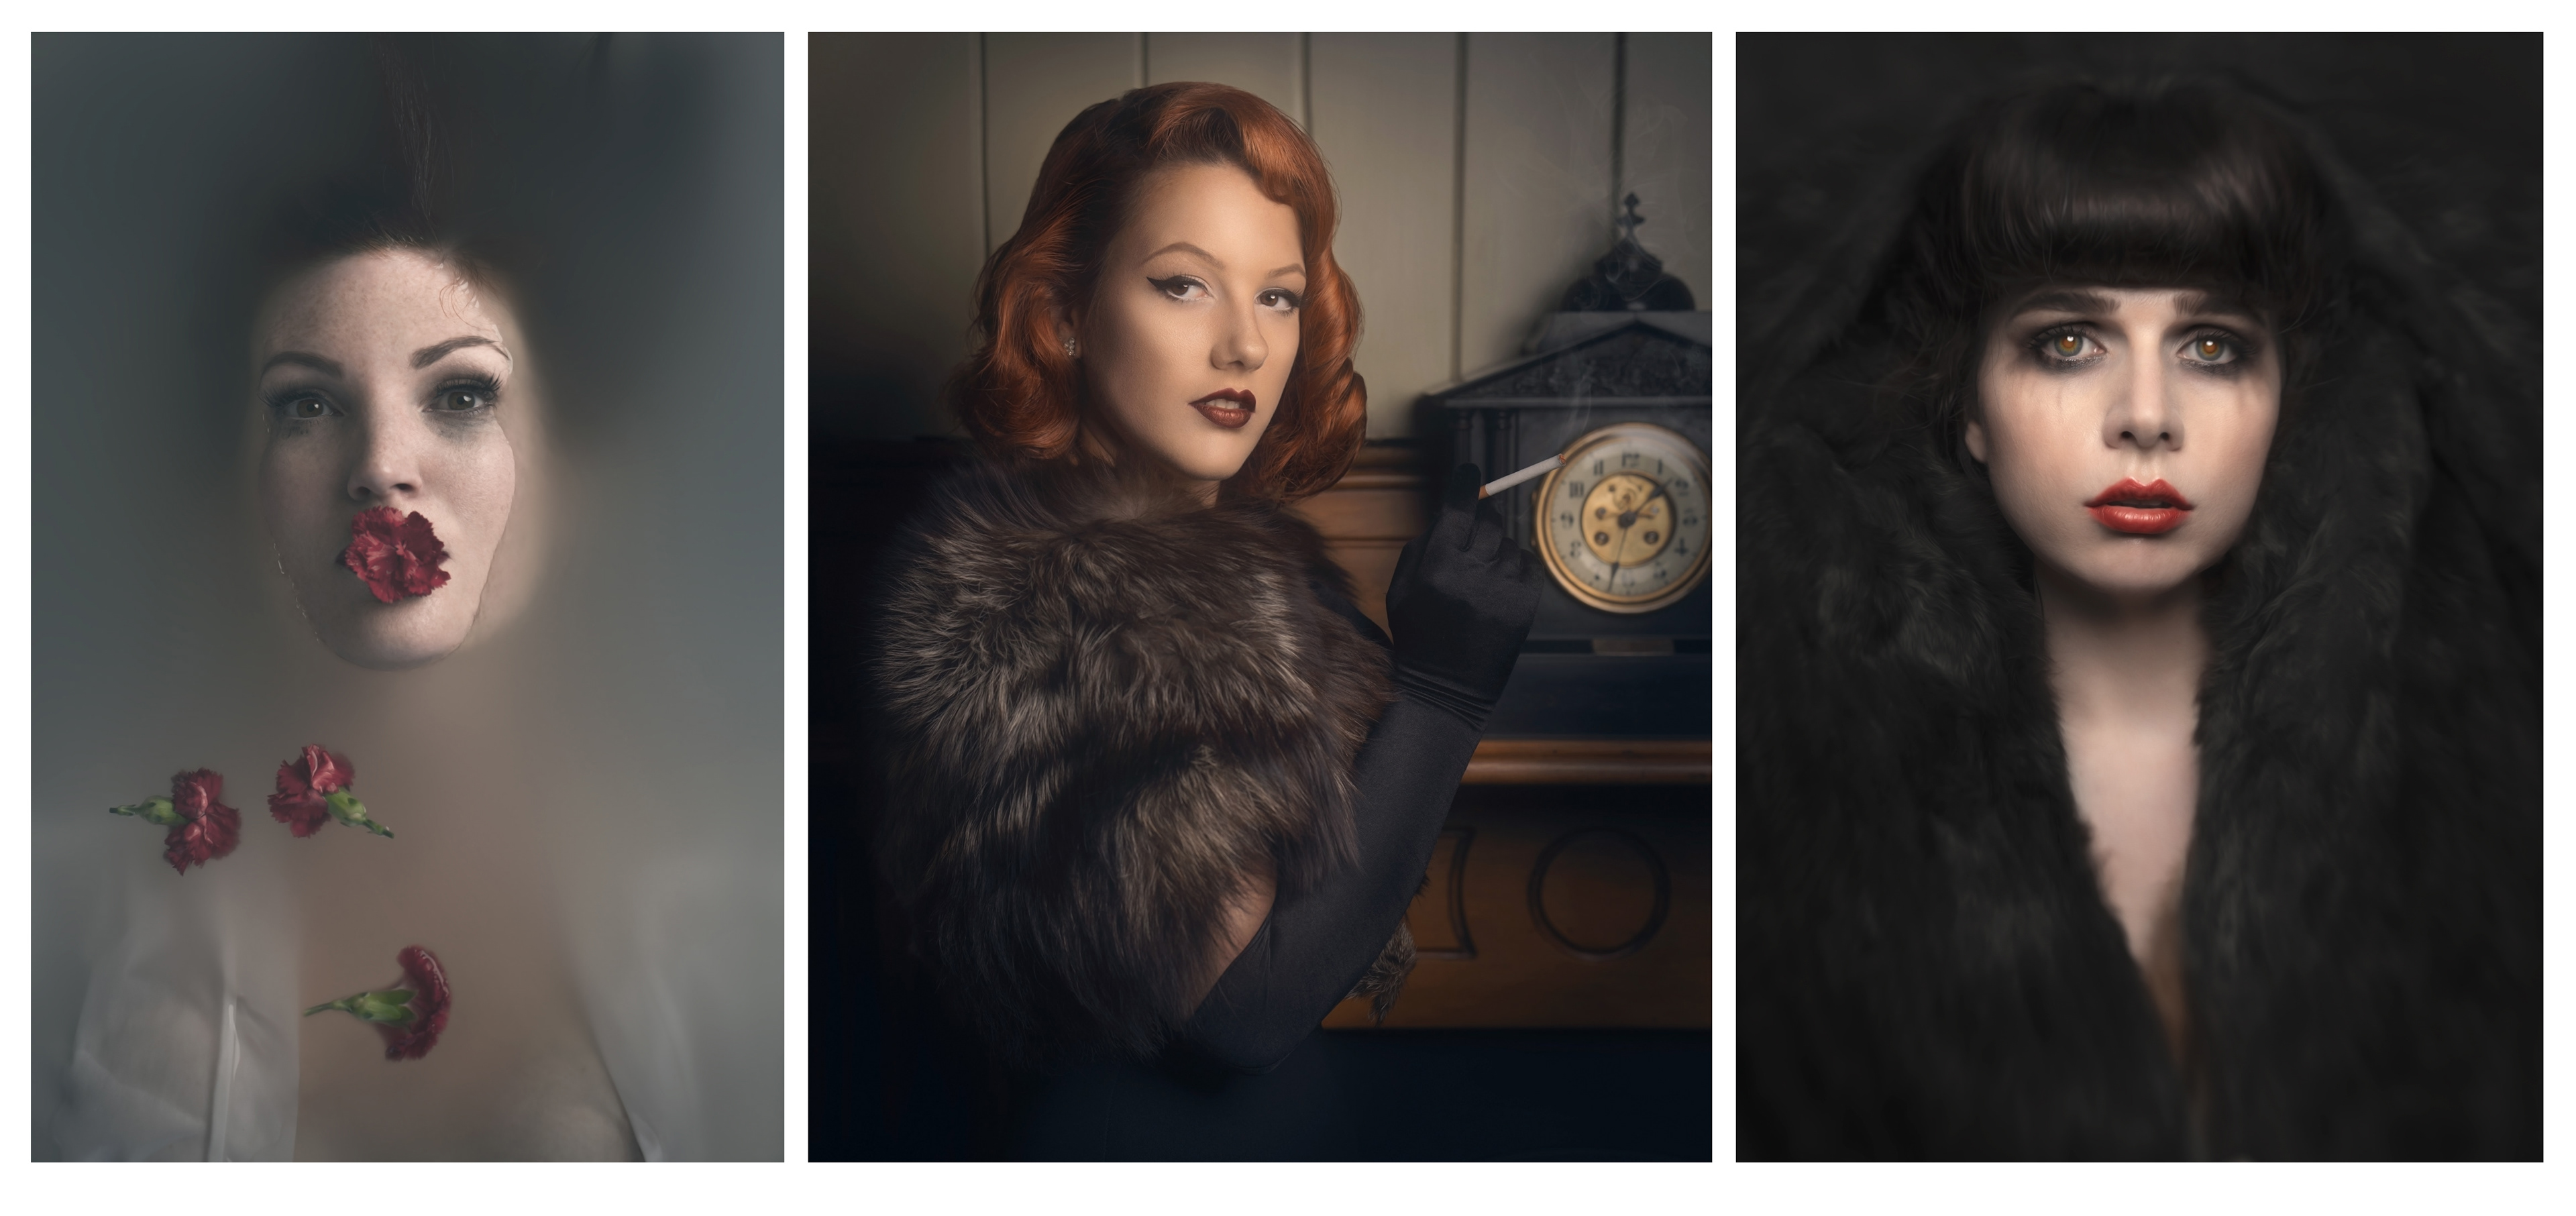
All my portraiture is captured with relatively soft light. From left to right, these images illustrate less to more contrast, created by the choice of modifier and how it was used with a single flash. Left: Large white umbrella. Centre: Deep parabolic softbox. Right: White beauty dish. Models: Natalie Thomas (@vintageaddictdiary), Marion Dollykitten (@dollykitten_marion), Emma Frances Malone (@frances.foxglove) - captured with Lensbaby Sweet 50.
Can you use any modifier with a speedlight? Yes! All you need is something called a speedlight bracket (sometimes called a speedlight grip) which has the correct mount for your modifier and will clamp your speedlight in the right place. Unless you have a very patient assistant, you’ll also need a light stand (or tripod in a pinch).
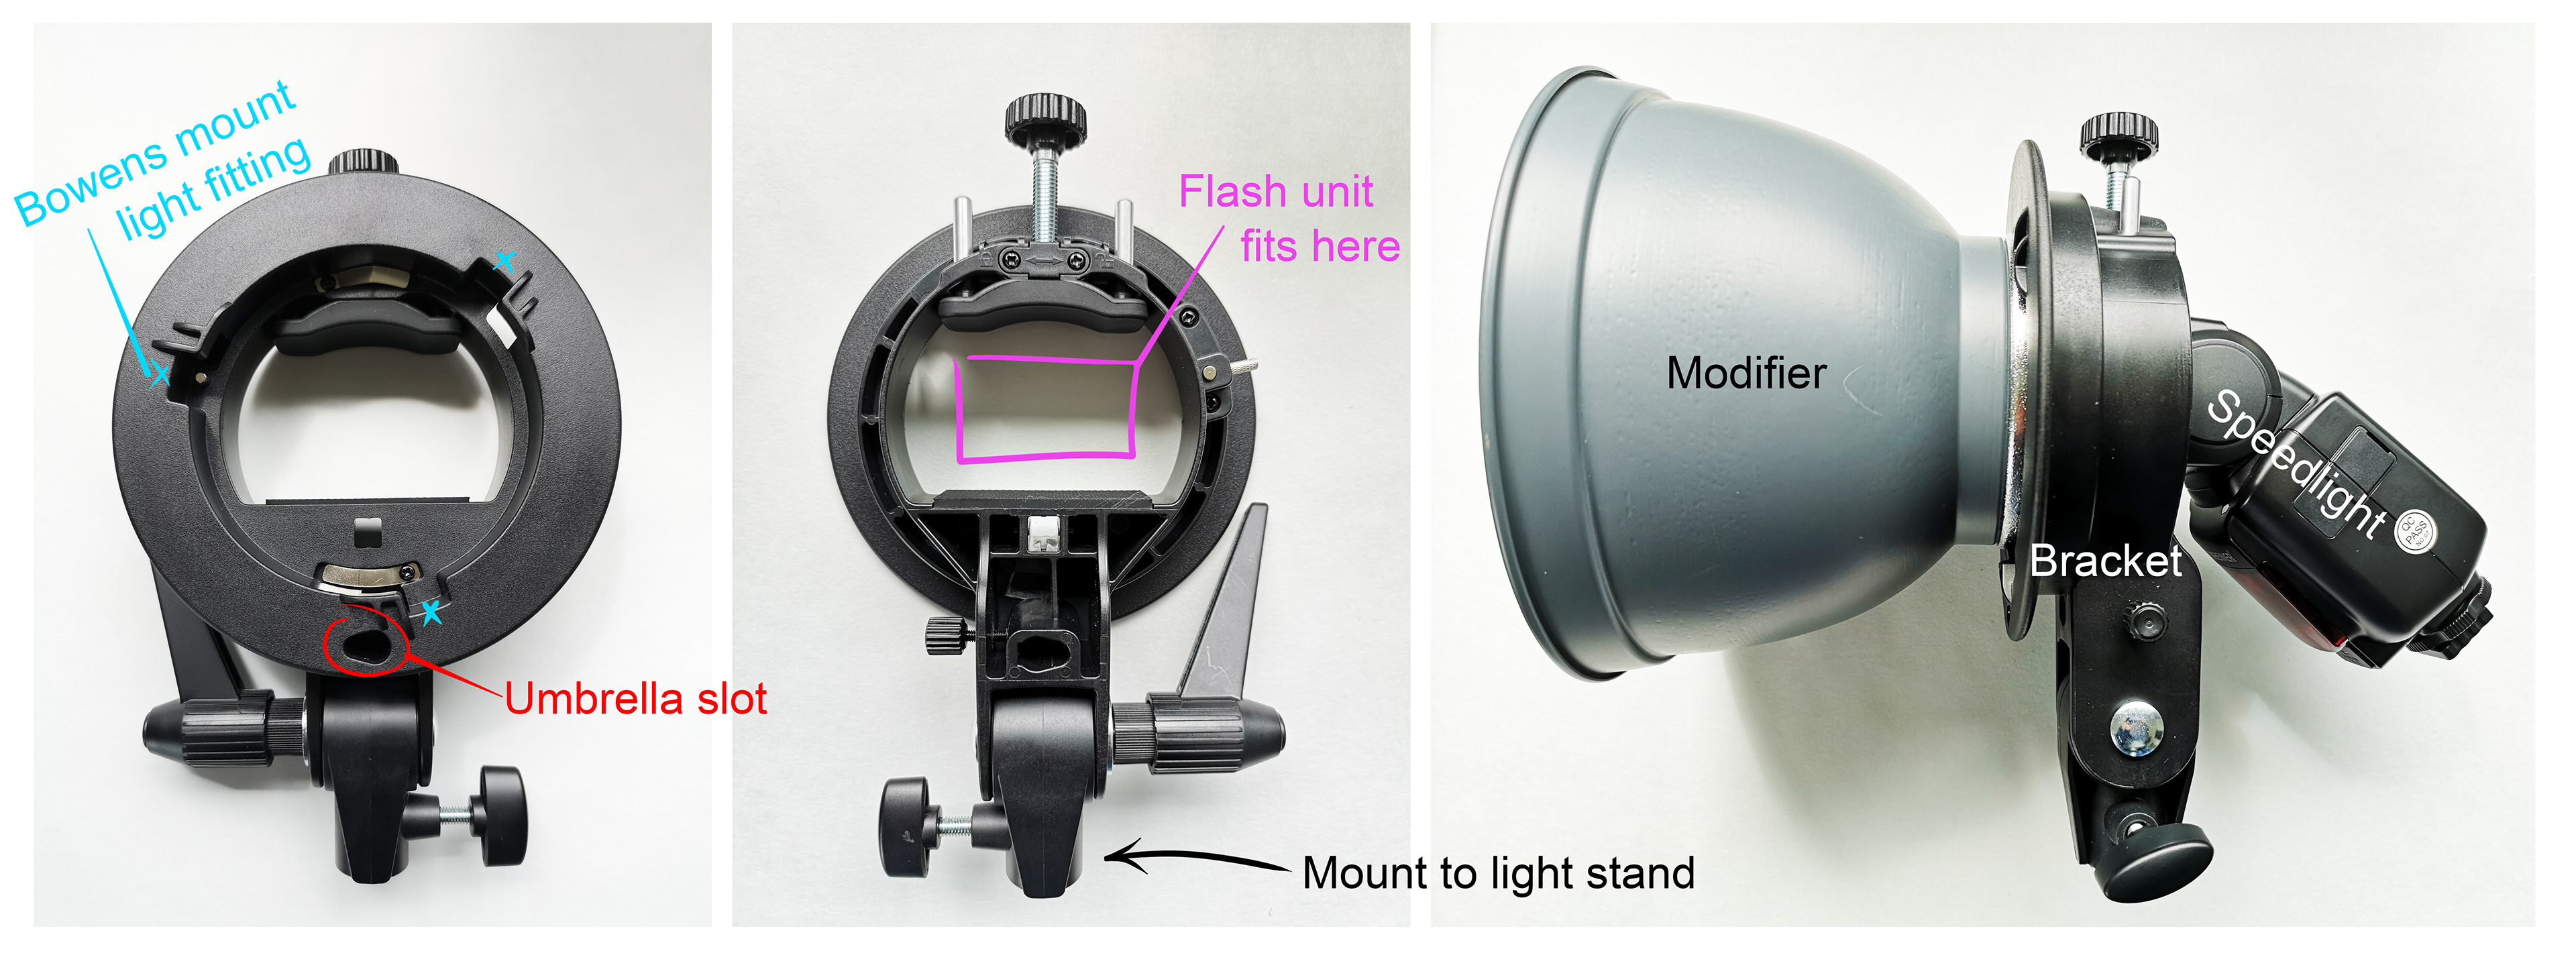
A speedlight bracket is incredibly useful for physically connecting all your gear together.
Summary
There’s so much more to say about modifiers, they really deserve their own article but unfortunately, this is my last in this series. I sincerely hope that you’ve found these ‘written workshops’ useful and of good value. I tried to choose topics that can be a bit daunting but can make a big difference to your photography. For me, improving my own knowledge vastly improves my enjoyment of an experience, and photography and all its elements is no exception to that. Through education and workshops, it is my aim to help photographers gain confidence and understanding and ultimately achieve more joy from the practice of photography.
If you’ve enjoyed these articles and want to learn more, please get in touch through my website or social media. Writing an article feels like a one-way conversation so I’d love to hear from you, just to chat, to give feedback, or anything in-between. I won’t nag you to practice like I normally do, since I’m pretty sure you’ll have got the message over the past year. I’ll just say thank you to all the readers out there. Now pick up your cameras and gear and get practising! Sorry, couldn’t help myself.