Photoshop: The software that strikes terror into the hearts of many and disgust into others. “That’s been Photoshopped!” goes the cry. I used to agree, being of the opinion that an image shouldn’t need editing if it was good enough when captured. Then I took some photography courses which included some editing and I conceded that small exposure and colour adjustments could be useful, especially when using RAW files.
Later, I took dedicated courses in Photoshop, not because I wanted to, but because it would look good on my CV. Despite myself, I became interested in compositing and creating images that I could never have captured in real life. Photoshop stopped being scary and started to be fun. I landed my current job partly because I had done the courses and, after a couple of years of constant practice, I became an Adobe Certified Expert in Photoshop CC. From where I first was to where I am now, I would have never guessed.
No doubt you’ve seen plenty of images which have been ‘overcooked’ in Photoshop. I look back on some of my old works and grimace. I think one of the best things anyone can learn about Photoshop is to know when to stop... But that’s not the purpose of this article - here I will show you how to get started . The basics of Photoshop are useful for every photographer, regardless of preferred genre or skill level. I would encourage anyone to learn Photoshop over Lightroom or similar editing programs because, one day, you might get to the point where you want to go further with your editing, and you’ll be limited with what that software can do. If instead you start off in Photoshop, you’ll never feel restricted, and you may even be inspired by the creative possibilities.
If you already have Photoshop but aren’t sure how to use it, perhaps skip to Getting Started. The best way to understand some of what I cover here may be to read along with Photoshop open in front of you. So set aside some time, grab a cuppa, and let me introduce you to your new best friend.
Why Use Photoshop?
When it comes to editing, the majority of photographers are divided between Photoshop and Lightroom, although other software is rapidly increasing in popularity. I’m not going to tell you which one to use, that’s up to you to decide based on what you want to do with your images. Adobe states that “Lightroom stays true to photography, while Photoshop lets you create the images in your mind’s eye”. Compared to Lightroom, Photoshop can perform a greater degree of edits; retouching, compositing images together, adding image filters, text and graphics if wanted, and so much more. If you’re wondering how to make your image pop, you can do the job in any editing software. If you want to remove an annoying sign in the background, edit your models’ skin without losing detail, change out a dull sky for a more interesting one, head-swap that person in a group photo who blinked, make those mountains look more impressive, change day into night, or overlay a texture… then Photoshop is for you.
Creative Cloud
Adobe now provides a subscription service which is wrapped up inside their most recent branding, the Creative Cloud. Think of the Creative Cloud as a folder which contains all of the Adobe Software. You can unlock which software you want to use by purchasing a subscription but before you purchase anything, you can download a free trial. All software; Photoshop, Lightroom, etc. is downloaded, installed and updated through the Creative Cloud. Before purchasing, take a look at the available packages because you may find a package which includes other software (even if you don’t initially want it) is cheaper than subscribing to Photoshop alone. Just because you have subscribed to the package doesn’t mean you have to have all of the included software installed on your computer. One of the positives of a subscription service is that you’ll always have the latest versions. Adobe offers updates regularly so, if you’re looking for online tutorials, try to find the most recent one or, better still, find someone (like yours truly) who offers tuition. For this article, I’m using Adobe Photoshop CC version: 22.3.1.
Getting Started
When you open Photoshop (from here onwards referenced as Ps), you are presented with a Home Screen. You must open or create a file to get into a Ps workspace with the Home Screen popping up again if all files are closed.
As photographers, we’ll primarily be opening our photographs into Ps rather than creating new files. If you don’t like the Home Screen, you can disable it so that Ps opens up straight into the default workspace and files can be opened through the regular File menu (just search online for “How to disable the Photoshop home screen”).

The Photoshop CC 'Home' screen
If your image files are saved as .jpg or .tif they will open straight into Ps. But if you open a RAW file in Ps, it will pop up in a separate window which is actually some pretty powerful software called Adobe Camera Raw. This is important software which allows you to make tweaks to the RAW file itself. Amongst other things, this is where you’ll be able to pull the most dynamic range (i.e. rescue highlight and shadow detail) from your images. Camera Raw is very similar to Lightroom and really deserves its own article but for now, have a play and see what you get. Know that those changes will be embedded into the file when you open it into Ps but don’t worry, the changes won’t overwrite your original RAW file.
At the bottom-centre of the Camera Raw window you’ll see some text with the colour space your image was captured in (sRGB or Adobe RGB), the bit depth your image will open in (8 or 16 bit), the image dimensions and MP (megapixels) and finally the ppi (pixels per inch).
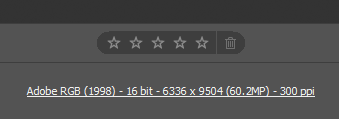
File properties as displayed in Camera Raw
This is telling you what properties your file will have in Ps when you click Open in the bottom-right of Camera Raw. If you click on this text, a dialogue box will pop up where you’ll be able to set the image how you want it. I recommend opening 16 bit images as this will reduce banding in the image caused by gradations in light or colour however, the file size will be much larger and less powerful computers may struggle. There are ways to improve the performance of Photoshop – have a search online for how to do this.
The Photoshop Workspace
It might make for dull reading but getting familiar with how Ps looks will help you navigate it and, ultimately, make it easier to use. Below is a labelled graphic naming parts of the workspace. The proportions of the panels and text will vary depending on the size of your screen. If you don’t see this layout, go to the application bar and select Window -> Workspace -> Essentials (Default). The entire workspace is contained within the ‘application frame’ which allows you to move panels and windows around and to dock them within other panels if desired. If you make a mess or accidently remove a needed panel, you can reset the workspace back to what it was (Window -> Workspace -> Reset Essentials).
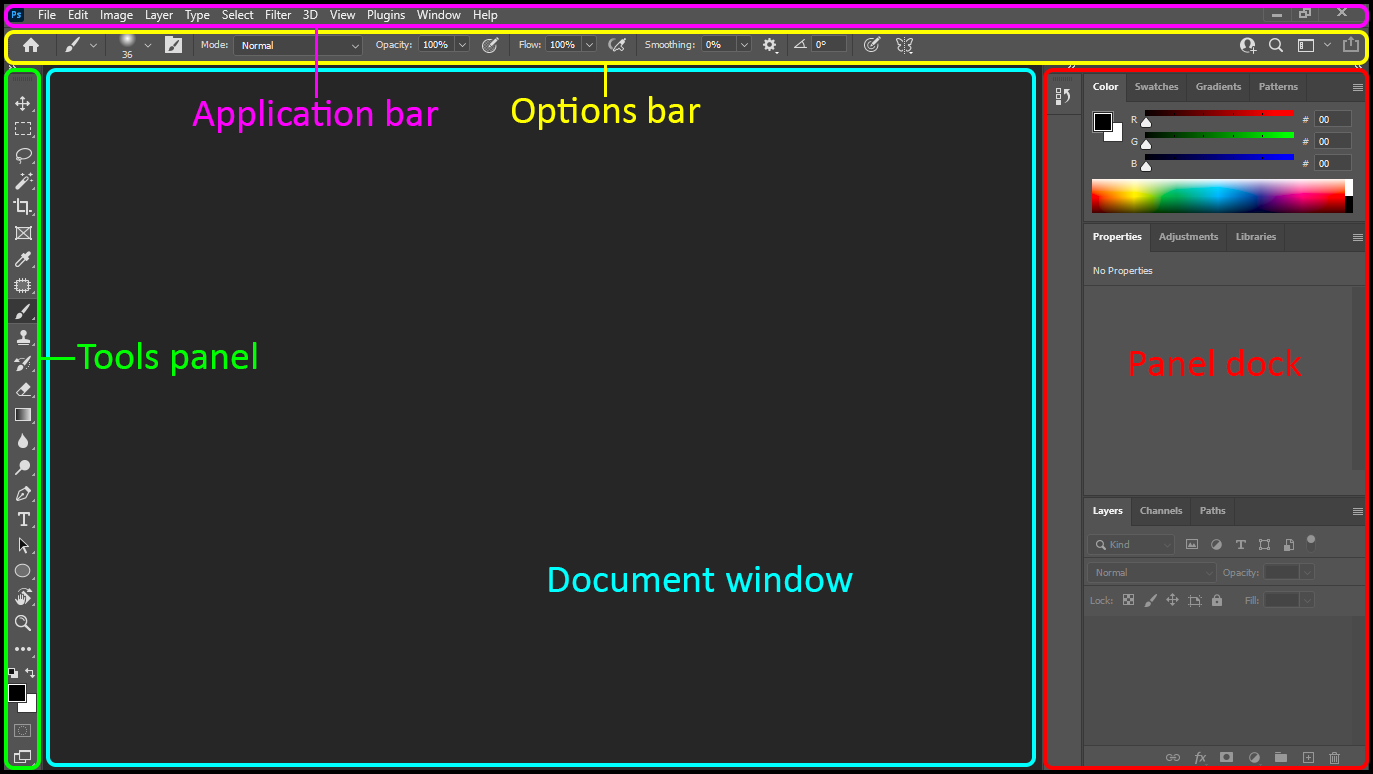
Areas of the workspace
Tools Panel: This is where you’ll find all the tools you need to be able to edit. This panel actually displays only a small selection of available tools – it can be overwhelming but, as you learn, you’ll be glad of the range. Luckily, the people at Adobe realise learning the tools can be a struggle so they’ve added a great feature: hovering the mouse over any tool in the tool bar will pop up a small, animated graphic showing what it does. Helpful! You might not have identical icons displayed on your screen to the screen shots shown here and that’s because most of these tools have a hidden range which you can access by clicking and holding on the icon until a sub menu pops up. Whichever tool you select from the sub menu replaces the current icon in the tools panel.
Options Bar: Whenever you select a tool, you’ll see a range of options appear in the options bar. This is where you can adjust and fine-tune whatever tool you’ve selected to do precisely what you want. Almost every tool has a unique set of options, piling on the already overwhelming heap of information. You can get by without knowing much about this to start with, but it is important once you get more comfortable with Ps.
Application Bar: The top menus are found within the application bar. This is where you can open and save files, edit and transform images, make image adjustments (destructively), create and alter layers, edit type, alter and refine selections, choose and apply image filters, render 3D, change the layout and view, manage plugins, customise the workspace, and find Ps help. Again, there’s a lot to take in from these menu options, but you’ll find that you use some all the time and ignore others entirely. Ps wasn’t made just for editing photos – it is widely used by graphic designers, web developers, digital artists, and many more – so lots of what it contains can (thankfully) be ignored by us photographers.
Panel Dock & Panels: Panels allow you to perform different tasks, edit adjustments and to fine tune tools. The Window menu in the application bar allows you to open new panels. Depending on what you select, the panels can appear differently, as shown in the following graphic which uses the Brushes panel as an example.
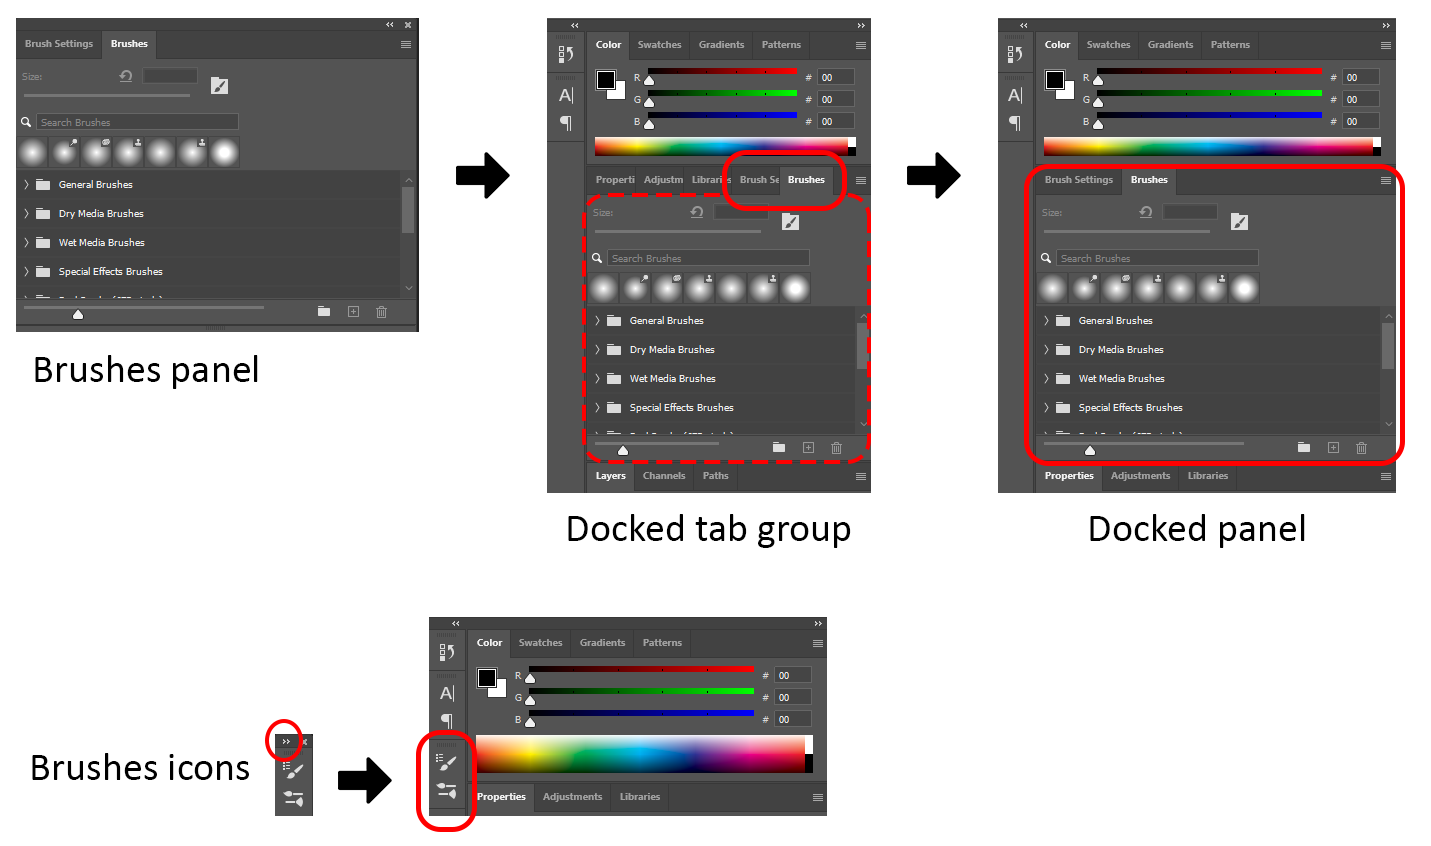
You can pull panels around to position them where you want; dock them, or collapse panels into icons by clicking the tiny double-arrow located at the top right of the panel. No matter how you customise panels within your workspace, the function remains the same.
Document Window: This is where your file appears once opened. Multiple files can be opened and you can switch between them by selecting the document tab at the top of the document window. Clicking on the x on a document tab will close the document. Clicking and dragging the document will make it pop out into its own floating window rather than being docked into the application frame as it appears by default.
Application Frame: This is frame which all other parts of the workspace dock into.
Phew! That’s the workspace covered. Now, let’s get on to the interesting stuff!
Adjustments (Part 1)
In the application bar, the Image menu is where you’ll find Adjustments. This menu contains a range of options to allow you to make tonal and color adjustments to your images. All of the adjustments in this menu are what is termed ‘destructive’ meaning they will directly alter the pixels of your image. Sounds bad, right? Well, it is. Once these adjustments are made, there is no way to independently alter or remove them without undoing any subsequent changes you made to the Ps file (RAW files are not affected). There are times when destructive adjustments are needed but I believe it’s important to work in a non-destructive way wherever possible. This means that, if you or a client changes their mind later, you can come back to the Ps file and tweak individual adjustments you made to that image without affecting any other changes you made. It may sound complicated but, trust me, it’s a much better way of working and easy once you get used to it. To do this, you need to learn about layers and masks and this is what Ps is really all about.
Intermission
It is normal to feel overwhelmed with the complexity of Ps and learning a new software. If you are, this is a great place to bookmark and come back to later. Meanwhile, have a go at opening up one of your images in Ps and try using some of these adjustments to tweak it. Yes, they are destructive, but you can still learn a lot about what they do and how to use them, all the while getting used to the look and feel of Ps. The next section in this article, History, tells you how to undo any mistakes you made. If you don’t want to work on your original image, you can work on a copy: open your photo into Ps (if Camera Raw pops up, just click Open) and you’ll see in the Layers panel, bottom right, your image will be a Background layer. Right-click this layer and select Duplicate Layer. Click OK on the dialogue box that pops up. You’ll now have a copy of your image that you can play with as you like. When you’re ready, come back and read on about Layers and Masks. I promise it’s worth it.
History
If you’ve been playing around in Ps and you’ve made some mistakes. Edit -> Undo (whatever you last did) will always be available to you but there's a faster keyboard shortcut: Ctrl - Z (Windows) or Command - Z (Mac). Press both keys together as many times as you like to undo one step at a time. If you made several mistakes or want to keep track of what you’ve done so far, you can use the History panel. This is set by default to be the top-most icon in the panel dock and is indicated by a set of 3 cubes with a curved arrow. Click the icon to see a list of your recent history.
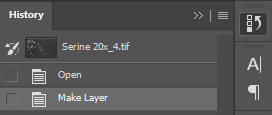
The History panel populates with every action you take in Ps but only remembers a set number of actions. It is a safety net if you make a mistake within this set number of actions.
Layers
Imagine you have a few sheets of regular plain paper, each with something different printed on them, stacked into a pile. You have made the equivalent of Ps layers. You know there are several sheets of paper in the pile but you can only see the top sheet. If you take off the top sheet, you’ll see the one underneath. That’s how pixel-based layers work (e.g. anything with a photo or image, or created using a pixel-based tool such as the paint brush).
Open up an image in Ps and you’ll see it in the Layers panel. Typically, it will be named the Background layer and it will have a little padlock next to it. This means the layer is locked. You can’t do anything much with a locked layer (options will be greyed out) so unlock it by clicking once on the padlock and the icon will disappear. The layer will now be named Layer 0. You can rename layers by double clicking on the type of the existing name. If you double click elsewhere on the layer, you’ll get the Layer Styles dialogue box which allows you to add funky effects and blending to layers (make a note to have a play with this later). To the left of the layer name is a small thumbnail image and left of that is an eye icon. Clicking on this eye icon will turn the layer on or off so you can see the layer underneath. Clicking on a layer once will highlight that layer and you can then use the icons at the bottom of the Layers panel (highlighted in the following screenshot). There are usually many ways to do the same thing within Ps, so I will just talk about my preferred methods for creating and altering layers using these icons. Again, Ps helpfully includes information on what the icons are if you hover the mouse pointer over them.

From right to left; the trash can deletes layers, the + inside a square creates a new layer, the folder icon groups layers together inside a folder, the half dark and light circle opens the adjustment layers menu, and the light rectangle with a dark circle inside creates a layer mask. The fx icon opens the Layer Styles dialogue box and the chain icon links multiple layers together so any adjustments made to one layer apply to all linked layers.
If you open two images into Ps, they will appear in 2 separate files. Click and drag the layer of the first image up towards the file tab for the second image, hold it there until Ps swaps over to the second tab, then drop the file onto the second image. Alternatively, copy-paste an image into an existing Ps document and it will appear as an additional layer. Either way, you should now have two images on separate layers in the same file. Create a new layer using the New Layer icon and you won’t see anything change on your image because the layer is blank and transparent until you put something on it. When you create a new layer, the new layer is automatically selected which means you are now working on this highlighted layer. Add some paint using the paint brush tool to this layer and it will appear over the top of the layer below. Don’t like what you did? Erase it using the eraser tool – only the paint on this layer will be erased. If you were to paint directly on your image layer rather than this new layer, it would be destructively changing the pixels and the eraser tool would erase your image as well as the paint you put down on it. The key to working non-destructively is to never alter the pixels on your original image layer by instead using additional layers to make changes and edits. Yes, you can duplicate your background layer and make destructive changes to that copy, but there are several problems with doing it this way (although many do) including doubling your file size.
Re-order layers by clicking and dragging them above or below (layers must be unlocked). To reposition a layer, use the move tool and click and drag the image. Edit layer size or rotation by selecting the layer then clicking Edit -> Free Transform and then play around with the toggles on the image, press the enter key when finished. If you have several layers, Ps may get confused about which one you want to move, so it’s sometimes easier to move them when using Free Transform.
Masks
Open two images and drag-drop one into the same file as the other so there are 2 image layers (or copy-paste). With the top layer selected, click the mask icon and a solid white square thumbnail will appear linked to your layer in the layers panel. The most important thing to remember about masks is that white shows and black hides. Think of it like have a light turned on to see (white) or off so you can’t see (black). The top layer will be currently entirely visible because the thumbnail shows all white. Click on the mask thumbnail to select it, choose the paint brush tool and change the foreground color to black (see screenshot below) – now paint on the top image to hide parts of it. Why would you do this instead of erasing it? One reason is because you can bring it back if you change your mind or make a mistake – just paint with white. Magic! You can do this the opposite way too – invert the entire mask by first clicking on it to select it, then go to Image -> Adjustments -> Invert. The mask will invert from white to black and be hidden. You can paint to reveal areas by painting white. If you see paint on your image, you may be painting on the layer rather than the mask – make sure to click on the mask to select it before painting.
The highlighted area in the Tools panel is where brush colours can be selected by clicking on the square color panels (foreground and background). Clicking on the tiny black and white duplicate panels above the foreground and background colors resets the colors to white and black. Clicking the tiny arrows swaps the foreground and background colors. Painting with the brush tool always uses the foreground color.
Masks can become as complicated as you want to make them but I just wanted to introduce you to the concept here. Layers and masks are the basis of image compositing – have fun experimenting with overlaying one image on top of another and blending it in using masks.
A top tip for blending using masks and the brush tool is to adjust the Opacity or the Flow of the brush. You’ll find these settings, amongst others, in the Options bar when you have the brush tool selected. Lowering the opacity is effectively like watering down your paint whereas lowering the flow will effectively be like reducing the amount of paint on your brush. Use one or the other at first and try using a setting of just 10% to blend an image using a mask.
Adjustments (part 2)
Are you ready? This is where we combine all we’ve learned so far about layers and masks in order to effectively use Adjustment Layers. You can see a list of available adjustment layers when you click the light/dark circle icon in between the mask icon and the folder icon at the bottom of the layers panel. Conversely to the destructive adjustments you can find in the Image menu, adjustment layers are non-destructive because they create a new layer for each adjustment. It may seem like a lot of unnecessary faff to make adjustments this way but, trust me, you’ll be glad you did. Adjustment layers, no matter how many you use, do not increase your file size. However, masks do, as do new layers with pixel data. All adjustment layers come with masks so you can refine where you would like the adjustment to be in your image if you want to. Note that you must have the correct layer selected to show the adjustment properties. Clicking the mask will show adjustments for the mask rather than properties for the adjustment layer – it’s very easy to be caught out this way! Unfortunately, Ps is full of picky little things like this which help to throw off new users. If you’re editing in Ps and something isn’t working the way it should, try to step back and work through it logically, starting by checking you have the correct layer selected.
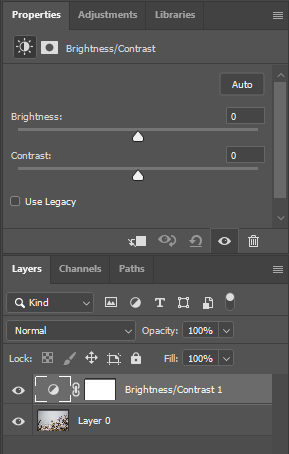
The Brightness/Contrast adjustment layer was selected – you can see it has appeared as a new layer above Layer 0 (background) and that it has a white thumbnail, indicating a mask. The Properties panel above the Layers panel shows where you can make the selected Brightness/Contrast adjustments.
Differing from pixel-based layers, most adjustment layers are transparent. You can use several adjustment layers and still see pixel-based layers below.
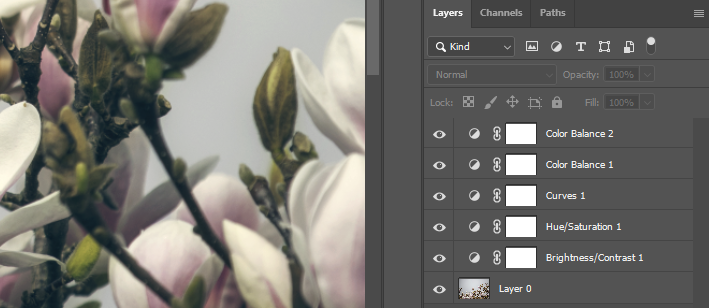
Even though there are multiple visible adjustment layers used in this file, the pixel-based layer (Layer 0) is still visible, showing all of the adjustments made to it cumulatively.
Blend Modes & Opacity
Going back to our stack of printed paper analogy - imagine that the top print is on a transparency instead of plain paper. You can see some details of the below image through the print and you can move it around until you’re happy with the overlapping composition. Next, imagine placing the stack of prints onto a light box and observe the image shining through from underneath. Both these examples are very similar to what some Blend Modes do.
You can safely ignore a lot of things in the Layers panel when starting off. All you need to do to set a Blend Mode is choose one from the drop-down menu which by default is set to Normal. You’ll need more than one layer to see the effects of a blend mode since it uses properties of the selected layer and the one below to display the resulting blended image.
You’ve probably seen lots of images making use of blend modes – blending images with portraits has been very popular, sometimes termed double exposure portraits because they can have a similar look to a traditional double exposure. Try it yourself: load 2 image layers into a single Ps file as before and change the blend mode on the top layer. Try out each blend mode to see what it will do. The result each blend mode gives depends a lot on the content of the image and the one below, so it’s always a good idea to try each blend mode in turn when trying to achieve a specific look. The most popular blend modes for ‘double exposure’-look images are Multiply, Screen, Soft Light and Overlay.

An example of how using blend modes can affect an image. Here, the bokeh texture layer was set above the portrait layer and the blend mode was changed to Screen. Model, makeup and styling by Laura Macdonald (@miss_powdered_primrose)
Sometimes the best way to blend an image with another is simply to lower the opacity. The option to change the opacity of a layer can be found next to the blend mode in the layers panel and is set by default to 100%. Lowering the opacity can help make a composite more believable or achieve a faded effect. This is also a great way to tone down an adjustment layer if you feel it is too strong. Many fine-art works are finished by adding a texture layer set to a low opacity to give the image the feel of an old painting.
Saving Files
Once you’re finished editing, save your file using File -> Save As. If you want to keep editing and save all your layers, it's best to save as a Photoshop file (.PSD), but that this can only be opened by Adobe software and the files are large. You can also save all your layers by selecting a .TIFF if you prefer, but these files tend to be even larger (though they can be opened in more software). Saving as a .JPEG will effectively merge all your layers together, flattening them into a single file. This will compress your image and there will be a slider for you to select the appropriate quality according to the file size you want to achieve. For images I want to use on the web, I use File -> Export -> Save for Web (Legacy). This converts my file to an sRGB colour space and to 72 dpi, ideal for online use. I can choose a .JPEG file type, set the image size and adjust the quality as well as see the predicted file size change in real time using this method. .JPEG files are ideal for every-day and digital use but most good printers will expect .TIFF files at 300 dpi.
Summary
This article contains all the knowledge you need to get Photoshop setup and to start playing. Experimenting with what Photoshop can do can be extremely rewarding and can elevate your images to the next level. It will also help you get used to the look and feel of Photoshop until it doesn’t feel all that intimidating any more.
I’ve given you the very basics of compositing images together – start off simple and work your way up. With so much to learn, it’s easy to forget what you did, so consider keeping notes on what you tried and how you did it and get into the habit of naming your layers with what you used or what they contain, like the example below. Don’t be put off by the apparent complexity of what’s going on in this image – this is an example of my personal workflow and looks more complicated than it actually is.
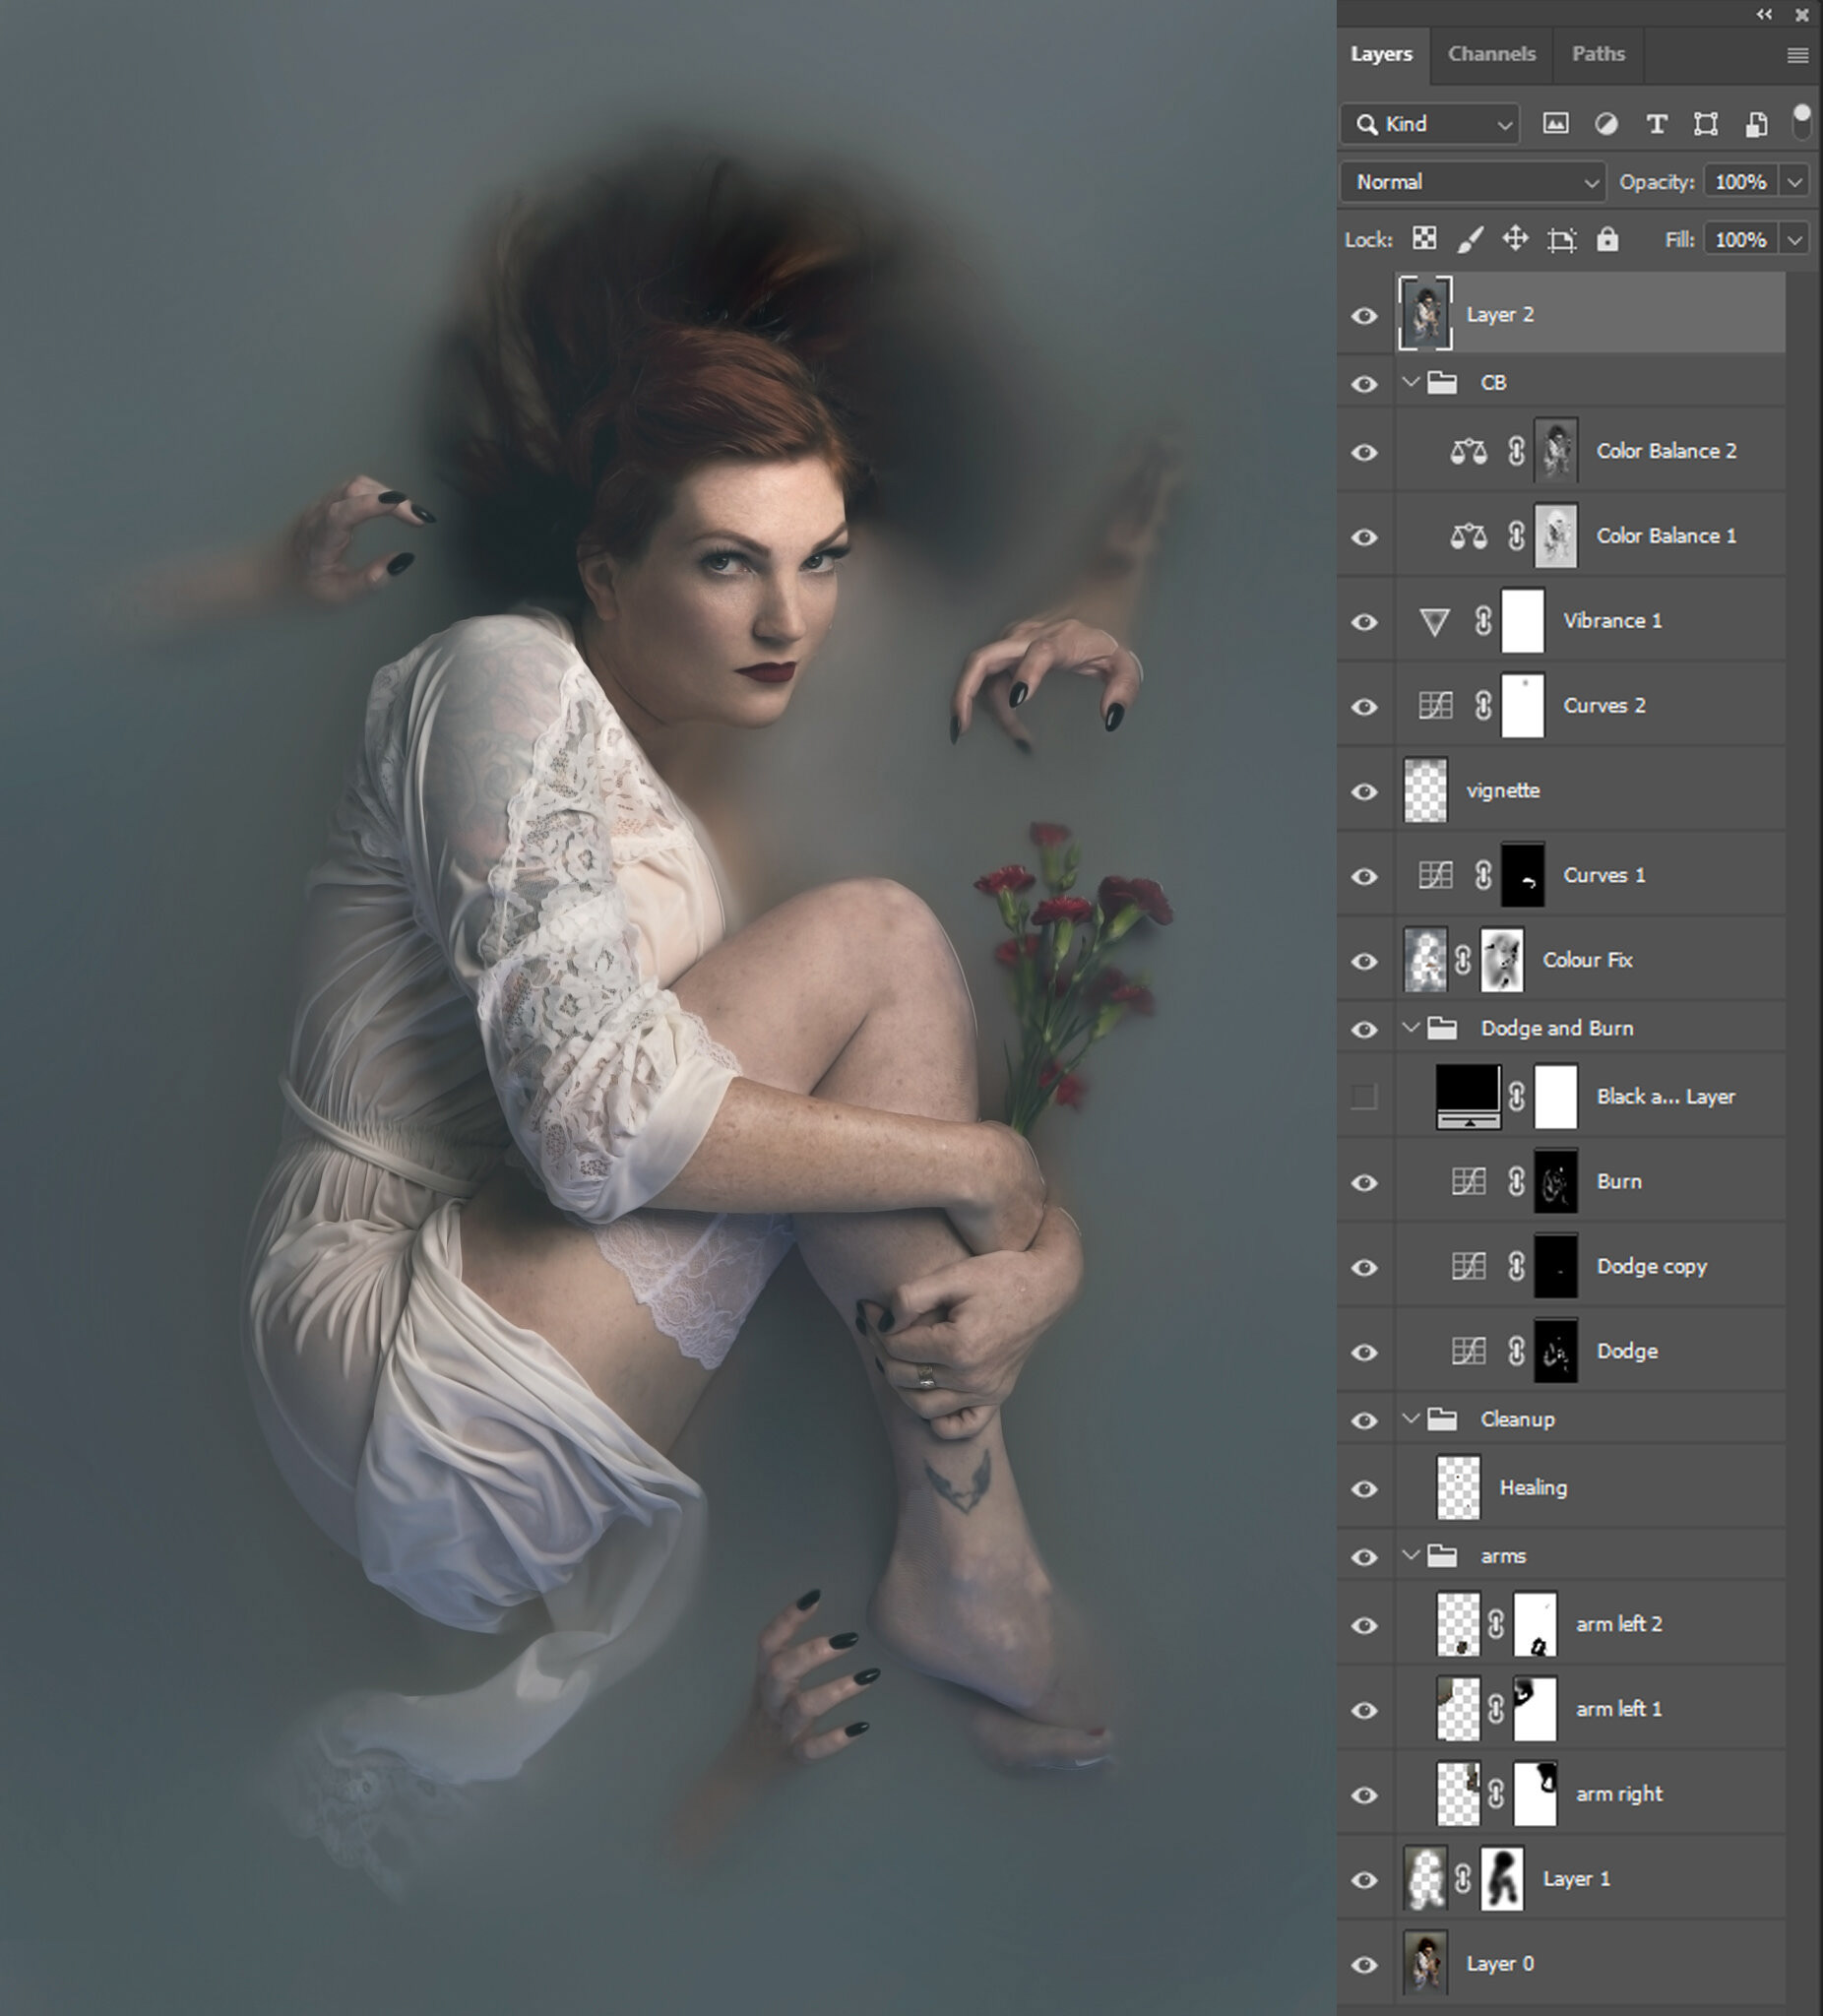
A screenshot showing the layers used to create one of my works. You can see the original, pixel-based layer at the bottom (Layer 0) and one more pixel-based layer at the top (Layer 2) which is all layers, merged, as the final image (shown). Adjustment layers and masks are an essential part of my Photoshop workflow. Modelled by Natalie Thomas (@vintageaddictdiary) with assistance from Laura Macdonald (@miss_powdered_primrose) and Viviane Castro (@misscherryseptember)
Don’t give up and remember that you don’t have to struggle alone – Photoshop is such a popular piece of software that there are no end of resources to help you learn; magazines, YouTube tutorials, online courses, and I also offer personalised tuition.
I can honestly say that learning Photoshop has been the most important factor in my personal development as a photographer. So get those files off your camera memory card and into Photoshop and practice, practice, practice!