Natural light can be the most beautiful form of light under the right conditions but, most of the time, it’s not quite as simple as heading outside and snapping a photo. Our strong New Zealand sunlight often results in less than flattering results for portraiture – shiny skin, harsh shadows. You could wait for an overcast day when the sun is hidden behind clouds but, whilst this lighting won’t give your subject harsh shadows, it doesn’t allow much contrast and is quite flat.
These two examples are the exact opposite of each other; what is known as ‘hard light’ e.g. direct sunlight, and ‘soft light’ e.g. an overcast day. You can tell the difference by looking at the transition between light and shadow. Very little or no transition is hard light, whereas a gradual transition is soft (or at least softer) light. Soft light is much more commonly used for portraiture as it is typically more flattering, especially for anyone with blemishes, wrinkles, or shiny skin. Despite this, hard light shouldn’t be overlooked though it can be more difficult to work with and you might need to do more post processing. Because of the look of hard light, you may feel you can’t capture a good portrait in bright sunlight. In this article, I want to share several tips and tricks I’ve found for using any kind of daylight for portraiture, including (and especially) bright sunlight.
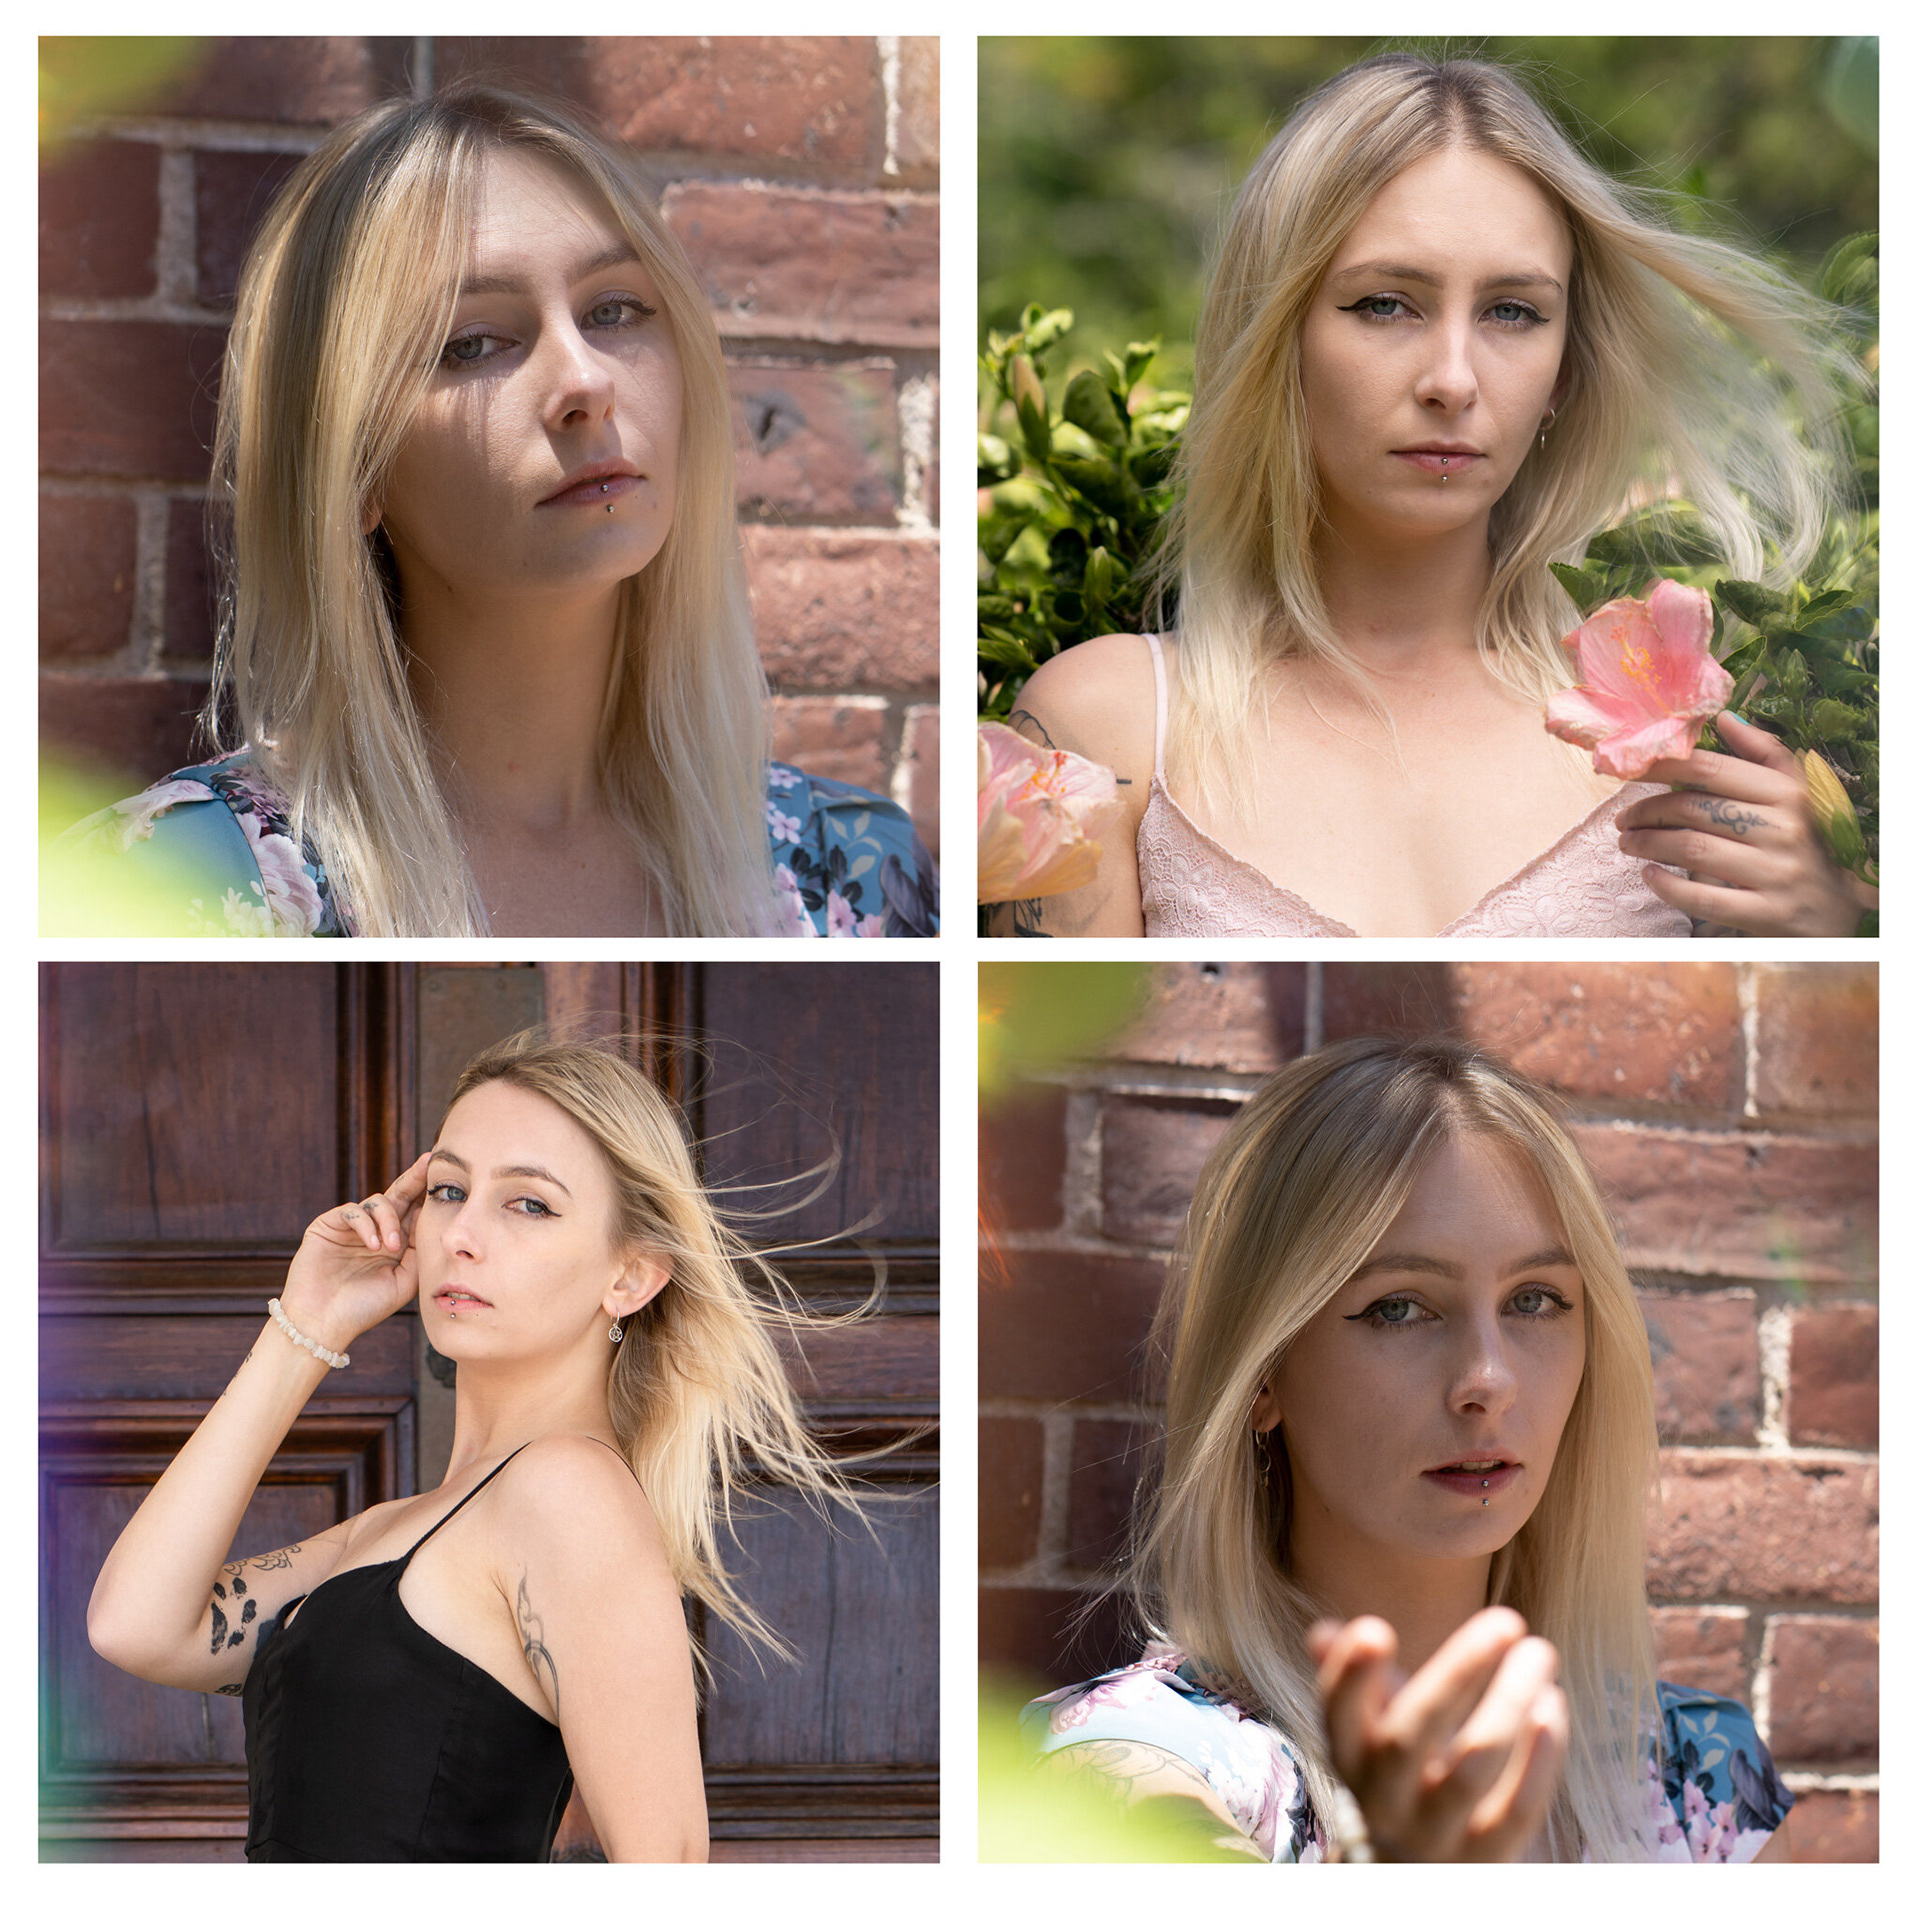
Comparison of light (unedited photos). Top left: Hard light. Top right: Soft, diffused light. Bottom left: Flat light. Bottom right: Shade. Observe the difference in the transition of light to shadow on the model’s cheek between the top left and top right images (hard vs soft light). See how diffused lighting retains shadows and depth in the model’s face compared to flat light and how muddy the image shot in shade looks compared to the others. Model: Monnie Jay (@monnikat)
The humble reflector
If you search online for how to photograph people in bright sun, one of the most common responses is to move your subject into shade. Whilst this will avoid the pitfalls of harsh light, it is a bit boring and you may as well have stayed indoors. Shaded areas don’t offer much contrast or depth to the lighting and can even cause your auto white balance to take on a blue or green tint, making skin tones appear muddy. To make your subject pop in shade, you need to introduce some light via either a reflector or a flash. Every portrait photographer should own a 5-in-1 reflector. They’re cheap, compact, and oh-so versatile. This is where you go and check the back of ‘the photography cupboard’ to dig out and dust off the reflector you bought all those years ago but never used. Hint: if it’s really old, open it up outside as they can go flakey!
The 5-in-1 reflector has a reversible zipped cover with silver, white, gold and black sides and the cover fits over a collapsible frame with diffusion cloth. They come in a range of sizes and shapes – a large reflector will be a softer light source than a small reflector but can be more difficult to handle. You probably know all this already, so here’s a handy table with more information that perhaps you weren’t aware of.
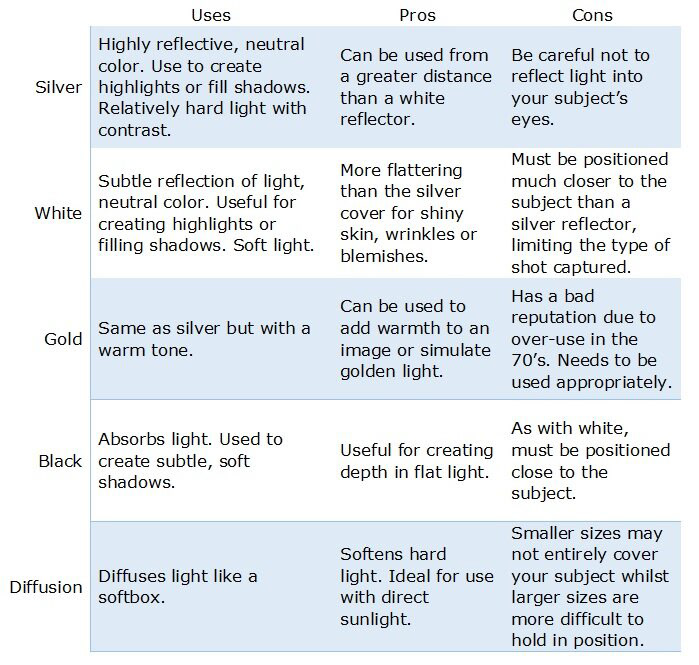
As well as the uses above, a reflector can be used as a plain background in a pinch, a ‘flag’ (something that blocks light), a windbreak or I often use mine to create a breeze to give movement to hair (I call it wafting the model). Of course, all these things are much easier if you have a second pair of hands, but you could (and I do) just clamp a reflector to a stand or tripod.
There is a right way and a wrong way to use a reflector to light your subject. Put simply, never angle your reflector to bounce light upwards. This creates a Halloween-horror look, similar to holding a flashlight under your chin. Shadows are in the wrong place and catchlights are in the bottom of the eyes. We are so used to the sun being above us and angling shadows down that the opposite does not sit well with our brains. Instead, the reflector should be above our subject, bouncing light downwards. But where exactly should you hold it? Look at your photos: a good rule to follow is that the main catchlights should be visible between 10 and 2 in your subject’s eyes. As with anything, there are exceptions to this rule, but this would be if you’re using multiple light sources for a more complicated setup (or if you ask your model to pose upside down… speaking from experience).
Diffusion – Softening light
When you use a diffuser with a strong light source, it softens that light. Clouds are nature’s diffuser for the hard light of the sun. Lighting modifiers employ layers of diffusion fabric, just like the fabric on the 5-in-1 reflector without the covers. You can also use sheer curtains, a white bedsheet, a frosted window, etc., to diffuse light. Have you ever noticed how soft the light is in bathrooms? You will now!
Diffused light is not as intense as direct light, gives no glare and is scattered/less directional. When you use a diffuser to soften bright sunlight, you will need to increase your exposure compared to shooting in direct sun because you are reducing the intensity and direction of that light. How is this different to photographing in shade? Firstly, you can position your subject wherever you want and aren’t limited to where the shade is. Secondly, I much prefer the look of diffused bright light vs shade. It has more color, warmth, brightness and still has soft highlights and shadows which are not present in shade. Saying all that, if you have a group of subjects to photograph in the middle of a bright day, your best option is probably going to be to shove them into a big area of shade!
Photographing in natural light doesn’t mean you always have to have your subject standing in the sun. Some of the most beautiful, soft light can be seen through a window or in a sheltered area with smooth, light-colored walls. You can test just how reflective a wall is by placing your hand up to it and watching the change in light as you move it closer/further away. Think of the wall as being a huge, white reflector. You can use this by asking your subject to stand next to a wall, lean against it or position them in a space surrounded by light-colored walls. You can create this look in a studio by using something called a v-flat which is simply a pair of large, rigid, rectangular sheets joined together in a hinge so they stand up in a V or L shape. Just be careful your lighting doesn’t become too flat. Rotate your subject around and watch how the light changes on their face. Make shadows by introducing a flag (blocking light) or the black side of a reflector or add/enhance some in post-production.
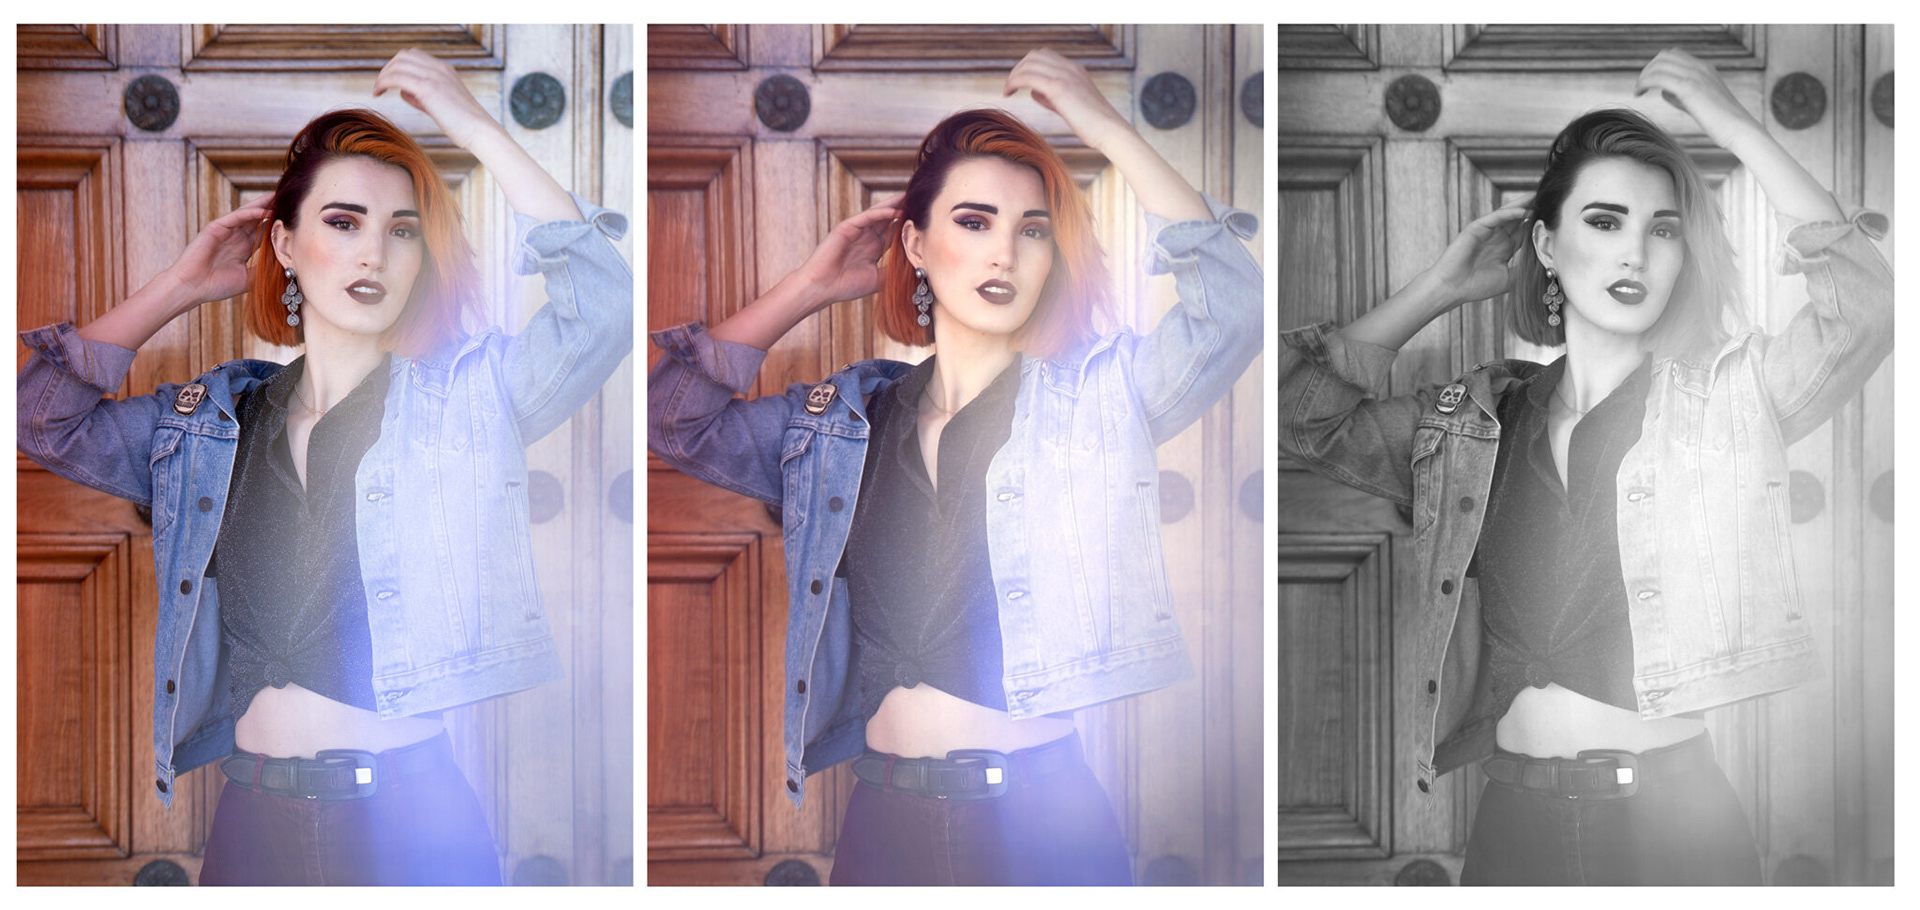
Left: Straight out of camera. Middle: Processed image. Right: Black and white conversion of processed image. For this image captured in flat light, I have added contrast, color and shadow in post-processing to create depth and contour. You can see this more clearly in the black and white conversion without the distraction of color. Model: Eleanor Oxley (@ele.in.wonderland)
Utilizing window light can give amazing results. Generally, window light is very soft and diffuse, typically half the brightness compared to outside, so you will need to adjust your settings to compensate. You can diffuse it further if you wish, as mentioned above. Because it is much less bright, you may find you need to increase your ISO quite a bit, especially if you only have a small window relative to the space you’re in. This can result in a quality to the images reminiscent of film. Window light tends to fall off quite quickly, meaning you will get deep shadows and dark backgrounds, particularly where you are using just one window. This can make for some wonderfully moody portraits and still life images. In addition, window light tends to have a ‘painterly’ quality because this is what was used by many well-known artists when lighting their subjects.
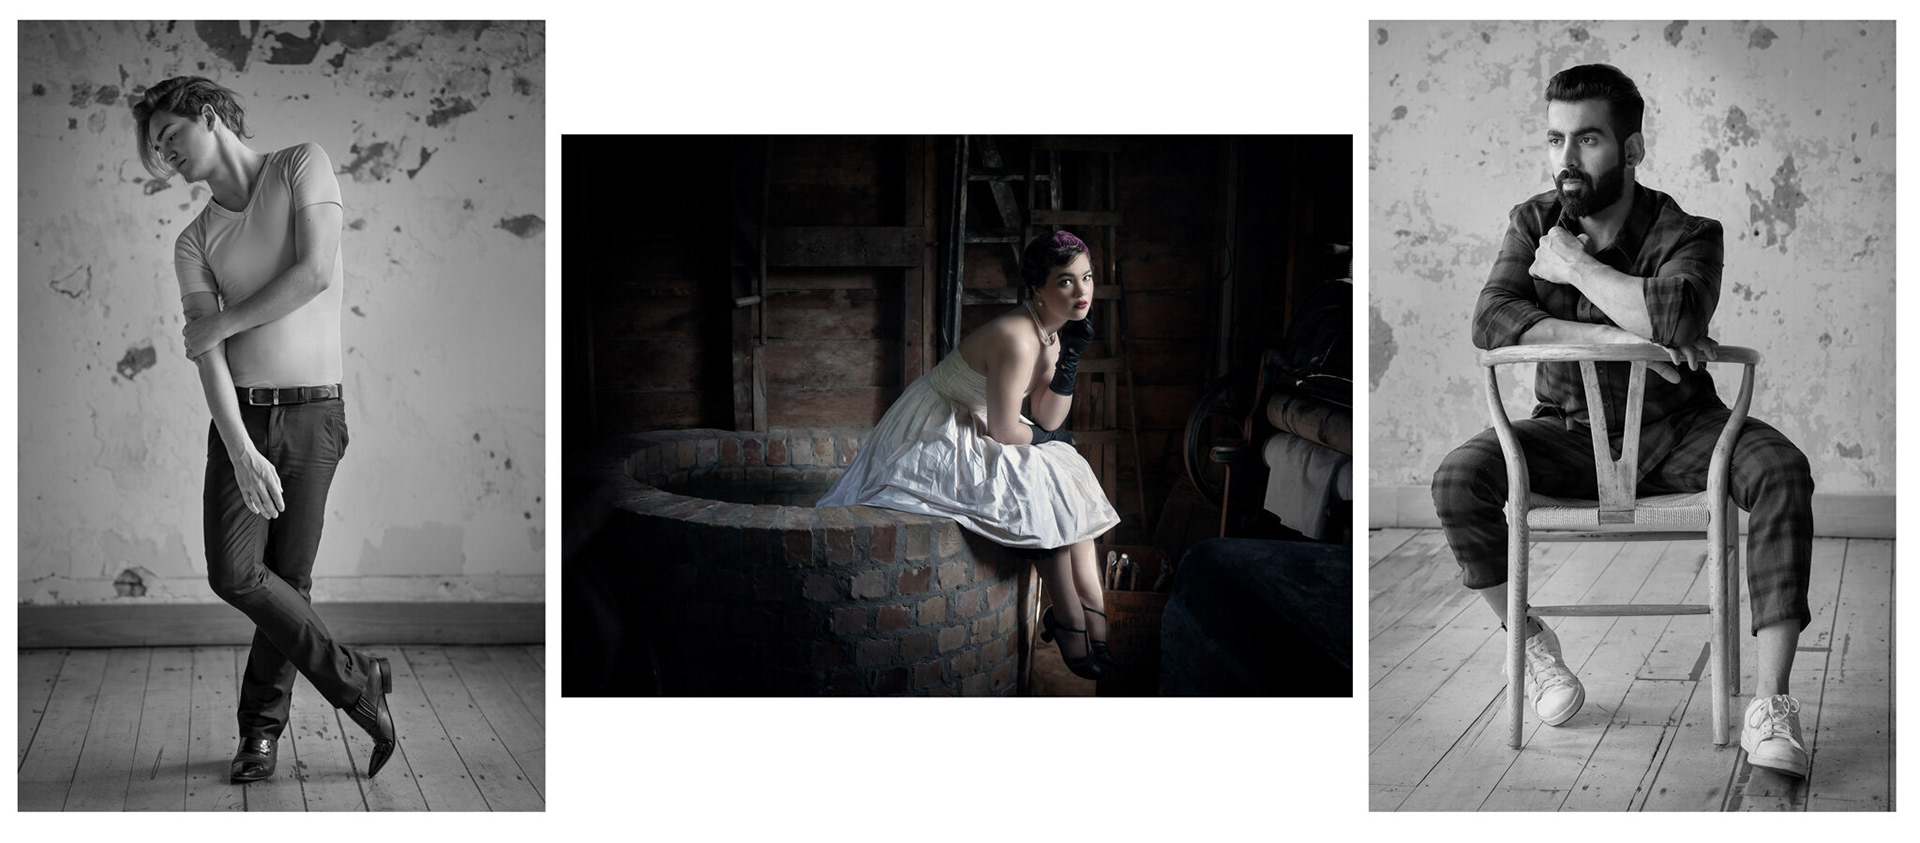
Left & right: This room was flooded with light from multiple windows on the same wall, lighting both the model and background. Middle: Here the model and environment are lit from a single window. Models: Liam du Preez (left @liamdupreez), Anita van der Mespel (middle @thewildlifeofme), & Ishant Ghulyani (right @ishant_ghulyani).
You can position your subject a few steps back from the window, putting yourself in between them and the window (without blocking the light) and this will light your subject most broadly. Vary the look by moving your subject closer or further away from the window, turning them, changing your own position and angle, and filling in shadows with a reflector. Filling in shadows and to what degree is completely dependent on personal taste and the intention for the image but be careful not to fill your shadows so much that they are no longer shadows. If you have several windows on different sides of your room, experiment with controlling the light by selectively closing curtains or blinds. You can also create a strip of light by not closing them all the way. Even direct sunlight shining in through a window can be used to creative effect – see the creative lighting section in this article.
Backlighting – Shooting into the light
When the sun is at a lower angle in the sky, you can position your subject with their back to it so that you are shooting into the sun. This creates what is called a backlight effect. You’ll notice your subject has light wrapping around them, creating a rim of brightness. Exposing for the bright background will make your subject very underexposed so you need to light them separately, either with a reflector or other light source. Placing this slightly to one side will help to create shape to your subject as opposed to placing it front-on. Otherwise, you can expose the shot as a silhouette.
Left: Backlighting from the sun creates a rim of light around the subject, separating her from the background and casting a long shadow. Middle: Strong sunlight on the white wall has a similar effect to a backlight. Right: Backlighting using a window with natural light bouncing in to fill shadows. Model: Anita van der Mespel (@thewildlifeofme).
You can even experiment with creating flare and sunburst effects when using backlighting. Simply position your subject so that the sun is slightly peeking out from behind them. A higher f-stop in this situation will create a sunburst effect (variable depending on the number of aperture blades in your lens) whereas a lower f-stop will create more of a hazy effect. Modern lenses are fastidiously manufactured and coated in order to specifically avoid lens flare but you can increase the chances of getting one by removing your lens hood and playing around with the angle you’re shooting at. There are also tools like the OMNI filter system by Lensbaby designed specifically to generate lens effects or the Black Pro-Mist filters by Tiffen which create a hazy look. Another way to get lens flare is to use a vintage lens with an adapter as these don’t have the anti-reflective coatings in modern lenses (and now you have an excuse to go op-shopping).
You can also photograph a subject backlit indoors by positioning them in front of a bright window. Instead of using a reflector to light your backlit subject, you could use a flash. I’ll be talking all things flash in a later article but, for now, try experimenting with the pop-up flash on your camera if you have one. If it’s not bright enough, move closer to your subject. If the light is too hard or bright, try diffusing it with a piece of baking paper attached with a rubber band. You can also get some subtle color effects by using color gels on your flash (and now you have an excuse to buy those chocolates that are wrapped in colored cellophane).
Creative lighting – manipulating light
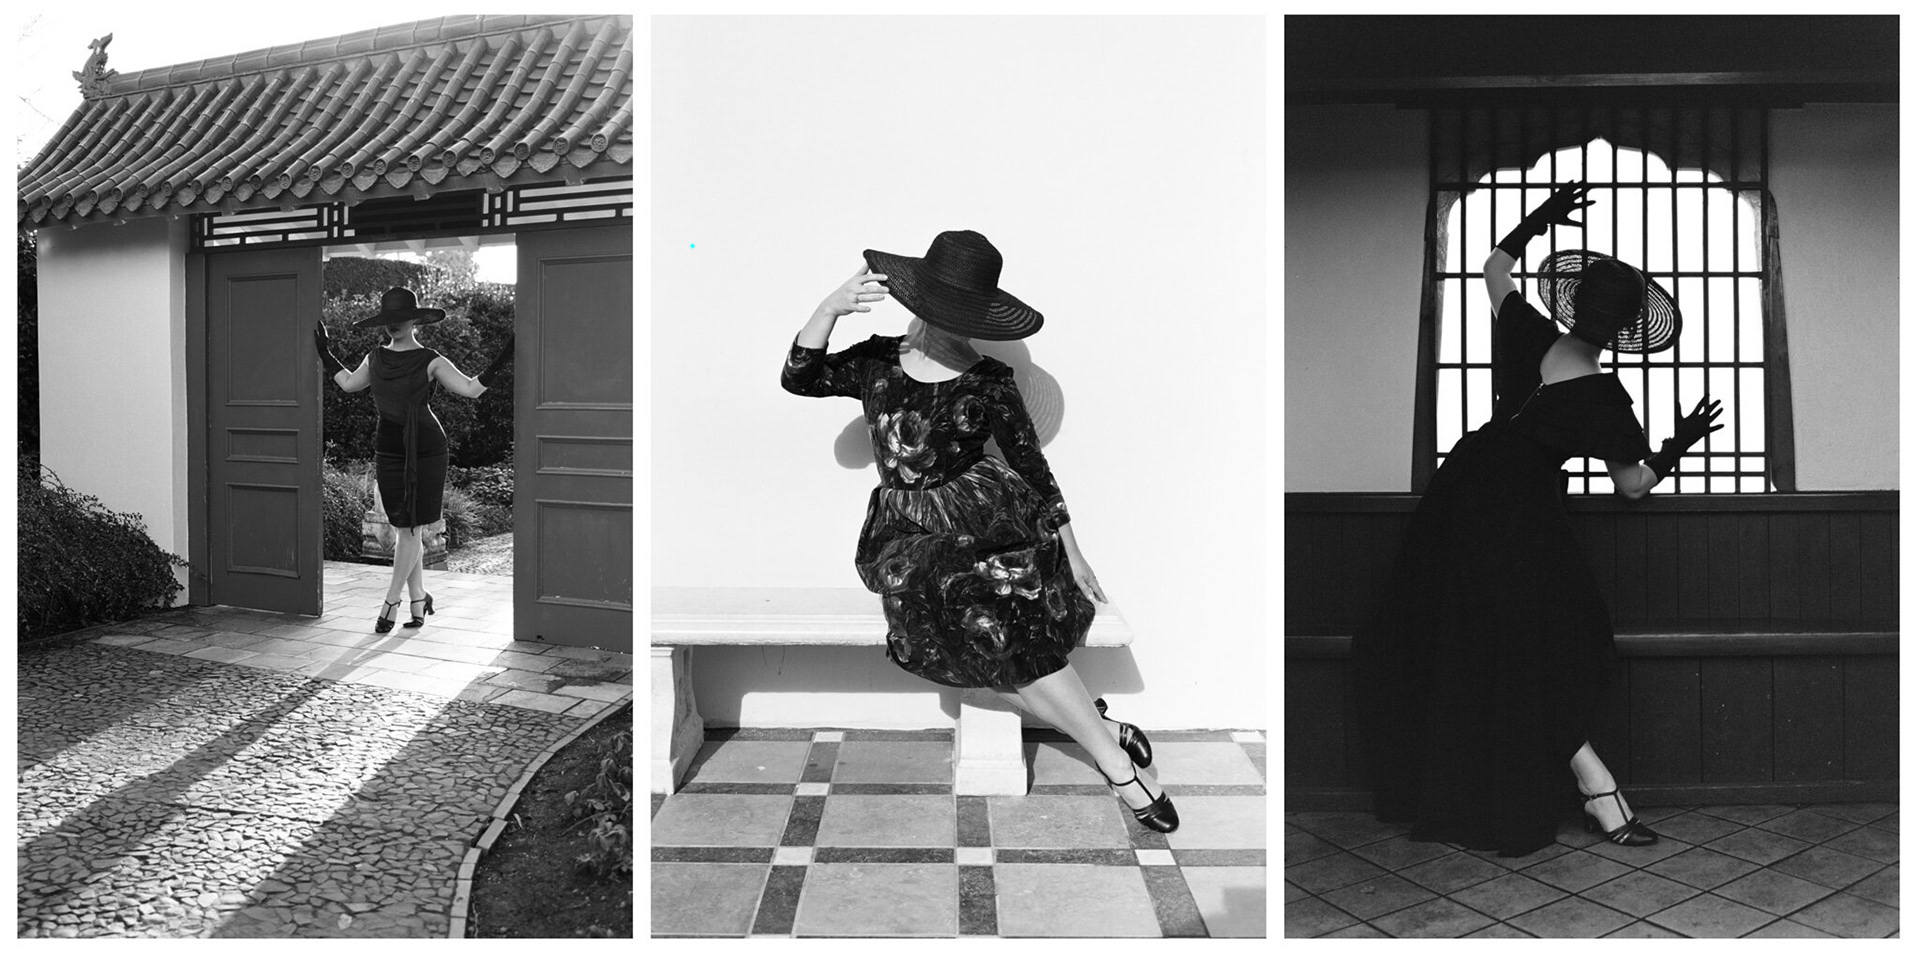
Strong, direct sunlight (hard light) can be used to great creative effect and you can try this indoors or out. You will have seen how bright sun shining directly in through a window casts patterns on the room inside. Any item with a pattern, provided that pattern is thick enough to block light, can be used for creative lighting. You can buy what is called a ‘gobo’ (short for go-between) for some studio lights and projectors to make light patterns, but I encourage you to have fun experimenting with your own finds or creations. For example, horizontal blinds create that classic film-noir look but, if you don’t have these, you can create it by taping up strips of cardboard or similar to your window. The sharpest results are achieved by moving your gobo close to the subject (or vice versa) which is why those film-noir images have the subject right up against the window blinds, peering through them. I have had success creating patterns with a tennis racket, fishnet tights, cardboard strips and cutouts… but my favorite is lace. Have a look to see what you have around the house that might create an interesting pattern. Hint: it needs to be large enough to create a pattern to cover your subject as it’s best to avoid being able to see the edges.
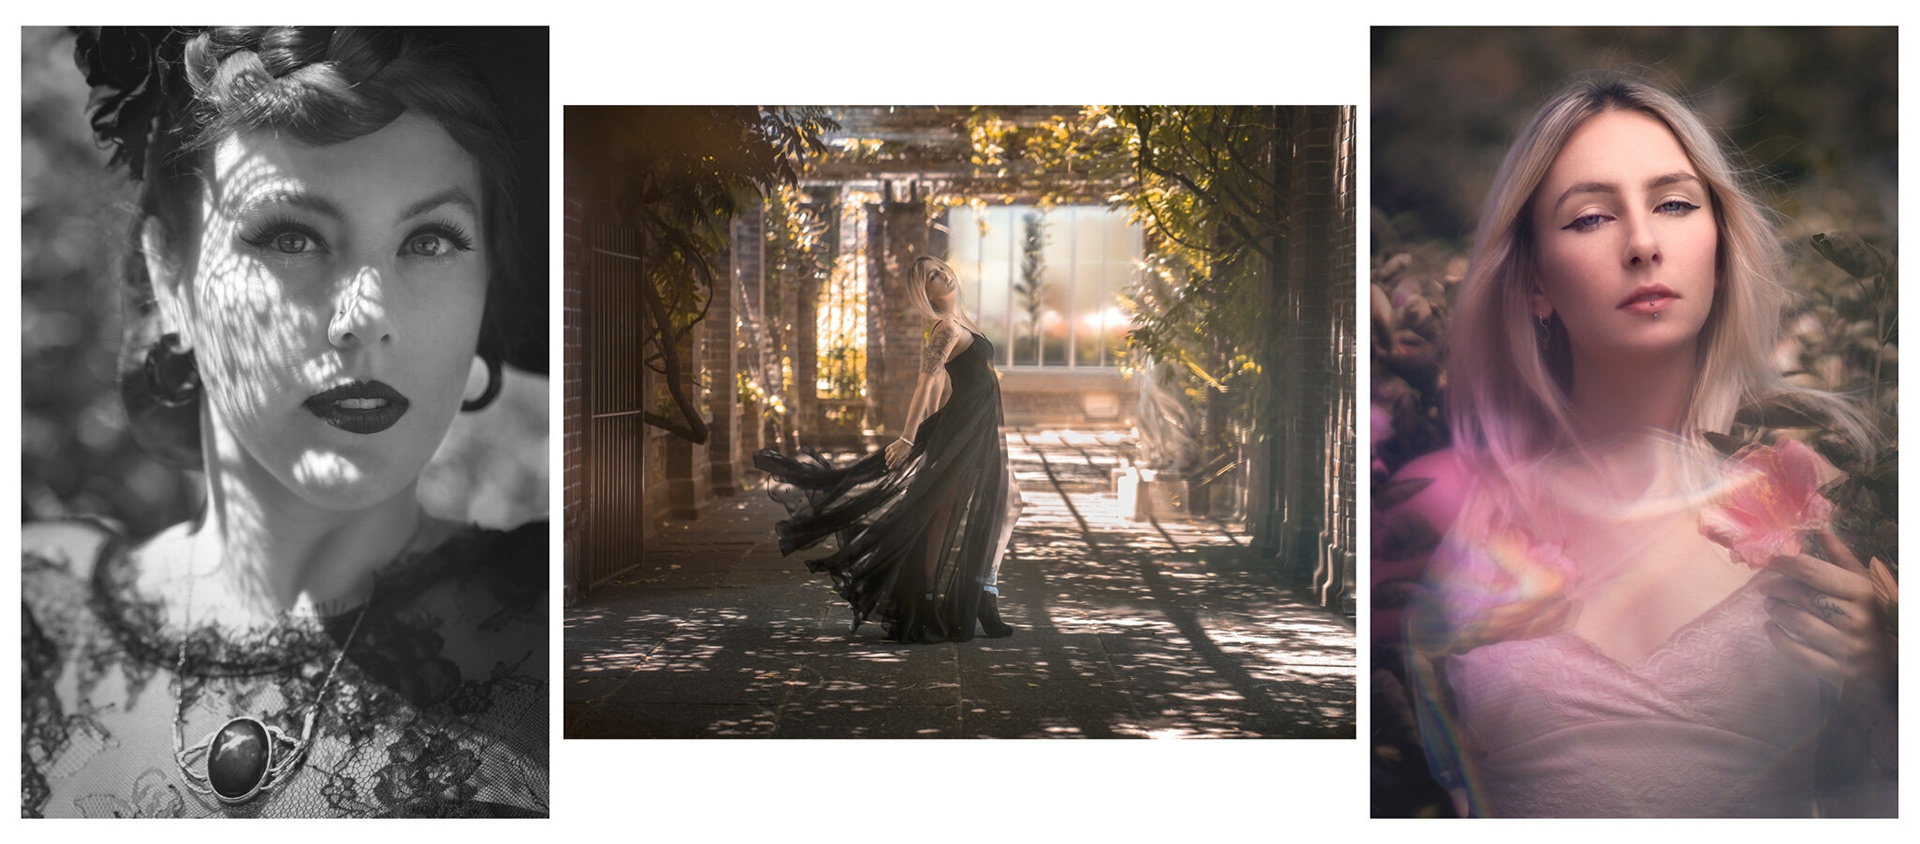
Left: The model holds a piece of lace above her head to create the pattern on her face. Middle: Dappled lighting creates patterns on the floor whilst the Lensbaby OMNI filter creates an effect along the right of the model’s body. Right: A diffuser softens hard midday sun whilst the Lensbaby OMNI filter is used to create flare and add a splash of color. Models: Katie McLaren (left @unspokenmelody) and Monnie Jay (@monniekat).
When experimenting with patterns, make sure you expose for the highlights and lift the shadows in post if needs be. Creating an image with strong highlights and shadows can often trick your camera so you may need to shoot in manual mode. Try using spot metering and placing the spot on a highlight. Switch to manual focus if the camera is having trouble in auto. If you’re unsure about camera settings and metering, take a peek at my article: ‘The Exposure Triangle’.
You can use any number of objects to inject creativity into your natural light photos. One of my favorites has to be a glass prism. Held up to the lens, it creates reflections of the scene within the scene. You can buy these online or try any piece of interestingly-shaped glass. An old CD can be used to reflect light into the lens and create flare. Cover a part of your lens with a color gel (or chocolate wrapper) to infuse color into the shot. Try venturing to your local film camera seller and rooting through the bargain bins for funky filters like star filters, kaleidoscopes, or buy a cheap UV filter and smear on some Vaseline (leaving the center clean) to get a blurred effect around the edge. Try shooting through different materials to create depth and interest in your shots or purchase a creative filter, lens or system. All these things work best with a wide aperture/low f-stop and a longer lens e.g. 85mm so the edges of what you’re putting in front of the lens are not as obvious.
Golden hour
No doubt you have heard about golden hour or magic hour. It is the hour-or-so (actually closer to 30 minutes) after sunrise and before sunset in which everything is bathed in a beautiful, golden light. Because of the angle of the sun, the light is softer (more diffuse) and more directional – far more flattering than at other times of day. We can’t help but associate the warm hue with comfort and happiness. Because of this, many photographers will say it is their favorite time of day to photograph any subject.
At golden hour, everything I have mentioned so far is at your disposal due to the low angle of the sun; diffused light, backlighting, silhouettes, lens flare and sunbursts. It’s the perfect time to use your reflector or other light source to fill in some shadows or add light to a subject if needed.
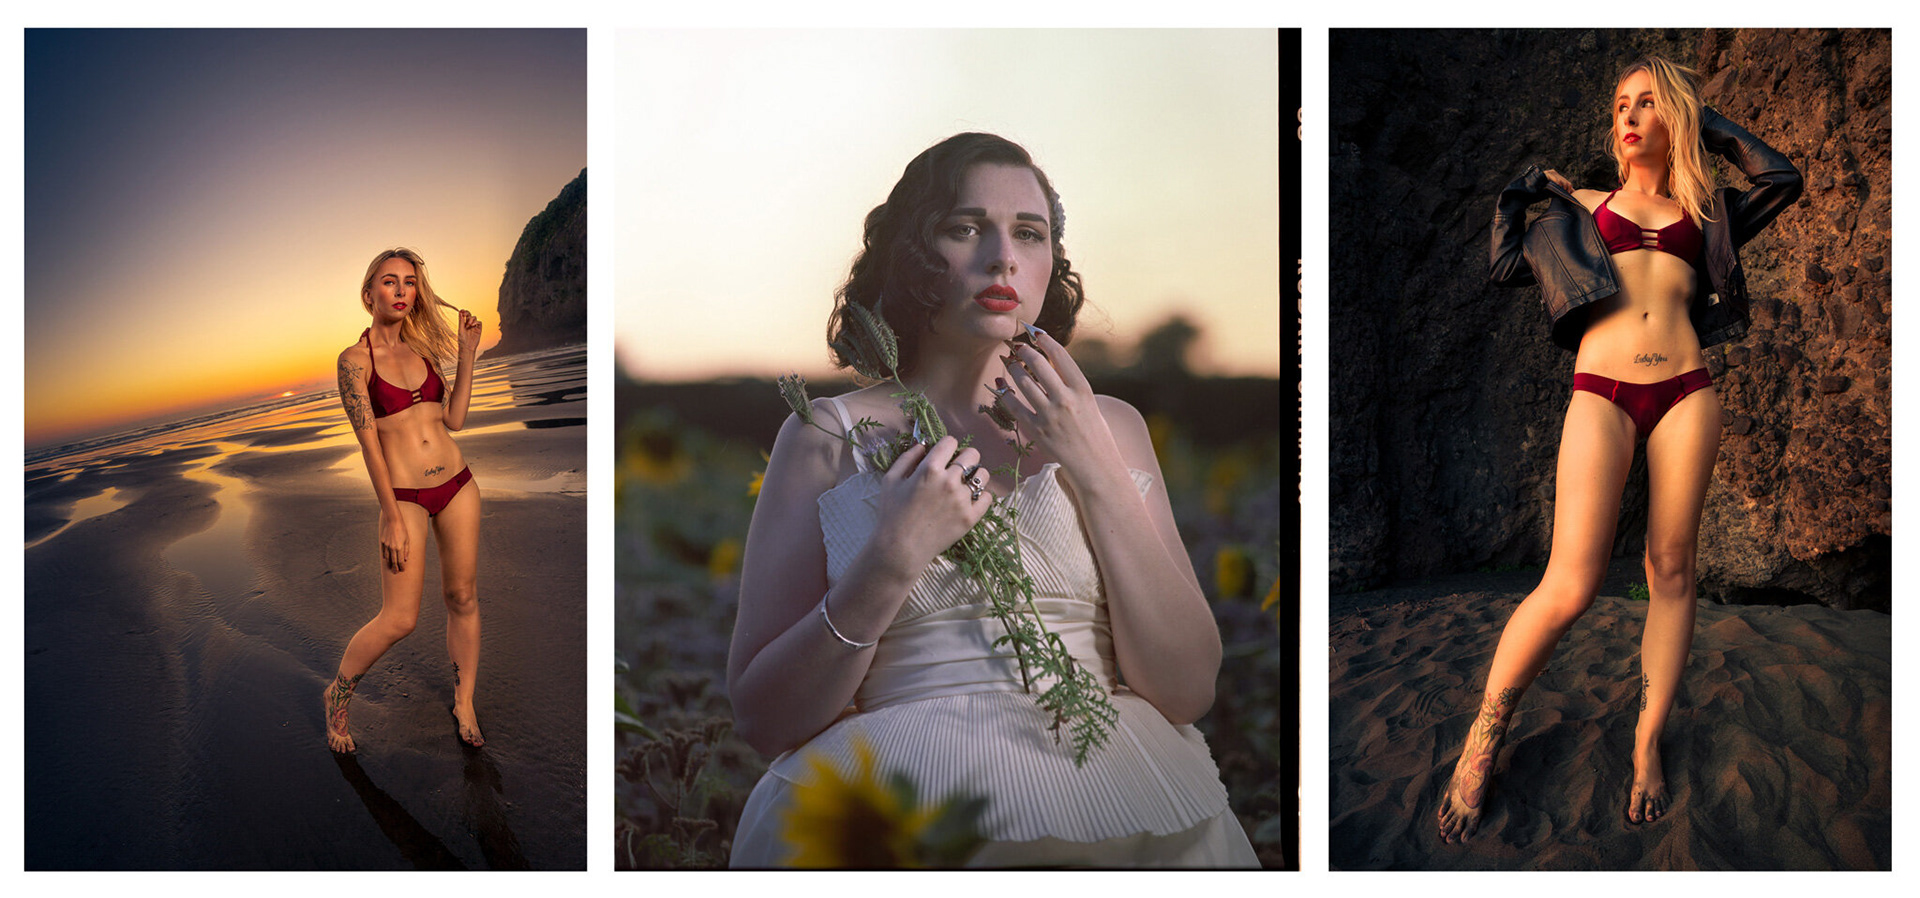
Left & middle: Placing the sun behind the model creates a backlit effect, separating them from the background. The model was then lit from the front with flash, centered (left), or with a continuous light source to one side (middle). Right: The model poses side-on to the setting sun. Observe how the angle of light in the middle and right images shapes the models more than the centered flash in the left image. Models: Monnie Jay (left & right @monniekat) and Emma Malone (middle @frances.foxglove).
Because of the directional quality of the light, golden hour is ideal for testing how light shapes your subject. However, you only have a short window of time and you must be careful not to let it slip away. Plan ahead as much as you can. Scout locations beforehand and check where the sun will be positioned using an app or previous visit. Be aware that you’ll need to set your exposure to balance between your subject and the brightness of the sky and you’ll likely need to play with recovering shadows and highlights in post. To capture the most information from the scene, it is best to shoot in RAW format rather than JPEG. It is useful to have an idea of your camera’s dynamic range (the range of exposure which can be captured) so you know how best to expose your image e.g. full frame cameras typically have a higher dynamic range (capture more stops of light) than crop-sensor cameras and therefore can recover more highlight and shadow detail.
If you haven’t taken a photograph during golden hour, put it on your list of must do’s. You’ll get the longest amount of golden light if you visit a beach or similar place where there are no landmarks, etc., blocking the sun. If you are at the beach, just be careful to always keep one eye on the tide, especially if using a tripod. You only make that mistake once…
Summary
So, what is the best time of day for portraiture? Well, that completely depends on what look you’re going for (you thought I was going to say golden hour, didn’t you?). Ask yourself the following questions:
· Do I want hard light or soft light?
· What tools and assistance do I have available to me?
· Do I want to add a creative element?
· Do I want to achieve a particular mood or lighting style?
Don’t forget the ultimate question for which there is no certain answer: what is the weather going to be like?!
I’ve given you the knowledge to capture portraits at any daylight hour, now you need to decide which one will suit your photos the best. Grab a willing test subject and practice, practice, practice!